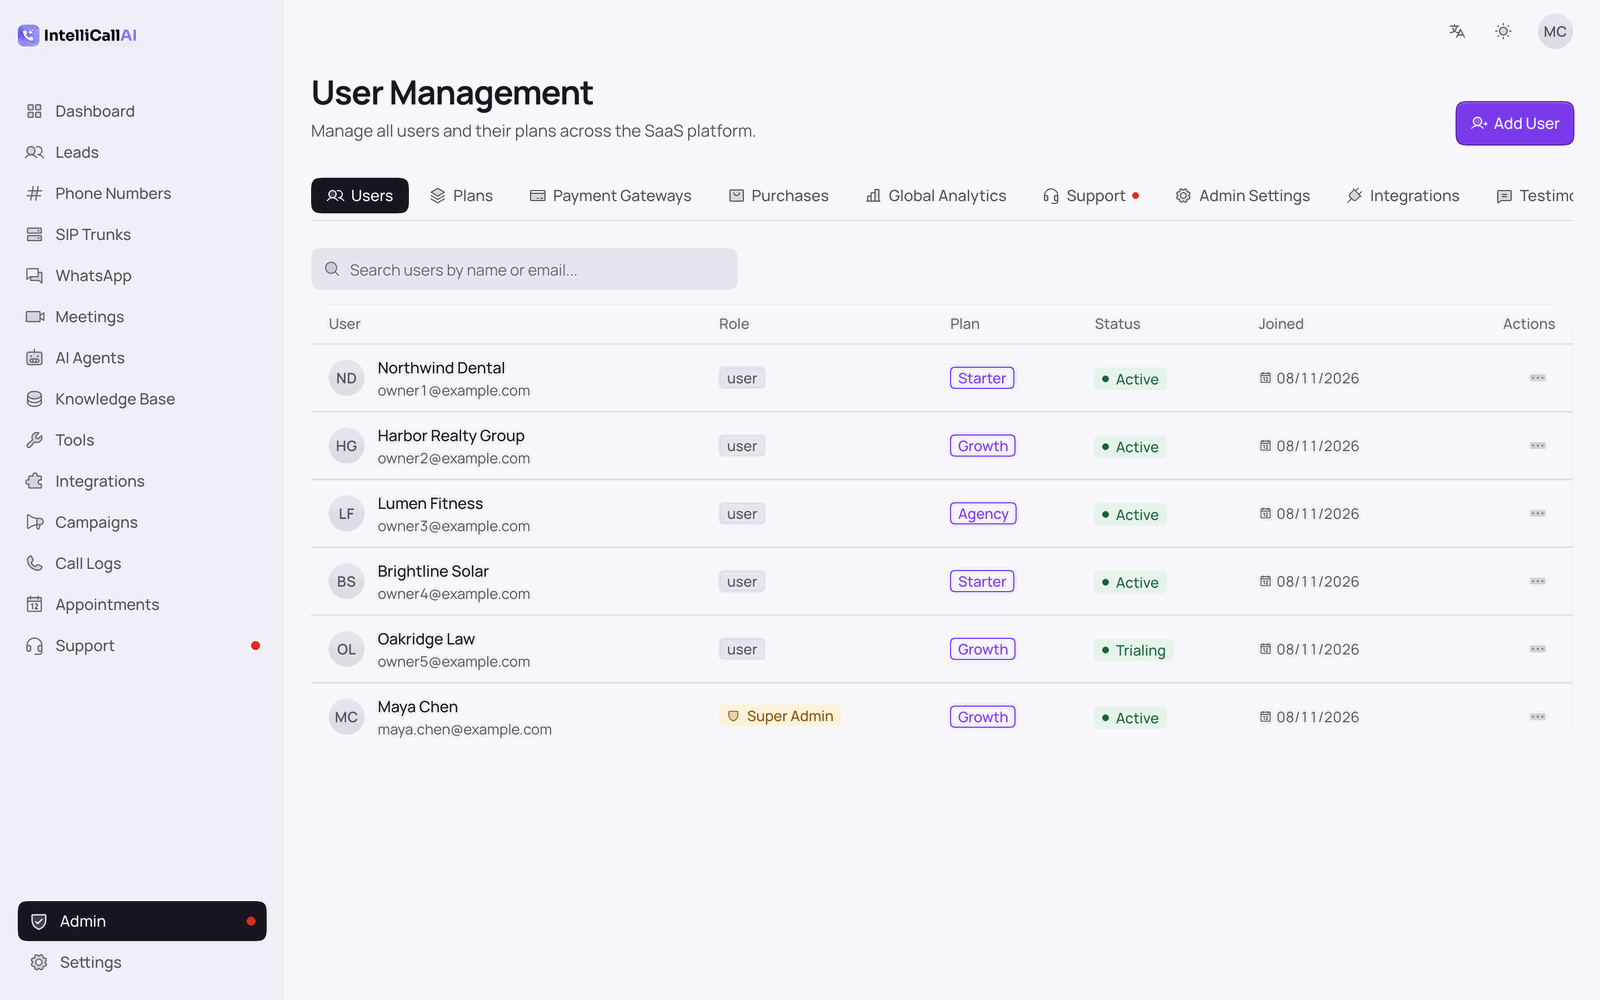
Self-hosted AI voice agents that answer your calls, call your leads, book appointments, use your tools and apps, join meetings and reply on WhatsApp. This guide covers installing, configuring and using all of it.
IntelliCall AI is a full-stack SaaS platform that automates inbound and outbound calls using
human-like AI voice agents. Run sales campaigns, qualify leads, answer customer questions, and even
book appointments automatically during live calls.
Powered by multilingual voice AI, knowledge-powered responses, and real-time automation tools,
IntelliCall AI helps businesses handle conversations, capture opportunities, and manage call
workflows with ultra-low latency and natural conversations.
What's New in Version 13.0
Version 13.0 lets your agents act beyond the phone call: call your own
endpoints mid-conversation, work inside apps such as HubSpot, Calendly and Stripe, sit in Zoom,
Google Meet and Microsoft Teams meetings, and answer WhatsApp chats.
NEW:Tools. Under Tools you define webhook tools: a
name, what the tool does, the fields the agent fills in, and the URL of your own endpoint
(your API, or a Zapier, Make or n8n catch hook). Tick the tool on an agent and it can call it
in the middle of a call on every voice engine, hear the answer and act on it: look up an
order, check stock, create a ticket. Each call is signed with your webhook secret and listed
on the call's details, and a Test panel shows what the agent would hear back. See
Tools.
NEW:Integrations has its own place in the sidebar. Besides
Google Calendar, Google Sheets, HubSpot, Slack, n8n, WhatsApp alerts and the API key, which
moved here from Settings, it holds a directory of apps with official remote MCP servers
(HubSpot, Salesforce, Calendly, Cal.com, Notion, Stripe, Freshdesk, Intercom and more).
Connect one with its sign-in or API key, choose which of its tools agents may use, attach it
to an agent, and the agent can read and change things in that app during a call. Any other
MCP server can be added by URL. See Integrations & MCP
apps.
NEW:Meetings. An agent can join a Zoom, Google Meet or
Microsoft Teams meeting as a named participant, through your own Attendee (attendee.dev)
account. It hears the room, speaks only when someone says its name (or always, if you
prefer), uses its normal prompt, knowledge and tools, and the meeting shows up in Call Logs
with its transcript. Meetings count as calls in your plan. See
Meetings.
NEW:WhatsApp. Connect a WhatsApp business number (with one
click through Meta, when the platform owner has set up a Meta app under
Admin → Integrations, or with your own Meta app's token) and pick the agent that
answers it. The agent answers chats and voice notes, with a voice note back on the classic
and Sarvam engines, books appointments, and can send approved templates, reply buttons and
lists. Agents on phone calls can send the caller a WhatsApp message, template or scheduled
reminder, and bookings can confirm and remind over WhatsApp automatically. Templates are
written and submitted to Meta from the number's page, and an inbox shows every chat. See
WhatsApp & Meta app.
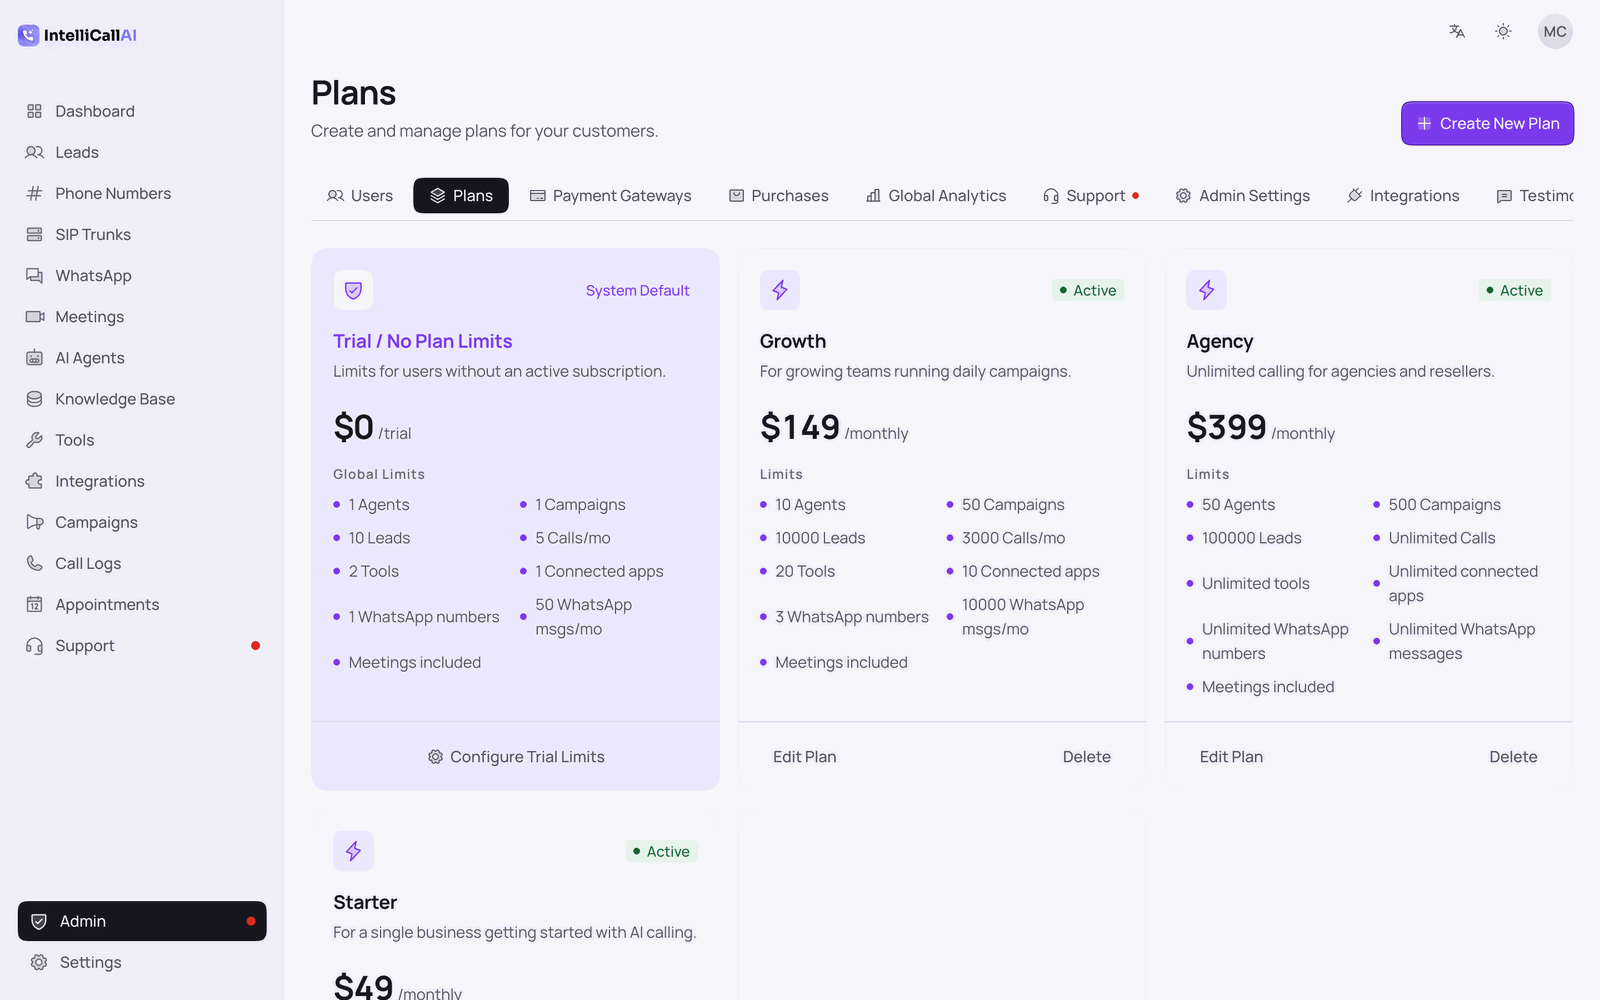
IMPROVEMENT: Plans gain limits for tools, connected apps, WhatsApp numbers
and WhatsApp messages per month, and switches for Meetings and WhatsApp, in
Admin → Plans and the trial settings
IMPROVEMENT: Webhook deliveries are always signed: an account with no
webhook secret gets one the first time anything needs it
UPDATE: Mongoose is updated to 9.12 for the security advisories published
against earlier 9.x releases. The retired components/settings/integrations-panel.tsx
is removed automatically when the frontend builds, so an updated install does not fail its
build on the leftover file
NOTE: New environment variables are documented in
backend/.env.example and in Manual Setup:
MCP_ALLOW_PRIVATE_URLS (when your n8n, MCP server or Attendee runs on your own
network), the META_* block for the Meta app that powers one-click WhatsApp
connection, WHATSAPP_* rate caps, MEETING_IDLE_SECONDS and
FFMPEG_PATH. None of them is required: every new feature stays off until it
is configured
NOTE: Voice-note replies on WhatsApp need ffmpeg on the
server (sudo apt install ffmpeg); without it the agent replies in text.
Meetings and WhatsApp webhooks need the backend's BASE_URL to be its public
https address
NOTE: If you run your own reverse proxy instead of the bundled Nginx
config, everything under /api/ must reach the backend, including
/api/webhooks/* (Meta and Attendee post there) and the WebSocket upgrade on
/api/meetings/stream. See the note under
Easy Install
NOTE: A WhatsApp number connected on the old WhatsApp alerts card
keeps sending owner alerts and appointment reminders as before, and also appears on the new
WhatsApp page marked Reconnect: add its app secret and WhatsApp Business Account
ID there to let an agent answer its chats
Updating from 12.x
Update the way you always do: the Web Installer's update flow,
or copy Projects/ over your install.
Run npm install in bothbackend and
frontend: 13.0 adds new packages to each.
Rebuild the frontend (npm run build) and restart with
pm2 restart all.
Optional: install ffmpeg, and add the new variables from
backend/.env.example you want to use.
What's Included
Backend API (Node.js/Express) - Core logic, telephony integration, and
real-time streaming using WebSockets.
Frontend Dashboard (Next.js/React) - Administrative interface for managing
leads, agents, and monitoring calls.
Telephony Integration (Twilio) - Seamless voice and media stream handling.
AI Integration - Customizable AI agents powered by OpenAI/Deepgram/etc.
Agent Actions (v13.0) - Webhook tools, MCP app connections, meeting bots
through Attendee, and WhatsApp through the Meta Cloud API.
Key Features
AI Intelligence
Premium Voice (TTS): Integration with ElevenLabs for human-like voices.
Real-time Understanding: Powered by Deepgram for ultra-low latency STT.
Advanced LLM Logic: Use GPT-4, Claude 3, and more via OpenRouter.
Custom AI Personas: Define goals, constraints, and personality for
every agent.
Campaign
Operations
Bulk Outbound Dialing: Automate thousands of calls with a single click.
Lead Management: Import CSVs, manage tags, and track qualification
status.
Smart Retries: Handle busy lines, no-answers, and failed attempts.
Campaign Monitoring: Real-time progress tracking of active calling
batches.
Human Transfer: Hand a live caller to a real person on your SIP
trunk, with automatic return to the agent if nobody answers.
Analytics &
Insights
Auto-Qualification: AI automatically scores leads based on
conversation.
Call Summaries: Instant TL;DR generated right after the call ends.
Full Transcripts: Complete word-for-word history of every interaction.
Audio Recording: Built-in modern player for QA and agent training.
Enterprise Ready
Google OAuth: Secure, unified login for your entire organization.
RBAC Security: Granular Admin and Member permission hierarchies.
The Web Installer lets you install IntelliCall on a fresh server or update
IntelliCall on an existing server without running shell scripts manually. All you need
is your Envato purchase code and SSH access to the server.
How it works: Open the installer in your browser, verify
your purchase, then follow either the fresh-install or update flow below.
If you are setting up IntelliCall on a new server, check the option “This is
a fresh server installation” on the Connect to VPS screen. You will then be taken to
Configure Deployment, where you must set:
Frontend domain and backend domain (e.g.
app.yourdomain.com and api.yourdomain.com) - ensure the corresponding
A records point to your VPS IP in your DNS provider (Cloudflare, GoDaddy, etc.)
MongoDB URI - use mongodb://localhost:27017/intellicall-ai for a
local MongoDB, or provide your MongoDB Atlas connection URL
Google Client ID and Google Client Secret - for steps to
create and retrieve these, see 🔐 Google OAuth
Optionally enable Automatically configure SSL (Let's Encrypt), then click
Continue to Deployment to run the installation.
Updating an existing installation
If IntelliCall is already installed on the server, leave “This is a fresh
server installation” unchecked. Enter your SSH details (IP
address/host, username, and password), then click Start Installation. The Web
Installer will update the current version on the server.
Easy Install - Linux VPS
For Linux-based VPS servers (Ubuntu 20.04 / 22.04 / 24.04), IntelliCall AI ships with two shell
scripts that handle the entire setup and production deployment with minimal manual steps.
What gets installed automatically: Node.js v20, MongoDB,
Asterisk PBX, PM2, Nginx, and Let's Encrypt SSL - all in one go.
Step 1 - Run manual_setup.sh (First-Time Configuration)
Select Option 1 for a fresh install. The script will:
Install Node.js v20, MongoDB, and Asterisk PBX via apt
Configure Asterisk ARI with auto-generated credentials
Open firewall ports for SIP (5060), RTP (21000–30000), and ARI (8088)
Prompt for your domain/IP, MongoDB URI, and Google OAuth credentials
Generate secure backend/.env and frontend/.env.local files
Install all npm dependencies for backend and frontend
Build the Next.js frontend for production
Generate Asterisk SIP config files and reload Asterisk
Install PM2 for process management
Note:manual_setup.sh must be run with
sudo. It is safe to re-run - use Option 2 to update
configuration, or Option 3 to repair SIP/Asterisk issues.
Step 2 - Run manual_deploy.sh (Go Live with SSL)
Once manual_setup.sh has completed, run the deployment script to configure Nginx as a
reverse
proxy and install a free Let's Encrypt SSL certificate:
sudo bash manual_deploy.sh
Before running, make sure your domain DNS A records are already pointing to your server's public IP.
The script will:
Install Nginx and Certbot
Prompt for your frontend and backend domain names
Configure Nginx reverse proxies (frontend → port 3000, backend → port 5001)
Start the backend and frontend via PM2 and persist them across reboots
Optionally install Let's Encrypt SSL certificates via Certbot
Rebuild the frontend with HTTPS URLs and restart all services
Done! Your platform will be live at https://your-frontend-domain.com
with the API at https://your-api-domain.com.
Running your own reverse proxy? The bundled
scripts proxy the whole backend domain to port 5001 with WebSocket upgrade headers, which is
all v13.0 needs. If you use your own Nginx, Caddy, Cloudflare or load-balancer config
instead, make sure that:
Everything under /api/ reaches the backend, including
/api/webhooks/*. Meta (WhatsApp) and Attendee (Meetings) send
POST requests there with no login; each is checked by signature instead.
A proxy rule that only forwards logged-in traffic, or a WAF that blocks unknown
POSTs, silently breaks both.
WebSocket upgrades are passed through
(proxy_set_header Upgrade $http_upgrade; and
Connection "upgrade"): Attendee streams meeting audio to
wss://your-api-domain/api/meetings/stream, the in-browser agent test uses
/api/agent-test, and Twilio Media Streams use the bare origin.
BASE_URL in backend/.env is the public
https address of the backend: it is what Meta and Attendee
are told to call back.
Do not shorten proxy read timeouts below a few minutes on that domain: a meeting
socket stays open for the whole meeting.
Updating Configuration Later
To update environment variables (MongoDB URI, Google OAuth, URLs) after initial setup, re-run
manual_setup.sh and select Option 2: Update Application Configuration.
Then
restart your services with pm2 restart all.
Manual Setup (Advanced)
While the wizard is recommended, you can set up each component manually if needed.
Backend API Setup
cd Projects/backend
npm install
cp .env.example .env
Required Backend Variables:
Variable
Description
MONGODB_URI
MongoDB connection string
JWT_SECRET
Secret for token generation
GOOGLE_CLIENT_ID
Google OAuth Client ID
GOOGLE_CLIENT_SECRET
Google OAuth Client Secret
BASE_URL
Your server's public URL
Asterisk / SIP (required for SIP Trunk support)
ASTERISK_ARI_URL
ARI endpoint of your Asterisk server (e.g., http://localhost:8088). Use
localhost if Asterisk runs on the same machine.
ASTERISK_ARI_USER
ARI username as configured in /etc/asterisk/ari.conf (e.g.,
intellicall).
ASTERISK_ARI_PASSWORD
ARI password matching /etc/asterisk/ari.conf. Auto-generated by
manual_setup.sh.
ASTERISK_CONFIG_DIR
Path to the Asterisk config directory. Default: /etc/asterisk.
WhatsApp, Tools, Integrations and Meetings (new in v13.0, all optional)
The platform owner's Meta app, used for the one-click Connect with Meta
popup on the WhatsApp page and for receiving those numbers' messages. Each user can
connect a number with their own Meta app without these. The same values can be
entered in Admin → Integrations → Meta (WhatsApp); when both are set, the
environment wins. See WhatsApp & Meta app.
META_SYSTEM_USER_TOKEN META_SYSTEM_USER_ID
A permanent system-user token on the platform owner's business, so numbers
connected with the popup keep working after Meta's 60-day business token expires.
META_GRAPH_VERSION
Graph API version used for WhatsApp calls. Default v26.0.
Rate caps: sends per number per minute, sends per person per hour, and agent
replies per chat per day. Defaults 80 / 30 /
200.
WHATSAPP_MESSAGE_RETENTION_DAYS
Delete WhatsApp messages older than this many days. Unset keeps them forever.
FFMPEG_PATH
Path to the ffmpeg binary when it is not on PATH. ffmpeg is
needed only for voice-note replies on WhatsApp; text replies work without
it.
MCP_ALLOW_PRIVATE_URLS
Webhook tools, MCP servers and Attendee URLs are refused when they point at this
server's own network (localhost, LAN and cloud-metadata addresses). Set to
true when your n8n, MCP server or self-hosted Attendee runs on the same
box or LAN. Default false.
MCP_TOOL_TIMEOUT_MS
How long the agent waits for one MCP tool call, in milliseconds. Default
10000.
MEETING_IDLE_SECONDS
Silence in a meeting after which the agent leaves, in seconds. Default
600.
BASE_URL (reminder)
For Meetings and WhatsApp it must be the backend's public
https URL: Attendee connects to
wss://<BASE_URL>/api/meetings/stream and Meta posts to
<BASE_URL>/api/webhooks/whatsapp.
Frontend Dashboard Setup
cd Projects/frontend
npm install
cp .env.example .env.local
Required Frontend Variable:
Set NEXT_PUBLIC_API_URL to your backend endpoint (e.g.,
http://localhost:5001/api).
Twilio Configuration
Twilio is the communication backbone that enables the platform to place outbound calls and handle
voice streams.
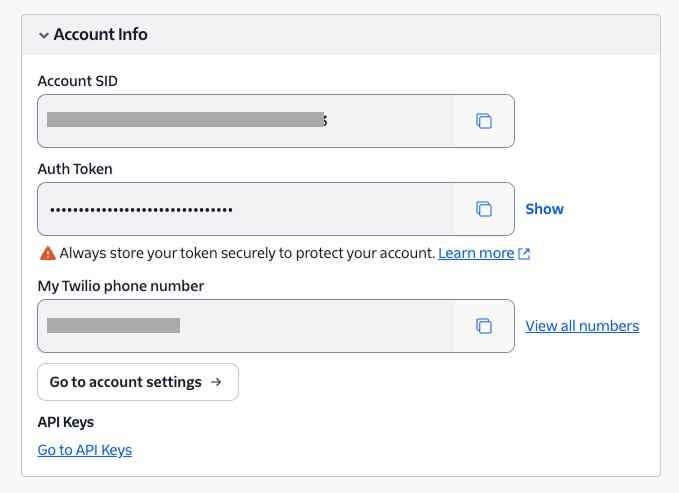
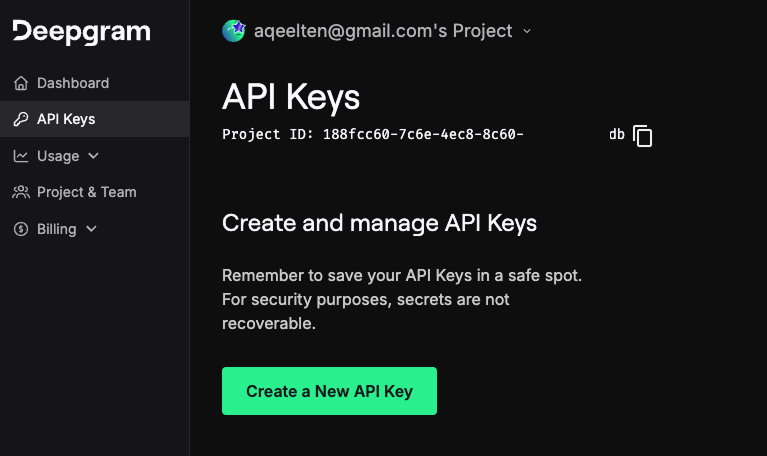
Obtain your Account SID and Auth Token from the Account
Dashboard.
Get a voice-capable Twilio Phone Number.
In the IntelliCall AI Dashboard, navigate to Settings > API Keys.
Enter your SID, Token, and Phone Number (in E.164 format, e.g., +1234567890).
Crucial Step: Ensure your BASE_URL is correctly set in your
backend .env file (e.g., your ngrok URL or public domain). The platform uses this
to tell Twilio where to send voice and status updates.
Local Testing with ngrok
Twilio needs a public URL to send events (like voice streams) to your local machine.
ngrok creates a secure tunnel from the internet to your local server.
1. Install ngrok
Windows: Download the ZIP from ngrok.com, extract it, and run the .exe.
macOS (Homebrew): Run brew install ngrok/ngrok/ngrok.
Linux: Use
curl -s https://ngrok-agent.s3.amazonaws.com/ngrok.asc | sudo tee /etc/apt/trusted.gpg.d/ngrok.asc >/dev/null && echo "deb https://ngrok-agent.s3.amazonaws.com buster main" | sudo tee /etc/apt/sources.list.d/ngrok.list && sudo apt update && sudo apt install ngrok.
2. Connect your account
Signup at ngrok.com and get your
Authtoken. Run this in your terminal:
ngrok config add-authtoken YOUR_AUTHTOKEN_HERE
3. Start the tunnel
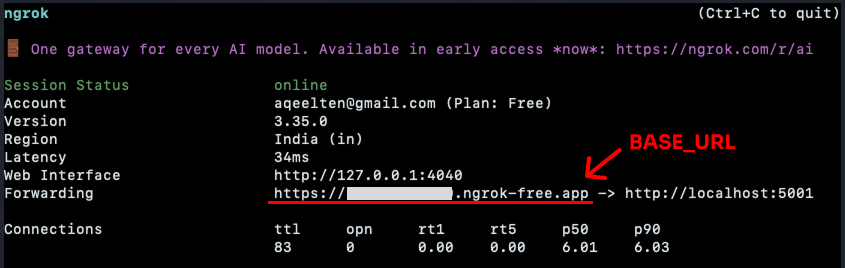
Start your backend (default port 5001) and then run:
ngrok http 5001
4. Copy the URL
Copy the Forwarding URL (e.g., https://a1b2-c3d4.ngrok-free.app)
and use it as your BASE_URL in the backend .env file.
Note: If using the free version, your URL changes every time you restart ngrok. Remember to
update your .env and Settings accordingly!
ElevenLabs Configuration (TTS)
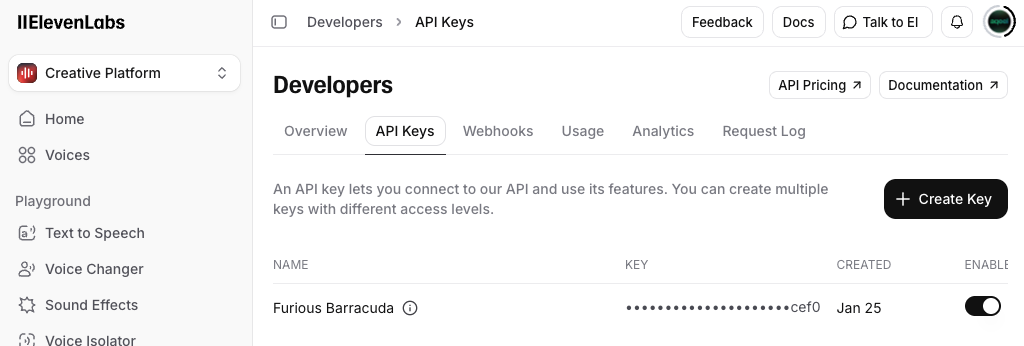
ElevenLabs provides the high-quality Text-to-Speech (TTS) engine that gives your AI agent its voice.
In the IntelliCall AI Dashboard, go to Settings > API Keys.
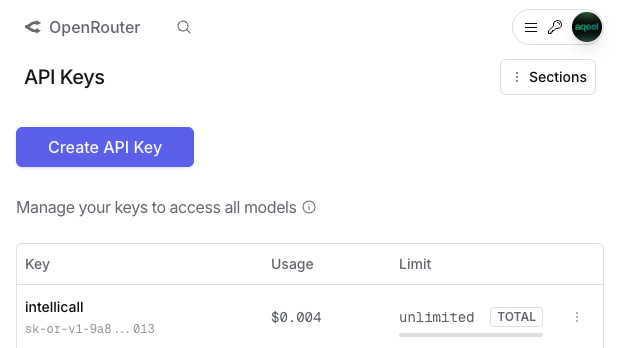
Paste your key into the OpenRouter API Key field and click Save
Changes.
Update all the settings in the Settings page.
Sarvam AI Configuration (Indian languages)
Sarvam AI powers the optional Sarvam Voice Engine — a fully self-contained
pipeline (speech-to-text, LLM and text-to-speech, all on Sarvam) purpose-built for Indian languages
such as Hindi, Tamil, Telugu, Bengali, Kannada, Malayalam, Marathi, Gujarati, Punjabi and Odia.
This key is only required for agents that use the Sarvam engine — if you only
use the classic or Deepgram Voice Agent engines, you can skip this step.
Create an account and generate an API subscription key at
dashboard.sarvam.ai.
In the IntelliCall AI Dashboard, go to Settings > API Keys.
Paste your key into the Sarvam AI API Key field and click Save
Changes.
To use it, open an agent, enable a custom voice, and set Voice Engine to
Sarvam AI. Then choose the Sarvam Language and Sarvam
Voice for that agent. Agents on this engine need only the Sarvam key
— Deepgram, ElevenLabs and OpenRouter keys are not required for them.
Tip: The Sarvam engine and the other engines can be mixed
freely — each agent picks its own engine, so you can run English agents on the classic or
Deepgram Voice Agent engine and Indian-language agents on Sarvam, all in the same install and on
both Twilio and SIP/Asterisk.
Phone Numbers Management
phone_numbers
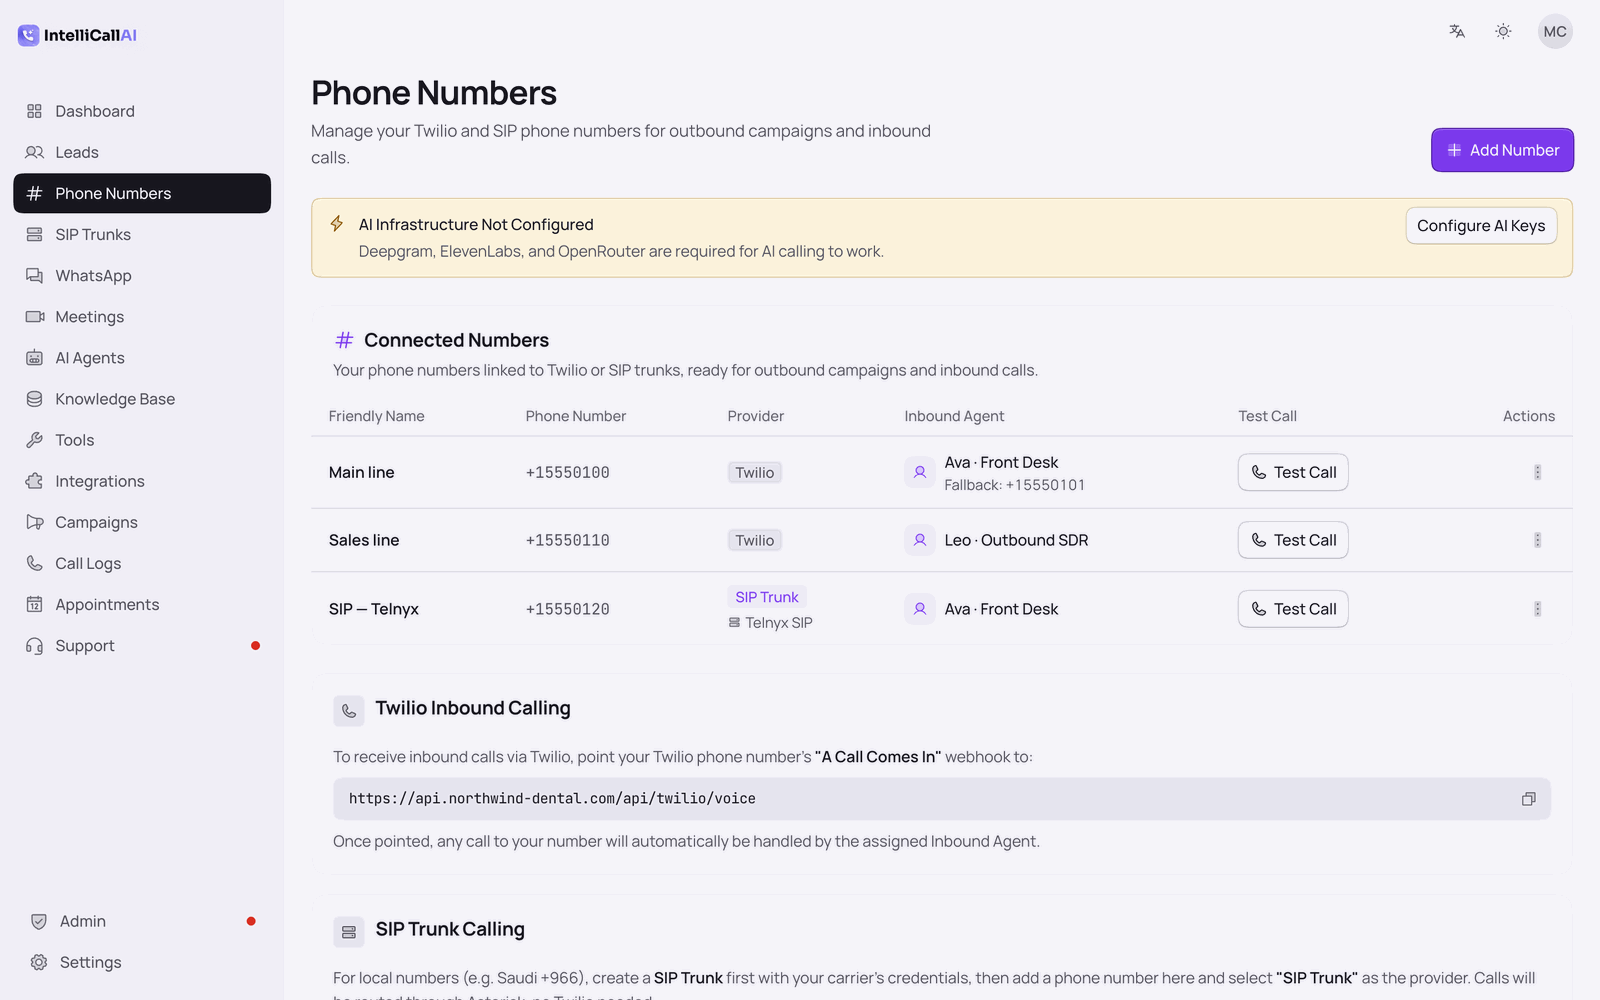
The Phone Numbers page allows you to manage the Twilio phone numbers used for both
outbound campaigns and inbound call handling.
Adding a Phone Number
add_phonenumber
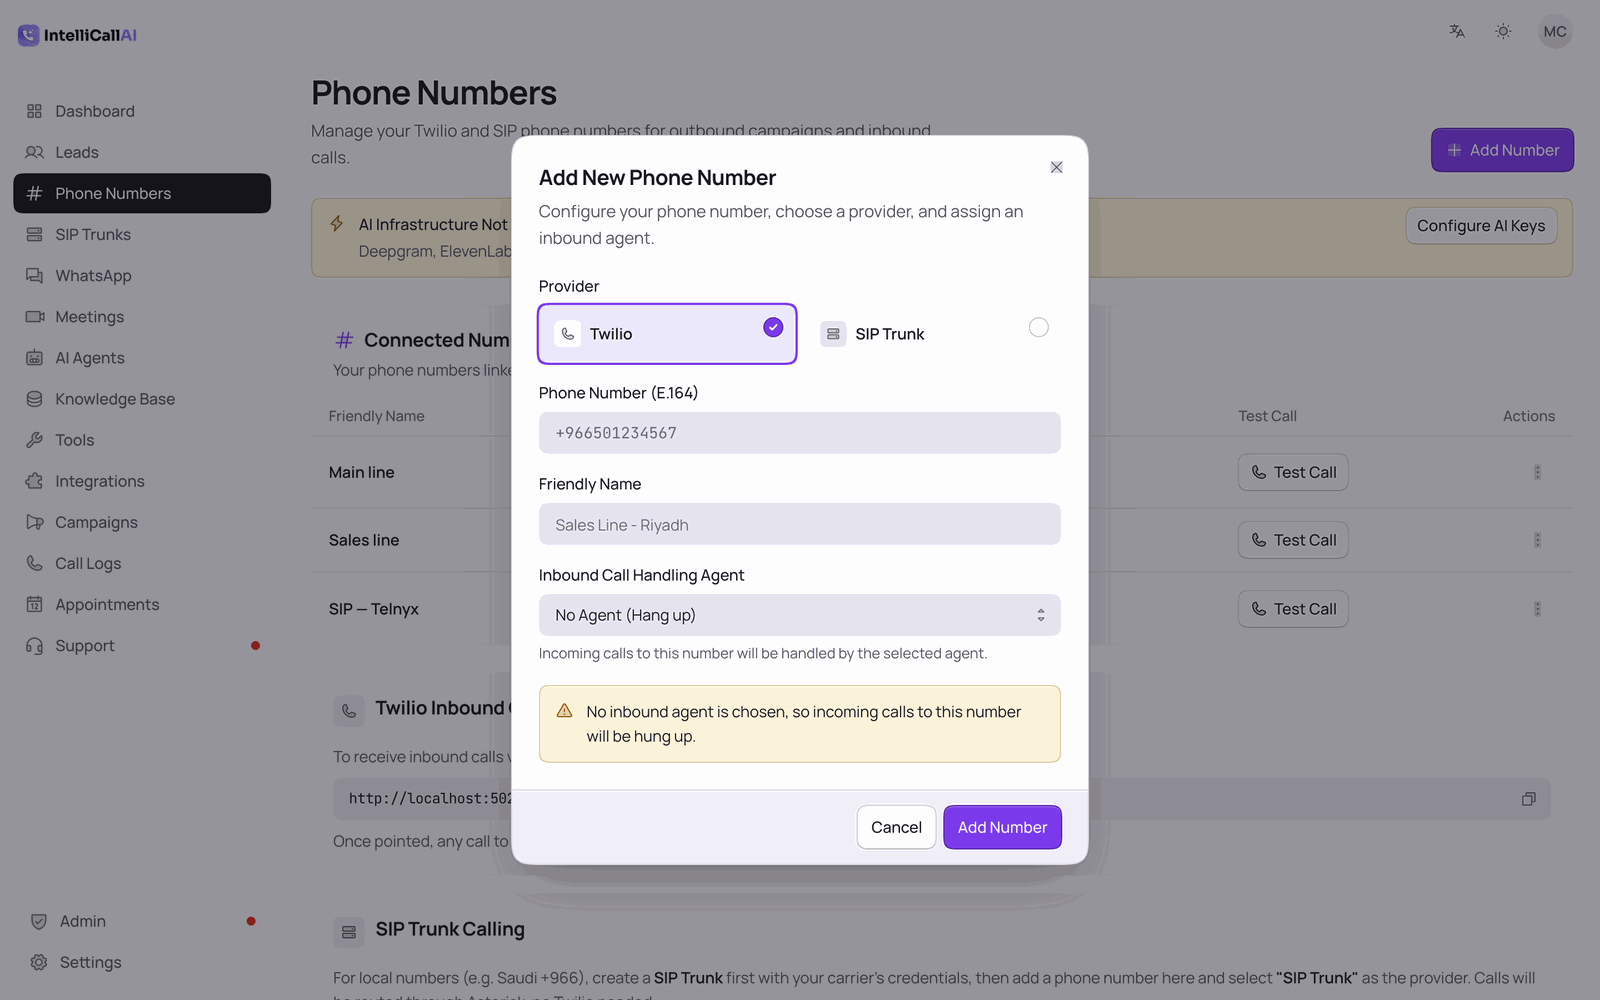
Navigate to the Phone Numbers page in the dashboard.
Click + Add Number.
Enter a Friendly Name (e.g., "Sales Line", "Support").
Enter the Phone Number in E.164 format (e.g., +1234567890). This
must be a valid Twilio phone number from your account.
(Optional) Select an Inbound Agent to assign for handling incoming calls to
this number.
Click Save.
Test Call Feature
Each phone number in the table has a Test Call button. Click it to initiate a test
call from that specific number to verify your Twilio configuration is working correctly.
Configuring Inbound Calling in Twilio
phone_numbers
To receive AI-handled inbound calls, you must configure your Twilio phone number to point to your
IntelliCall AI server:
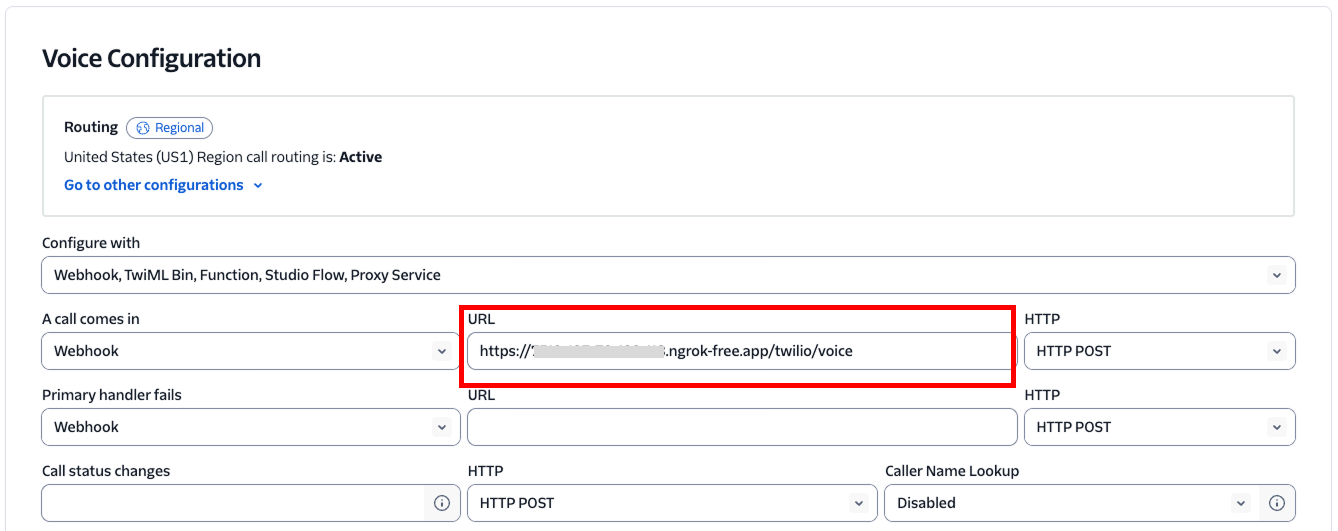
Under "A Call Comes In", select Webhook and enter:
[BASE_URL]/api/twilio/voice
Ensure HTTP Method is set to POST.
Click Save Configuration.
Tip: Replace [BASE_URL] with your actual
public URL (e.g., https://yourdomain.com or your current ngrok URL).
For example: https://a1b2-c3d4.ngrok-free.app/api/twilio/voice
Assigning an Inbound Agent
For the AI to handle inbound calls, you must assign an agent to the phone number:
Go to the Phone Numbers page.
Click the Edit button (in the Actions dropdown) for the number you want to
configure.
In the dialog, select an Inbound Agent from the dropdown. This agent will
answer and handle all calls to this number.
Click Save.
When a call comes in to that number, the assigned agent will greet the caller and handle the
conversation according to its system prompt and configuration.
SIP Trunks
IntelliCall AI includes a built-in Asterisk PBX integration that allows you to
connect your own SIP trunk provider instead of (or alongside) Twilio. This can significantly reduce
per-minute call costs and gives you full control over your telephony stack.
Supported Providers: Any SIP-compatible carrier works,
including Telnyx, Twilio SIP Trunking, VoIP.ms, STC, Mobily, Zain, and others.
Prerequisites
Using the setup script? If you installed IntelliCall AI
using manual_setup.sh (Option 1 - Complete Installation), Asterisk is
already
installed and configured automatically. You do not need to set it up manually. Skip
straight to Adding a SIP Trunk below.
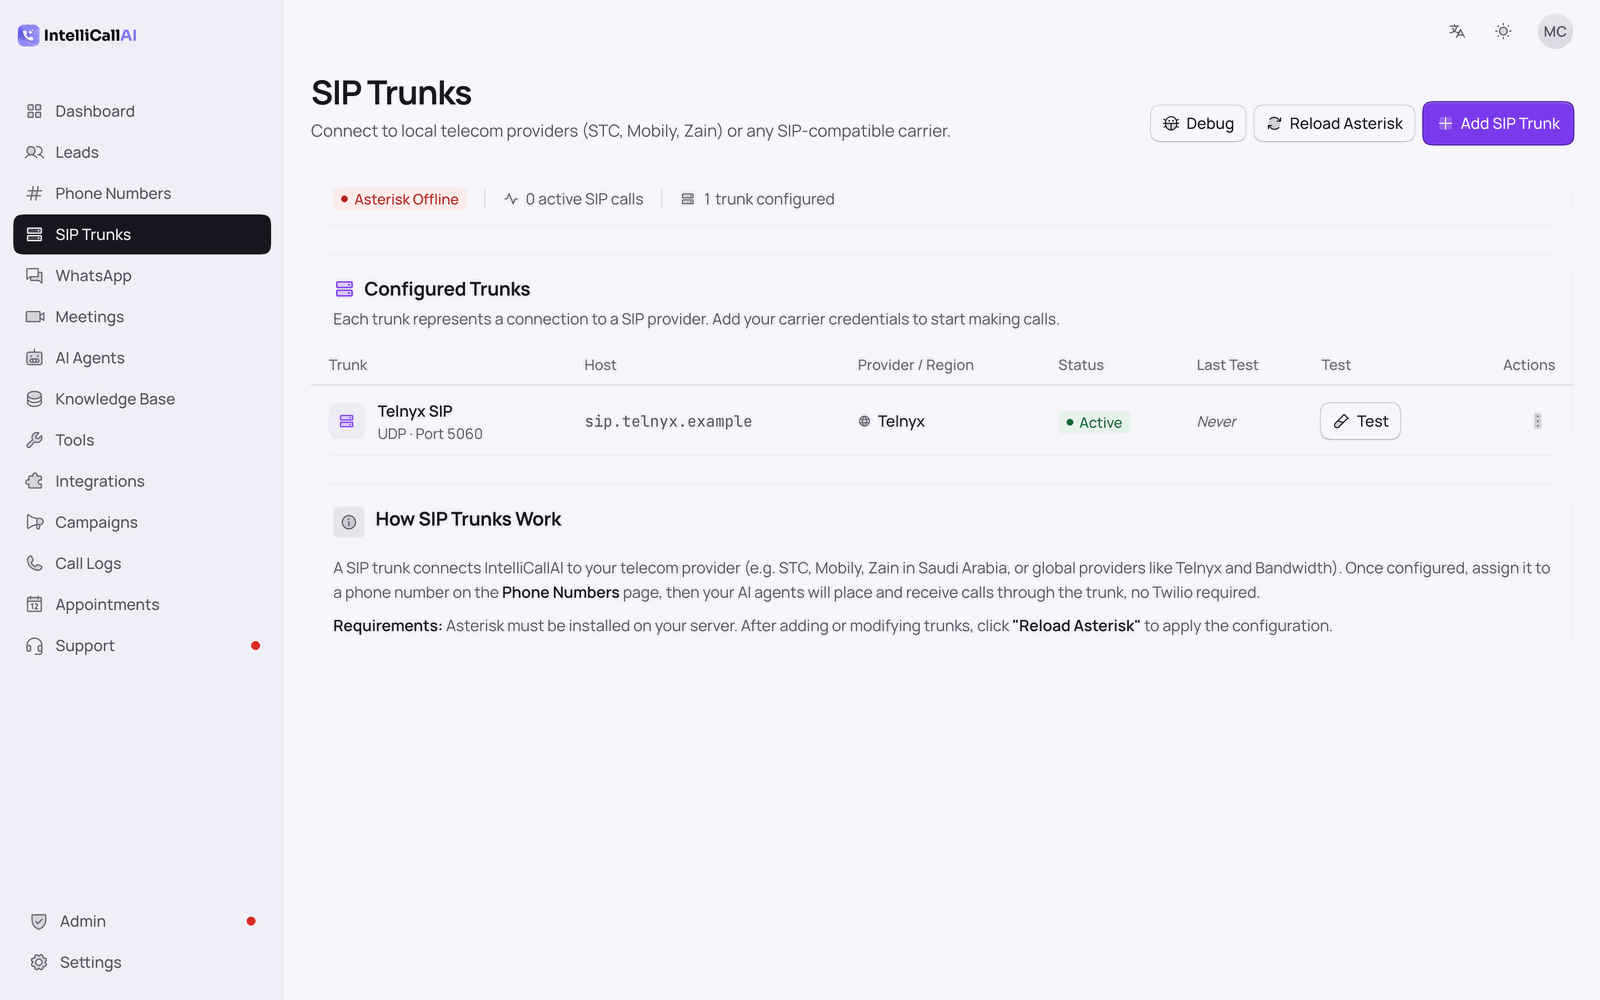
Asterisk PBX must be installed and running on your server. The dashboard shows a live
Asterisk Connected / Offline status indicator on the SIP Trunks page.
Your SIP provider account credentials (Host, Username, Password).
If Asterisk shows as Offline after installation, see the
Troubleshooting → Asterisk / Config File Issues section, or
re-run sudo bash manual_setup.sh and select Option 3: Fix SIP/Asterisk
Configuration.
Inbound calls: To receive inbound calls,
you must configure the Origination URI in your SIP provider’s portal so that
incoming calls are sent to your IntelliCall server. You can find the Origination
URI on the Phone Numbers page in the dashboard when you add an SIP
Trunk phone number - use that URI in your provider’s settings.
Adding a SIP Trunk
Navigate to SIP Trunks in the dashboard sidebar.
Click + Add SIP Trunk.
Fill in the trunk details:
Field
Description
Trunk Name *
A descriptive label (e.g., "Telnyx Main").
Provider Name
The carrier name for display purposes.
SIP Host / Registrar *
The SIP server hostname or IP (e.g., sip.telnyx.com).
Port
SIP port, default is 5060.
Transport
UDP, TCP, or TLS.
Username
SIP authentication username from your provider.
Password
SIP authentication password.
Auth Realm
Optional. Leave blank to use the host value.
Default Caller ID
The outbound number in E.164 format (e.g., +1234567890).
Region
Optional label for your reference.
Codecs
Audio codecs to use (e.g., PCMU, PCMA).
Dial Prefix
Optional. A technical prefix some wholesale carriers require in front
of the number, e.g. 999. When set, IntelliCall dials the
prefix followed by the number without the leading +
(999491799988620). Leave blank unless your carrier
documents one — most providers such as Twilio and Telnyx do not
use a prefix.
Click Save. The trunk is written to the Asterisk configuration automatically.
Testing a Trunk
Each trunk in the table has a Test button. Clicking it sends a SIP OPTIONS ping to
verify the trunk is reachable and registered. The result (reachable / unreachable) is shown as a
status badge.
Reloading Asterisk Config
After adding or editing trunks, click Reload Asterisk in the top-right of the SIP
Trunks page. This applies the new configuration to the running Asterisk instance without a full
restart.
Assigning a SIP Trunk to an Agent
Once a trunk is configured, go to your AI Agent settings and select the SIP trunk as
the outbound calling method. Campaigns using that agent will then route calls through your carrier
instead of Twilio.
Creating AI Agents
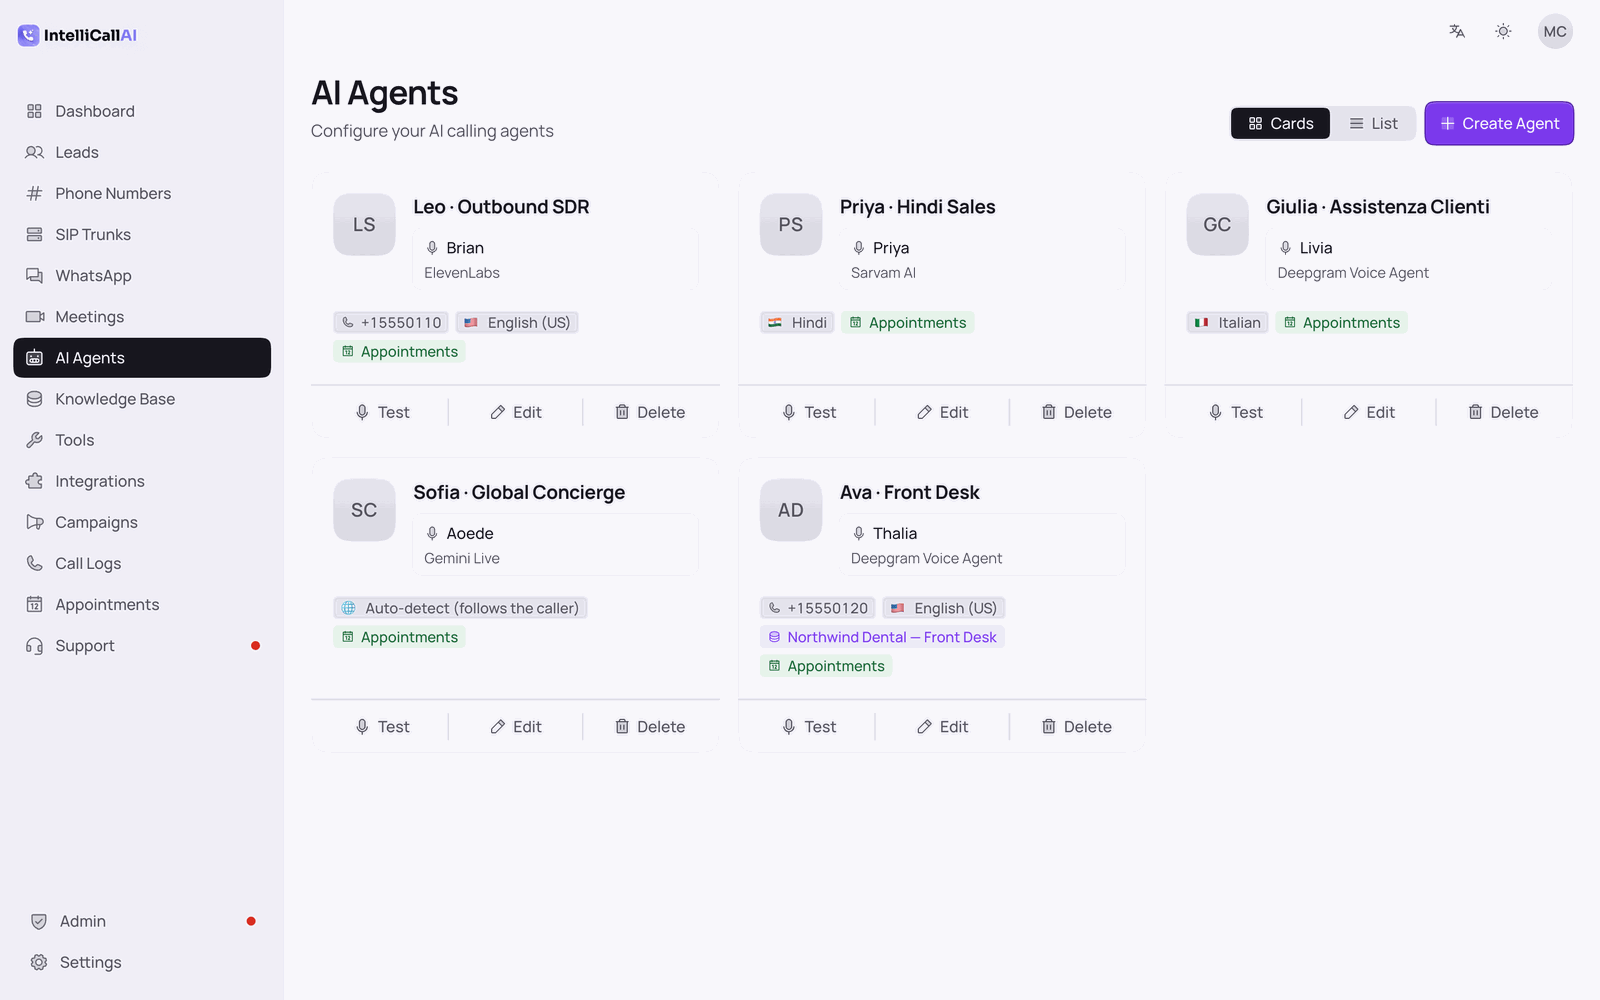
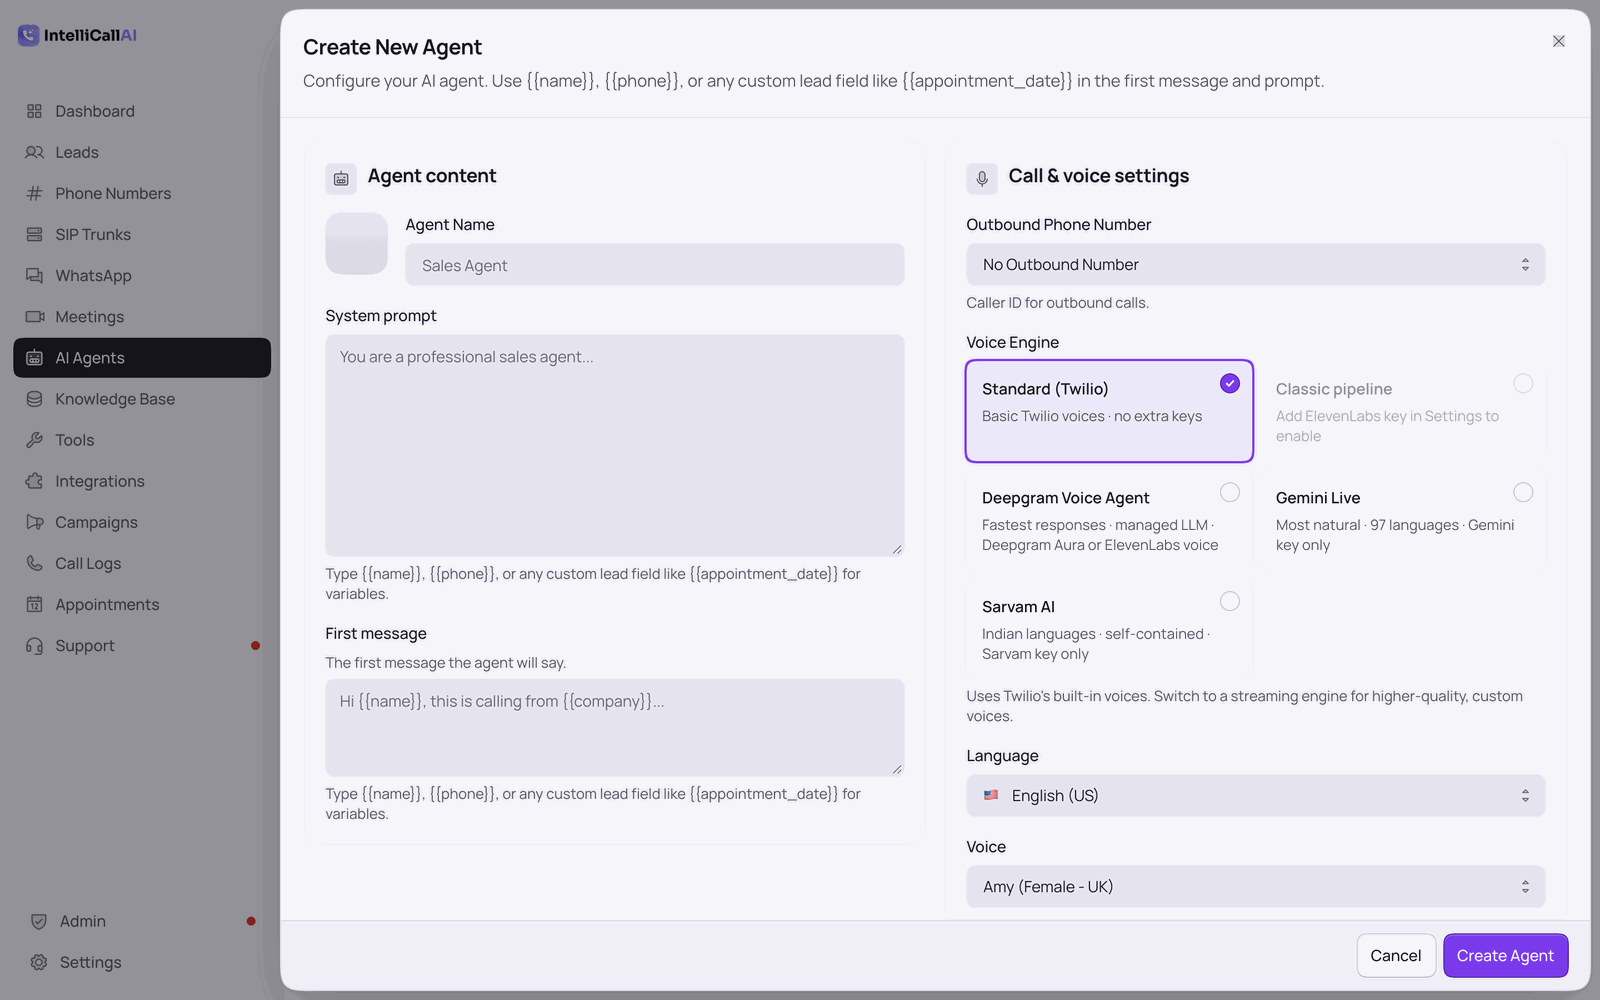
Agents are the “brains” of your calls. You can customize how they speak and behave.
Navigate to the AI Agents page in the dashboard.
Click Create Agent. A dropdown will appear with two options:
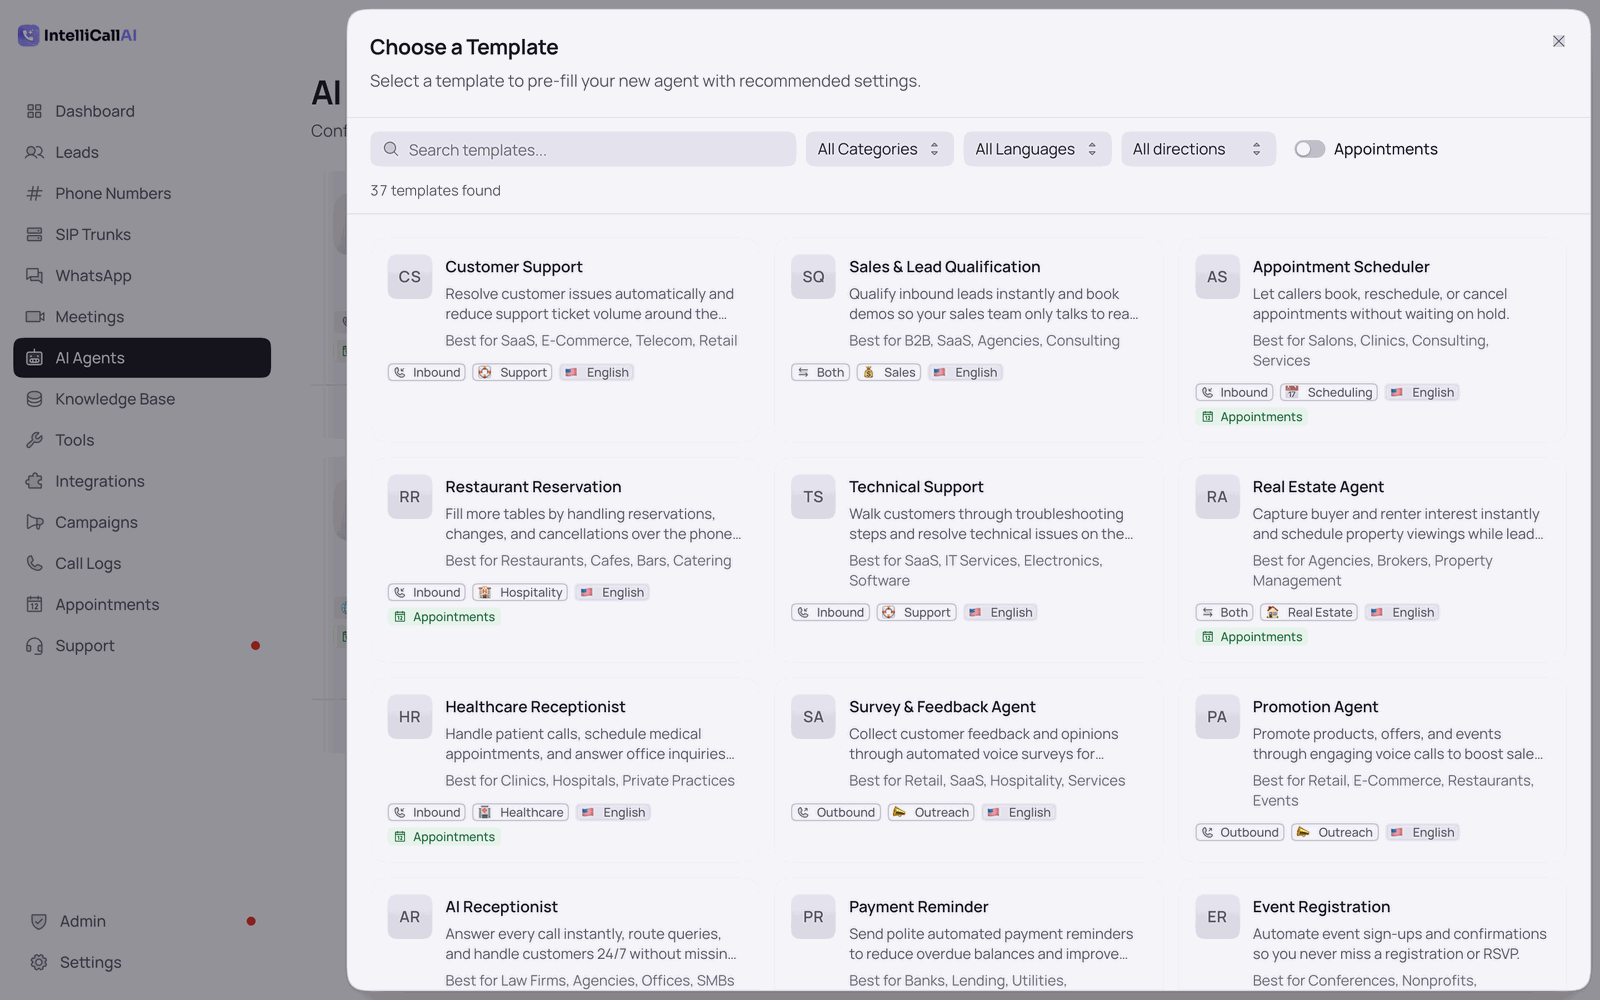
From Template — Opens the template picker drawer with 37+
pre-built agent templates. You can search, filter by category, language, call direction
(Inbound / Outbound / Both), industry, or appointment support to quickly find a template
that fits your use case. Selecting a
template opens the Create Agent form pre-filled with the template’s settings (name,
system prompt, opening message, voice, language, and appointment configuration). You can
review and adjust any field before saving.agent_templates
From Scratch — Opens the Create Agent form with empty fields so
you can configure everything manually.
Name: Give your agent a descriptive name (e.g., “Sales Assistant”).
System Prompt: Define the agent's personality and goals (e.g., "You are a
helpful sales representative for a solar company..."). You can personalize it with
merge tags like {{name}}, {{phone}}, or any custom
lead field such as {{appointment_date}} — see the callout below.
Opening Message: This is the first thing the agent says when the lead answers.
Supports the same merge tags (e.g. "Hi {{name}}, calling to
confirm your {{service_type}} appointment on {{appointment_date}}").
(Optional)
Voice Settings: Select a voice name (like "Rachel") or provide a custom
ElevenLabs Voice ID for premium results.
Outbound Phone Number: Select which Twilio phone number this agent should use
when making outbound calls. This is required for campaigns - the selected number will appear as
the Caller ID.
Language: Choose the language for the AI agent. You can pick from 16
languages — English (US), Arabic, Hindi, Hebrew, Spanish, French, German,
Portuguese, Portuguese (Brazil), Italian, Russian, Japanese, Korean, Dutch, Urdu, and Tamil — or
select Auto-detect (Multilingual) so the agent detects the caller’s language
during the call and responds accordingly.
Knowledge Base: Select the knowledge base data you want to pass into the agent.
The agent will use this content to answer questions accurately. For how to create and manage
knowledge bases, see 🧠 Knowledge Base.
Appointment Booking: Turn this option on to allow the agent to book and manage
appointments during calls. For setup and behavior, see 📅
Appointments.
Personalizing Calls with Merge Tags & Custom Fields
Any lead detail can be dropped into an agent's System Prompt and
Opening Message using {{double_brace}} merge tags. During each
call the tags are replaced with that lead's values, so the AI is personalized for every
contact — and because the tags work in the System Prompt too, the agent knows the details
for the entire conversation, not just the greeting.
Built-in tags:{{name}} and {{phone}} are always
available for every lead.
Custom fields: Add your own fields to a lead from the
Add Lead / Edit Lead dialog on the Leads
page (click Add field and enter a name and value, e.g.
appointment_date = July 10th at 3 PM). Each field becomes a
{{appointment_date}}-style tag. You can also import a CSV and
every column beyond name and phone is turned into a custom field
automatically.
How it resolves: Tags are case-insensitive ({{Name}} =
{{name}}). Any tag with no matching field is silently removed from what the
agent speaks, so callers never hear stray {{…}} text. Inbound calls with
no matched lead simply skip the tags.
Where it works: Both voice engines (classic and Deepgram Voice Agent) and
both call paths (Twilio and SIP/Asterisk).
Example — Opening Message:
"Hi {{name}}, this is a courtesy call to confirm your
{{service_type}} appointment on {{appointment_date}}." With a lead
whose fields are service_type = dental cleaning and
appointment_date = July 10th at 3 PM, the agent says:
"Hi Sam, this is a courtesy call to confirm your dental cleaning appointment on July 10th at
3 PM."
Phone Number Assignment
Each agent can have an Outbound Phone Number assigned
for making calls. Separately, each phone number can have an Inbound Agent
assigned to handle incoming calls. This allows flexible routing - for example, you can have a
"Sales" agent make outbound calls from a specific number, while a different "Support" agent
handles incoming calls to another number.
Knowledge Base (RAG)
The Knowledge Base allows you to provide your AI agents with specific business data, FAQs, and
company policies. This uses Retrieval-Augmented Generation (RAG) to ensure agents
stay on-topic and provide accurate information during calls.
1. Creating a Knowledge Base
Navigate to the Knowledge Base page and click + Add Knowledge Base.
You can organize your info into three main sections:
Basic Info: General company background, mission, or core services.
FAQs: Specific question-and-answer pairs that the AI can quickly reference.
Other Info: Any additional context, table data, or specific instructions for
the agent.
2. Assigning to an Agent
When creating or editing an AI Agent, you can select which Knowledge Base to link.
You can also toggle exactly which parts of that knowledge base the agent should use (e.g., enable
FAQs but disable Basic Info for a specific specialized agent).
Pro Tip: Use the Knowledge Base for complex data like
pricing tables or technical specs. This prevents the LLM from "hallucinating" or making up
details when it doesn't know the answer.
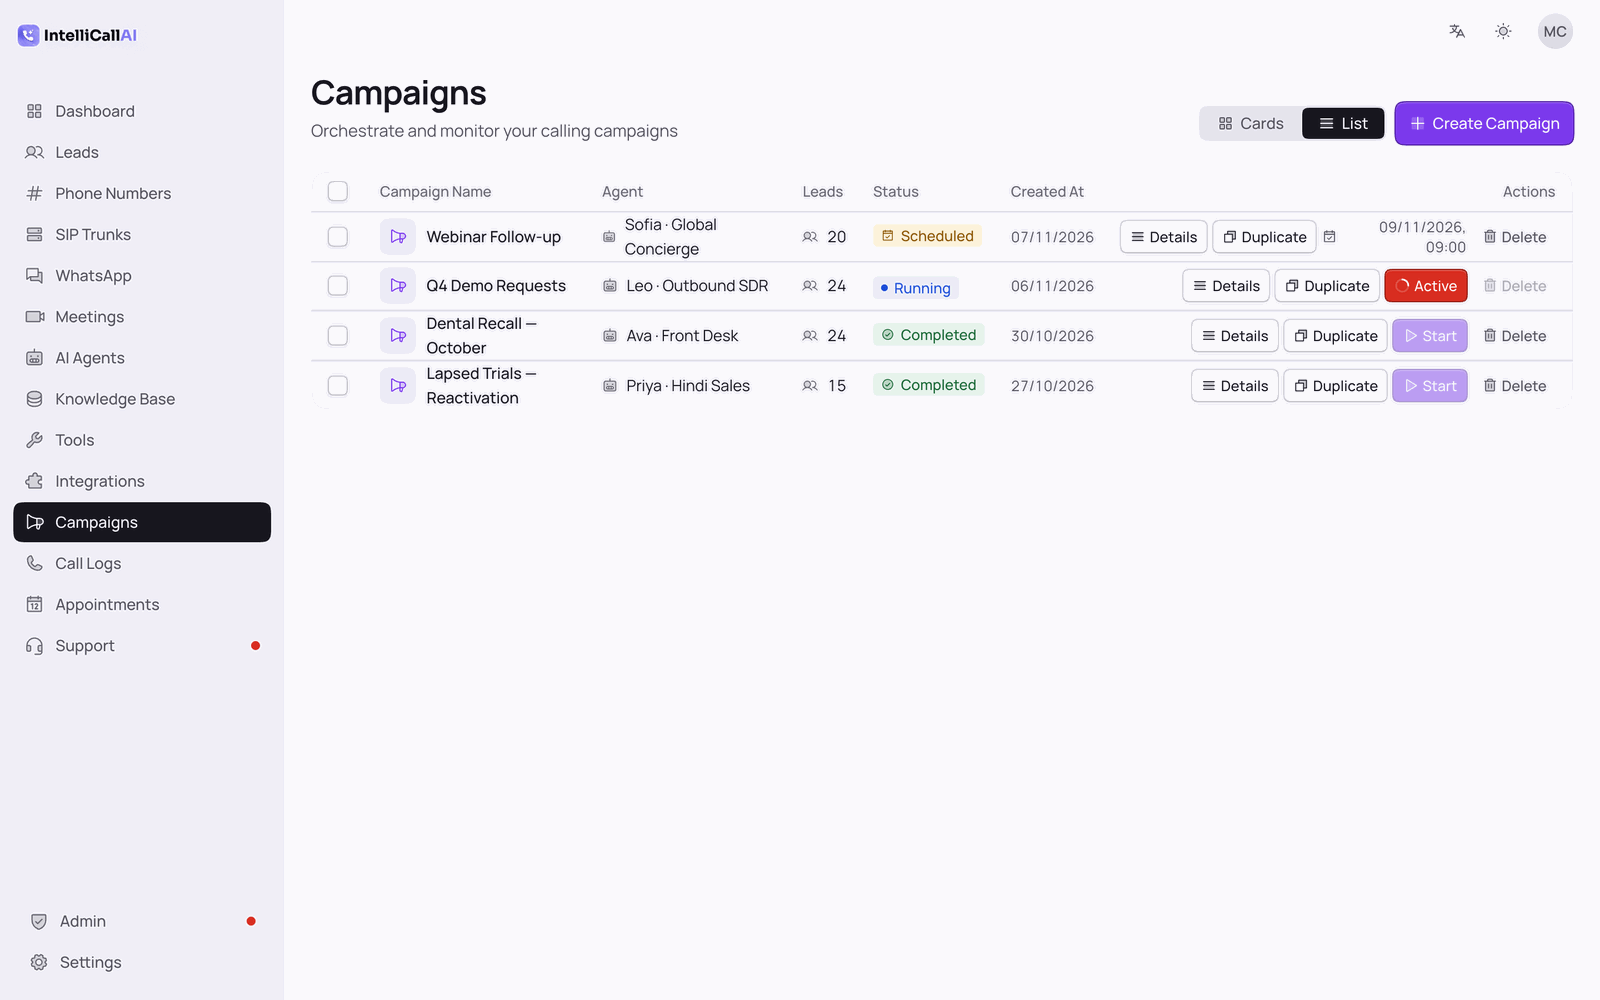
Creating Campaigns
Campaigns allow you to automate calls to a list of leads using a specific AI Agent.
Ensure you have imported leads in the Leads page.
Go to the Campaigns page and click + Create Campaign.
Select the AI Agent you want to use.
Select the Leads or specific tags you want to target.
Click Start on the campaign card to begin the automated calling process.
Campaign Scheduling
Instead of starting a campaign immediately, you can schedule it to begin at a specific future date
and time. The backend scheduler will automatically start the campaign at the configured time.
How to Schedule a Campaign
Go to the Campaigns page and click + Create Campaign.
Fill in the campaign details (Agent, Leads, etc.).
Instead of clicking Start Now, use the Schedule option to pick
a future date and time.
Click Schedule Campaign. The campaign will appear in the list with a
Scheduled status badge showing the exact start time.
Campaign Statuses
Status
Description
Idle
Campaign created but not yet started or scheduled.
Scheduled
Campaign will automatically start at the configured date/time. The UI polls for status
changes and updates in real-time.
Running
Campaign is actively dialing leads. Live progress is shown on the campaign card.
Completed
All leads have been called.
Stopped
Campaign was manually stopped before completion.
Tip: The dashboard automatically polls for status changes
when a campaign is Running or Scheduled, so you will see the
status update to "Running" without needing to refresh the page.
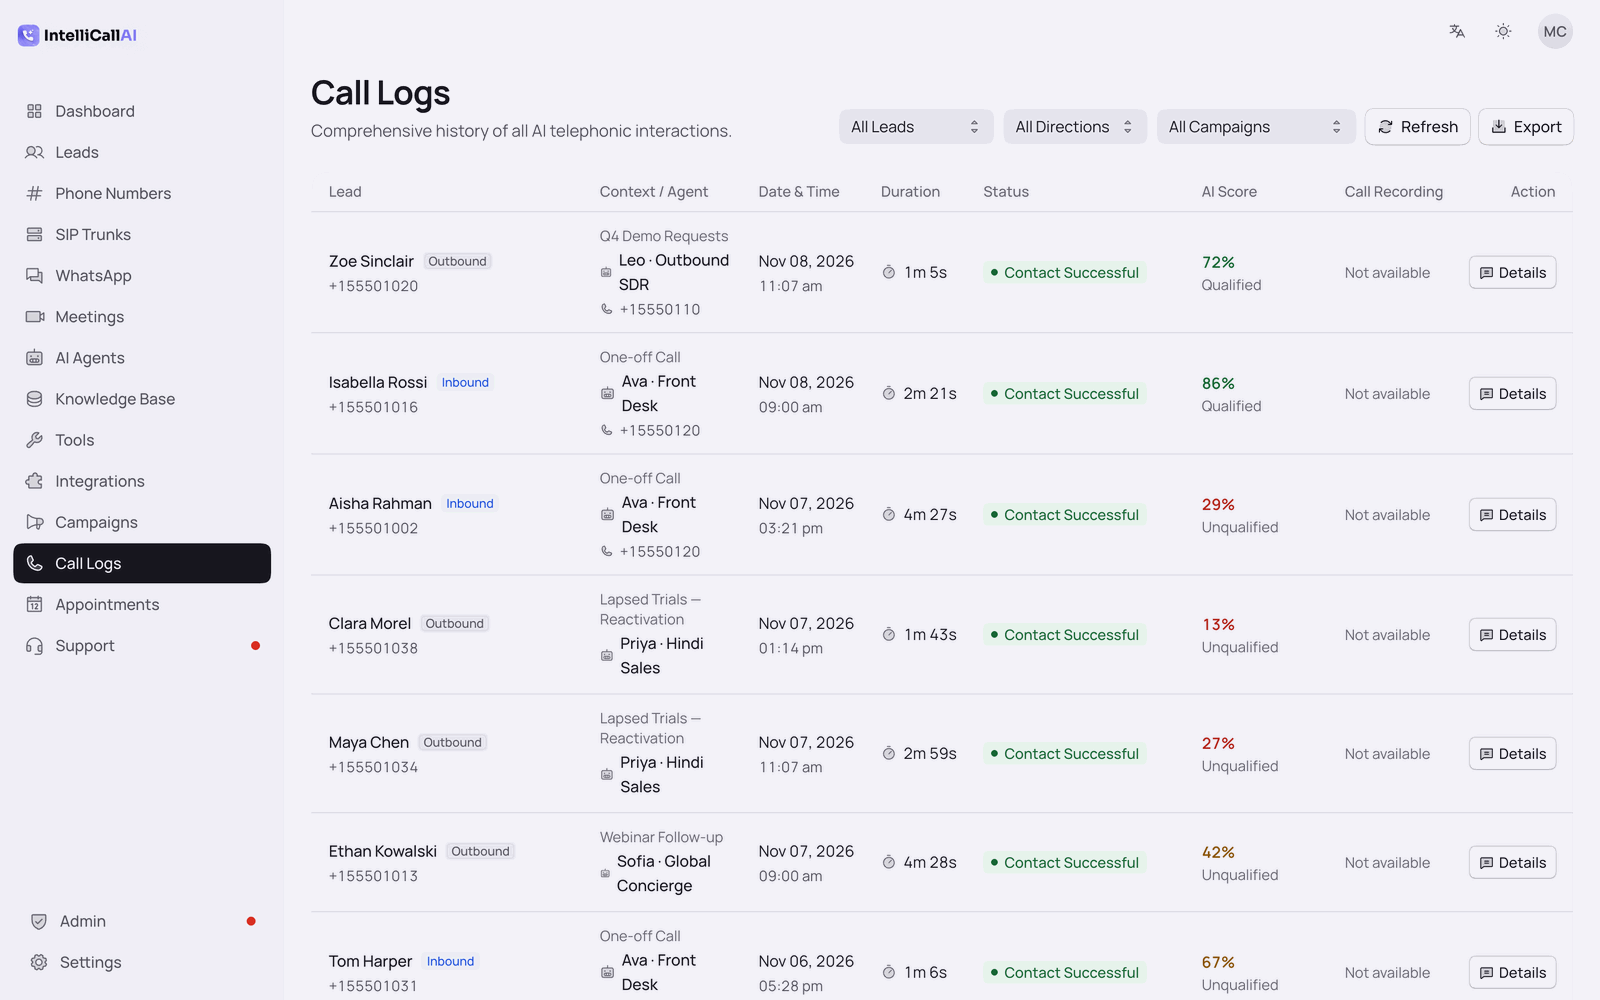
Call Logs & Analytics
Monitor your performance with detailed conversation history and AI-driven insights.
Viewing Logs: The Call Logs page shows every interaction,
including the status, duration, and AI qualification score.
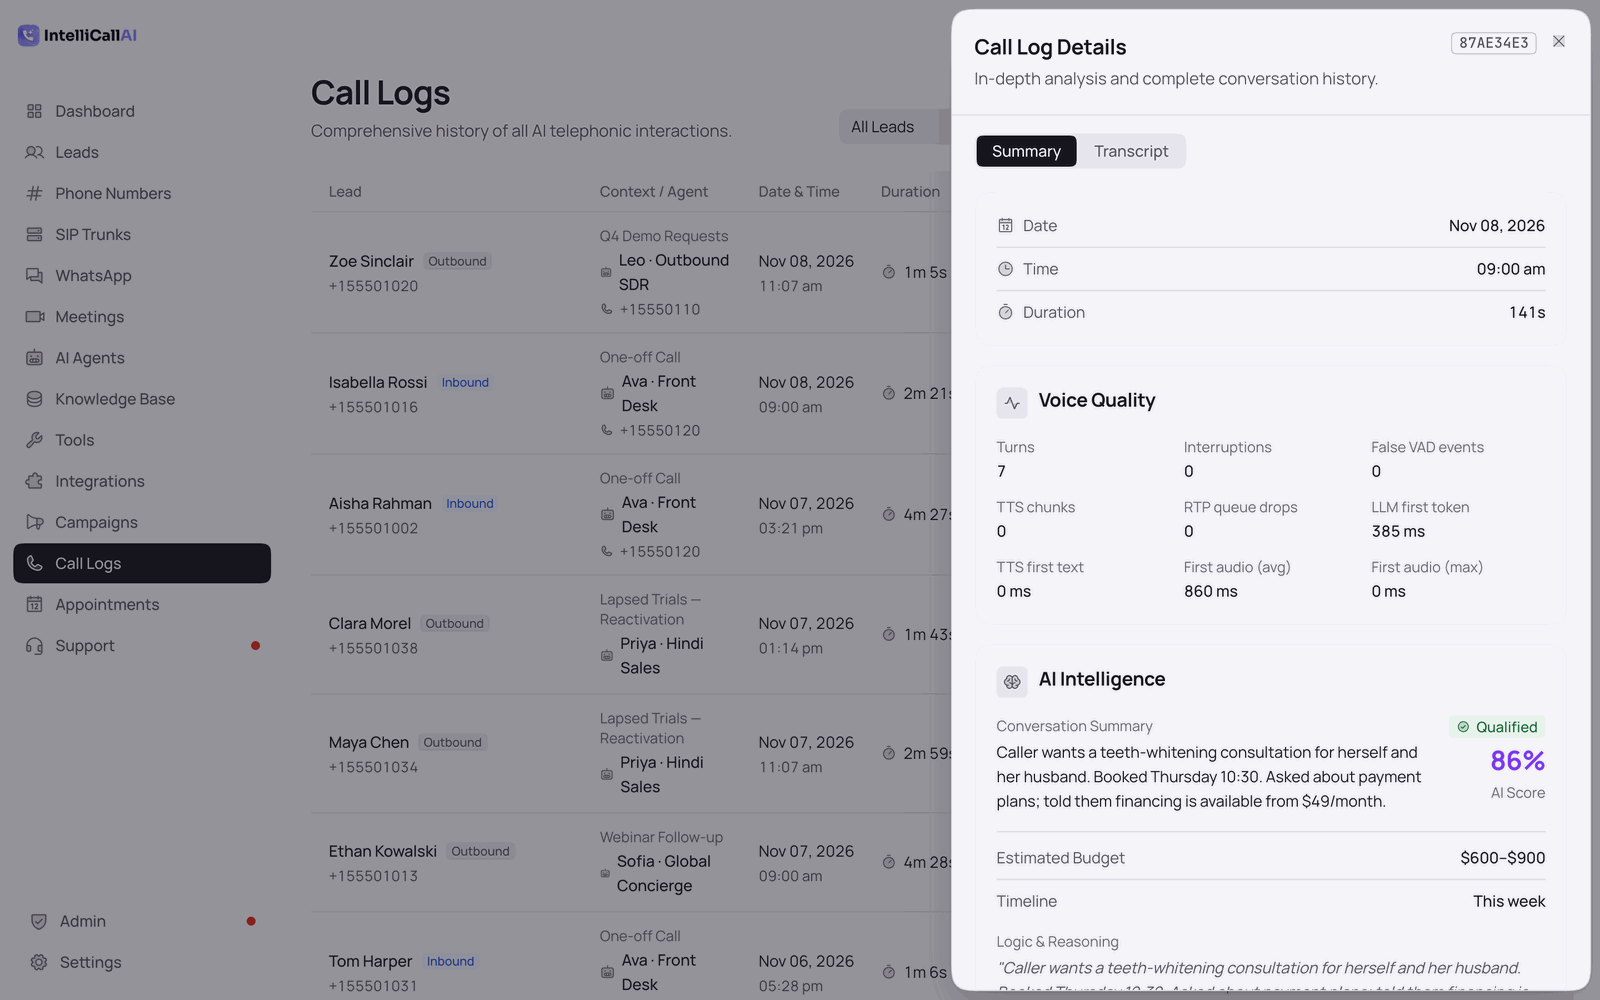
Conversation Details: Click Details on any log to see the full
transcript between the AI and the lead.call_logs_details
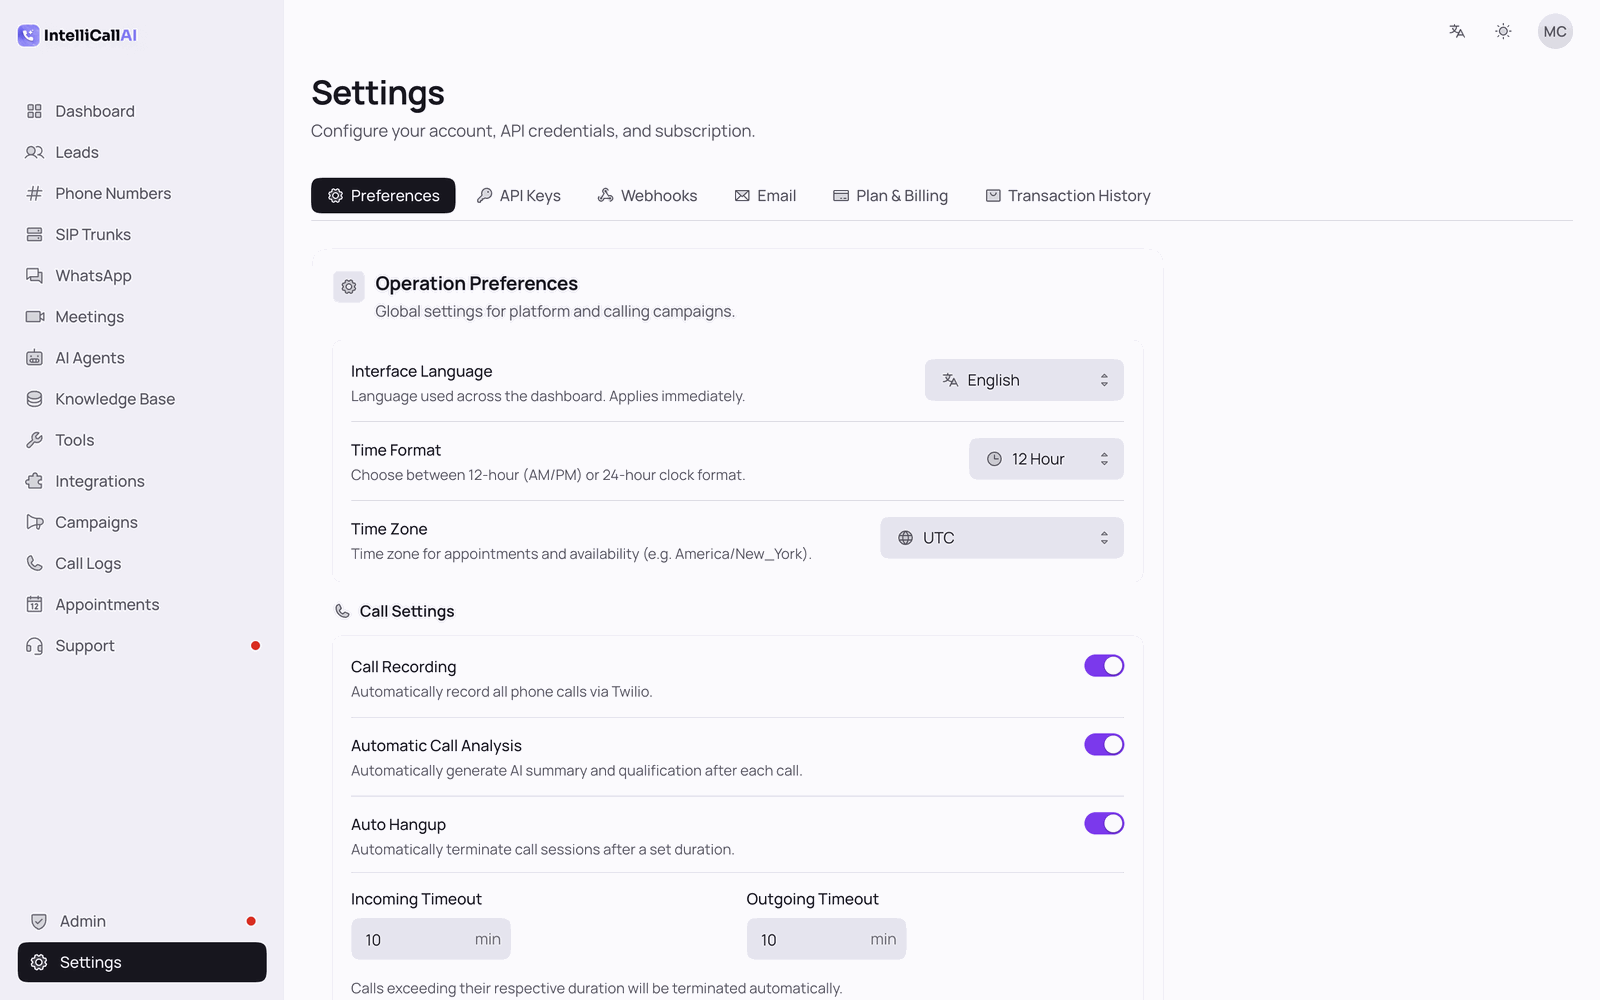
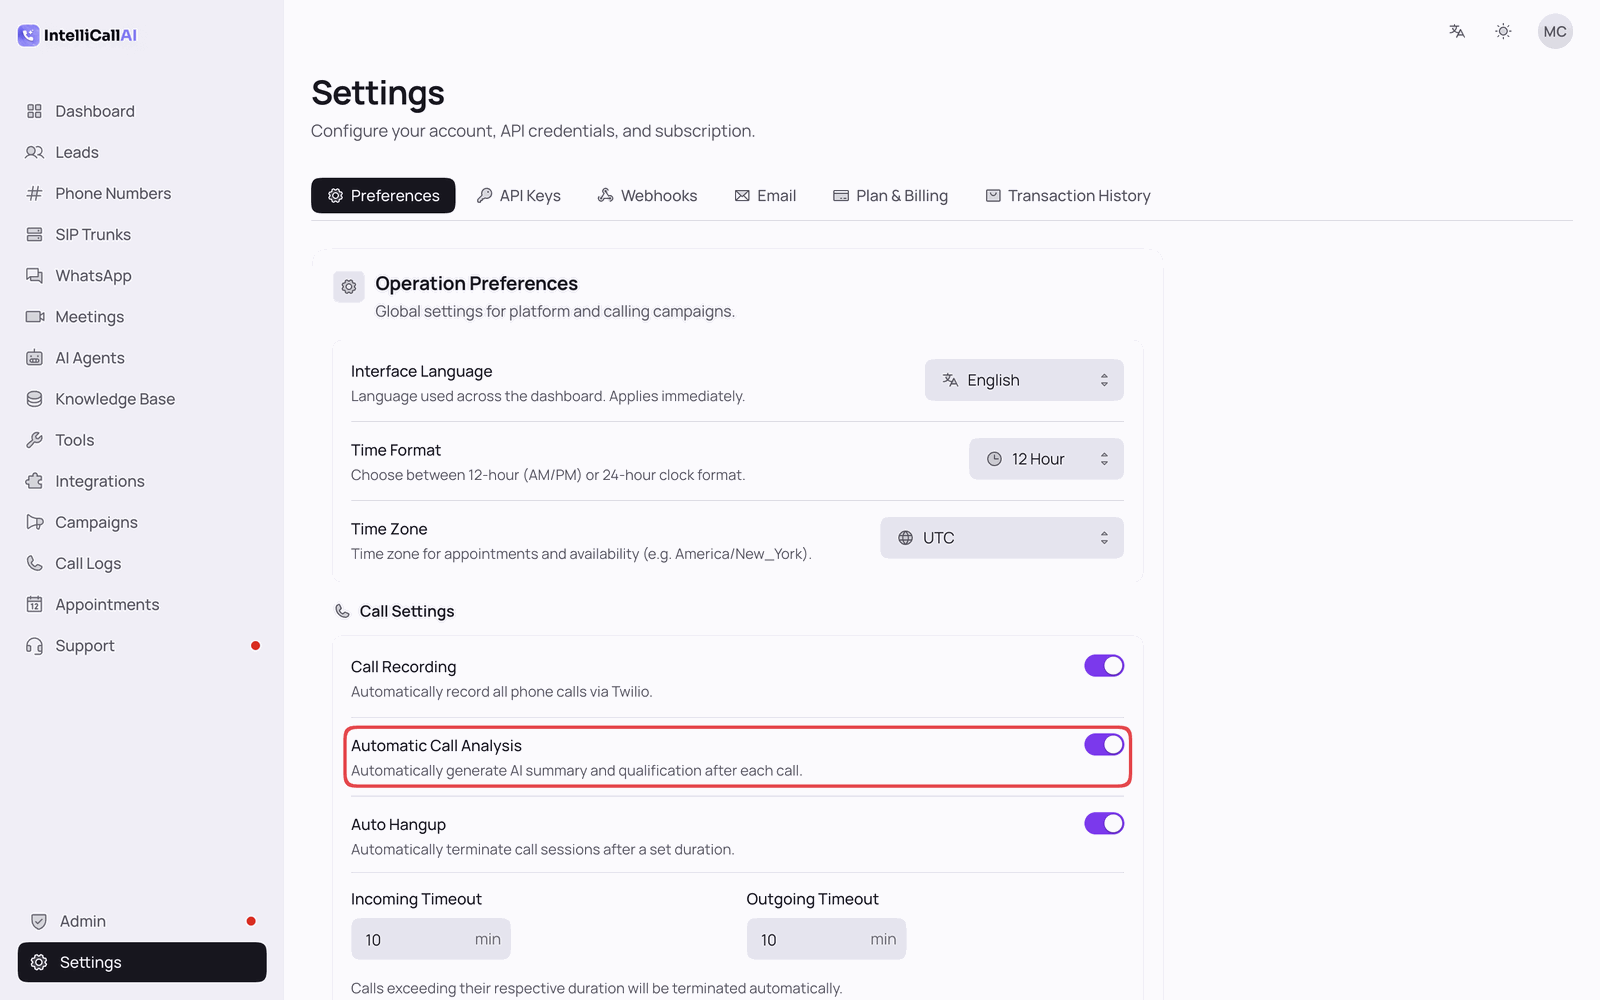
Auto-Analysis: To enable automatic call summaries and qualification scores, go
to Settings > Preferences and toggle Automatic Call Analysis
ON. This uses OpenRouter to analyze the transcript immediately after the call ends.call_logs_analysis_enable
Call Recording
Keep a record of all conversations for quality assurance and training.
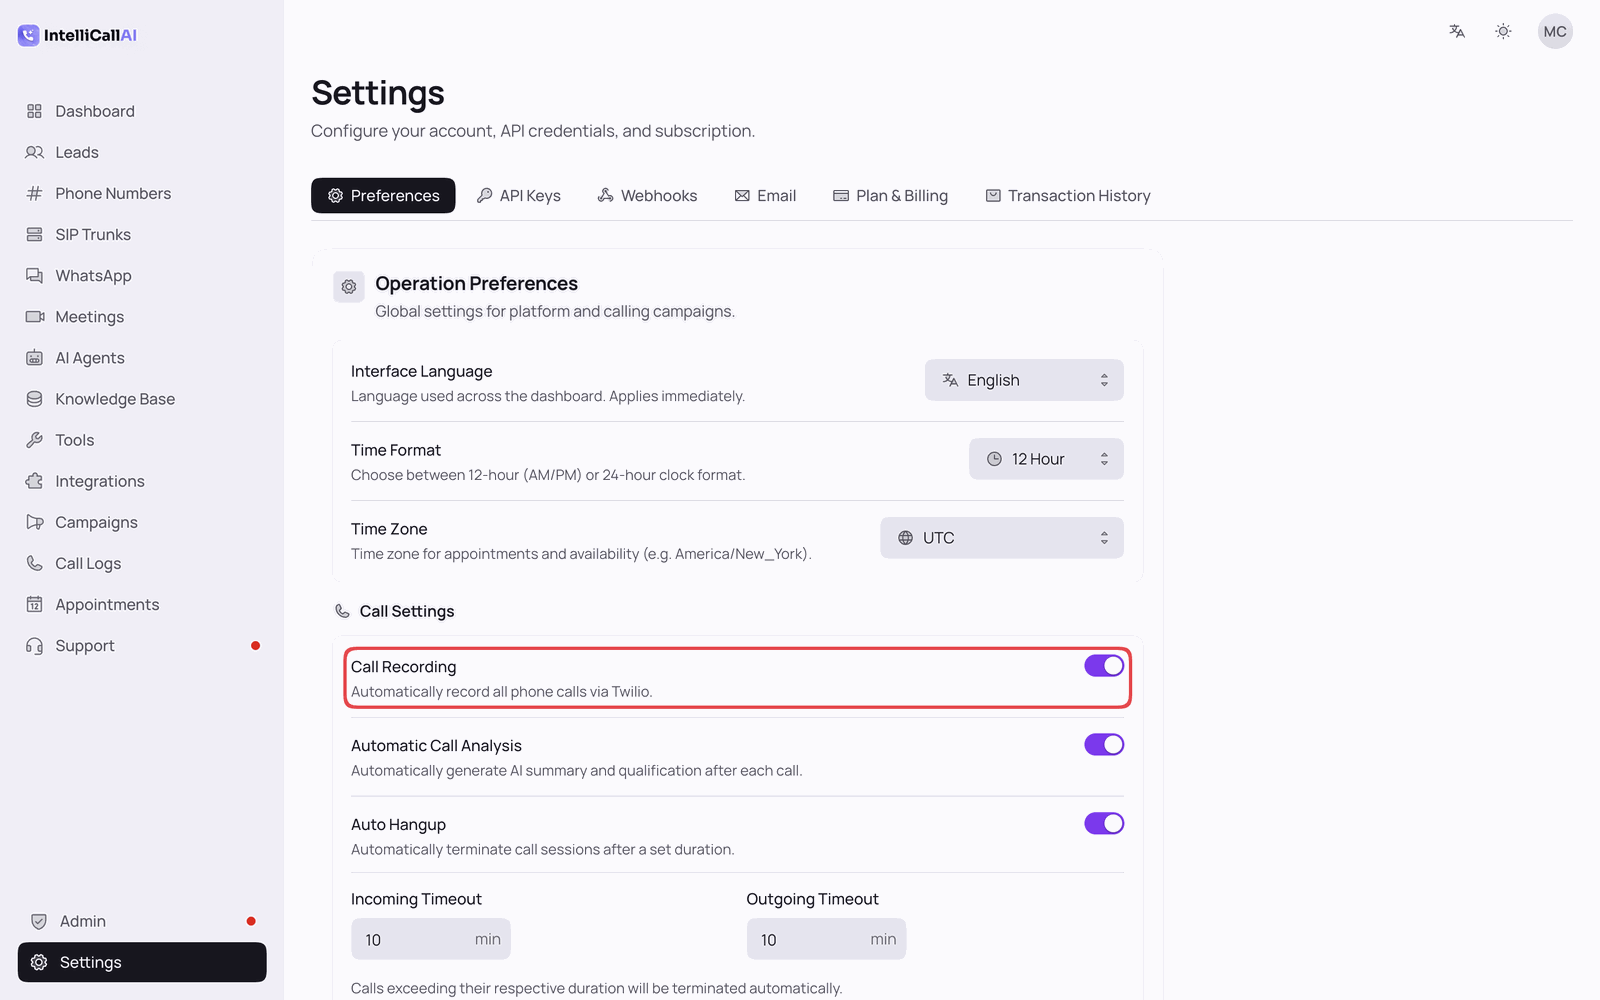
Go to Settings > Preferences.
Toggle Call Recording to ON.call_recording_enable
Once enabled, a play button will appear in the Call Logs table for all new
calls.
You can listen to recordings directly in the browser using the built-in modern audio player.
AI Appointment Booking
IntelliCall AI v5 allows your agents to handle end-to-end appointment scheduling. Agents can check
availability, book new slots, and cancel existing appointments on behalf of the client.
1. Configuring Availability
Before your agents can book anything, you must define your working hours:
Go to the Appointments page.
Click on the Availability & Slots tab.
Define your working hours for each day of the week and set your Slot Duration
(e.g., 30 minutes).
2. Enabling Agent Capabilities
When creating an agent, toggle Appointment Booking to ON. You should also provide an
Appointment Description so the AI knows what kind of service it is booking for
(e.g., "Solar Consultation").
3. Agent Commands
Agents use specialized internal commands to manage your calendar. They are trained to:
Check Slots: Browse available times for the next 7 days.
Book Appointment: Secure a slot once they have the client's name and preferred
time.
List/Cancel: Find and remove existing bookings if a client needs to reschedule.
Safety: The system automatically prevents double-booking
and respects the time-zone settings of your server to ensure accurate scheduling.
4. Managing Appointments from the Dashboard
The Appointments page lists every booking — whether created by an AI agent during a
call, manually, or via the API — and lets you act on each one without leaving the page.
View toggle: switch between Card and List
layouts using the icons in the top right of the Appointments tab.
Complete: mark a scheduled appointment as completed once the
session is over.
Cancel: flip a scheduled appointment to canceled. The row stays
visible (faded) for your records.
Edit: open the edit dialog to reschedule date / time, change the duration,
update the client name or phone, or revise the notes. Saving the form sends a
PATCH to /api/appointments/:id and — if Google Calendar is
connected — the linked Google event is updated in place (same event ID, no duplicate).
Google Calendar sync: appointments automatically mirror to a connected
Google Calendar account. Connect it from Integrations in the sidebar; see
📆 Google Calendar Sync Setup for the full onboarding flow.
Note: Complete, Cancel, and Edit are only available
while an appointment is in scheduled state. Cancelling an appointment also
removes the corresponding Google Calendar event when sync is enabled.
Human Transfer
Human Transfer lets an agent hand a live caller to a real person. When the caller asks to
speak to someone, or says they do not want to talk to a machine, the agent briefly tells
them it is putting them through and dials the destination you configured — while the
caller stays on the line with the agent the whole time it rings.
SIP only: transfers are dialled over the same
SIP trunk the call is already using. Agents on a Twilio number
cannot transfer, and neither can the in-browser agent test — in both cases the
capability is simply never offered to the agent.
1. Turning it on
Go to AI Agents and click Edit on the agent.
Scroll to Human Transfer (just below Appointment Booking) and switch it
ON.
Click Add destination and fill in the three fields below.
Click Update Agent.
2. Authorised destinations
Each destination is one person or department the agent may transfer to:
Field
What it does
ID
The short name the agent uses internally, e.g. reception. Lowercase
letters, numbers, - and _ only.
Name
How the destination is described to the agent and shown in Call Logs, e.g.
Reception. Ask callers for this by name and the agent will match it.
Phone number
The number actually dialled, in international format
(e.g. +34600111222). Never shown to the AI.
Ring time
How long this destination may ring, 5–60 seconds. Leave it blank to use the
agent-wide ring time.
Enabled
Turn a destination off without deleting it — the agent stops being told
about it immediately.
Why the numbers stay hidden: the agent only ever
receives the IDs and names of your destinations. The phone number is looked up on the
server and validated immediately before dialling, so no amount of persuasion can make an
agent call a number you did not authorise.
3. Agent-wide settings
Default destination — used when the caller just asks for
“a person” without naming a department. Must be one of your enabled
destinations.
Ring time — how long a destination may ring before the caller is
handed back to the agent (default 20 seconds).
Max attempts per call — caps how many times one call may try a
transfer (default 3), so an agent cannot keep re-dialling someone who is not there.
4. What the caller experiences
The caller asks for a person. The agent says it is putting them through.
The destination rings. The caller is still connected to the agent while
this happens.
If the human answers, the agent steps out and the caller is talking to
your colleague. The call recording continues through the handover.
If the destination is busy, declines, or nobody answers within the ring
time, the agent apologises in its own language and carries on helping — with the
whole conversation so far still in its memory. The caller is never dropped and never has
to repeat themselves.
5. Reviewing transfers
Open Call Logs and click Details on a call. If the call
attempted a transfer, a Human Transfers panel shows each attempt: the
destination, the outcome, which attempt it was, how long it rang, how long the caller spoke
to the human, and the SIP cause code if the carrier rejected it.
Tip: mention your departments in the agent's system
prompt too (“if the caller wants pricing, transfer them to Sales”) so it knows
when to transfer, not just where. Two events,
Caller Transferred and Transfer Failed, are available
under Webhooks, Slack, WhatsApp and n8n if you want to be
notified.
Tools (Webhook Tools)
A tool (new in v13.0) is an action your agents can take during a call: look up an
order, check stock, open a ticket, fetch a delivery date. Technically it is a webhook on your own
server, or a catch hook in Zapier, Make or n8n. The agent calls it mid-conversation with the
details it has gathered, waits for your reply, and reads it back to the caller. Tools work on
every voice engine, in WhatsApp chats and in meetings.
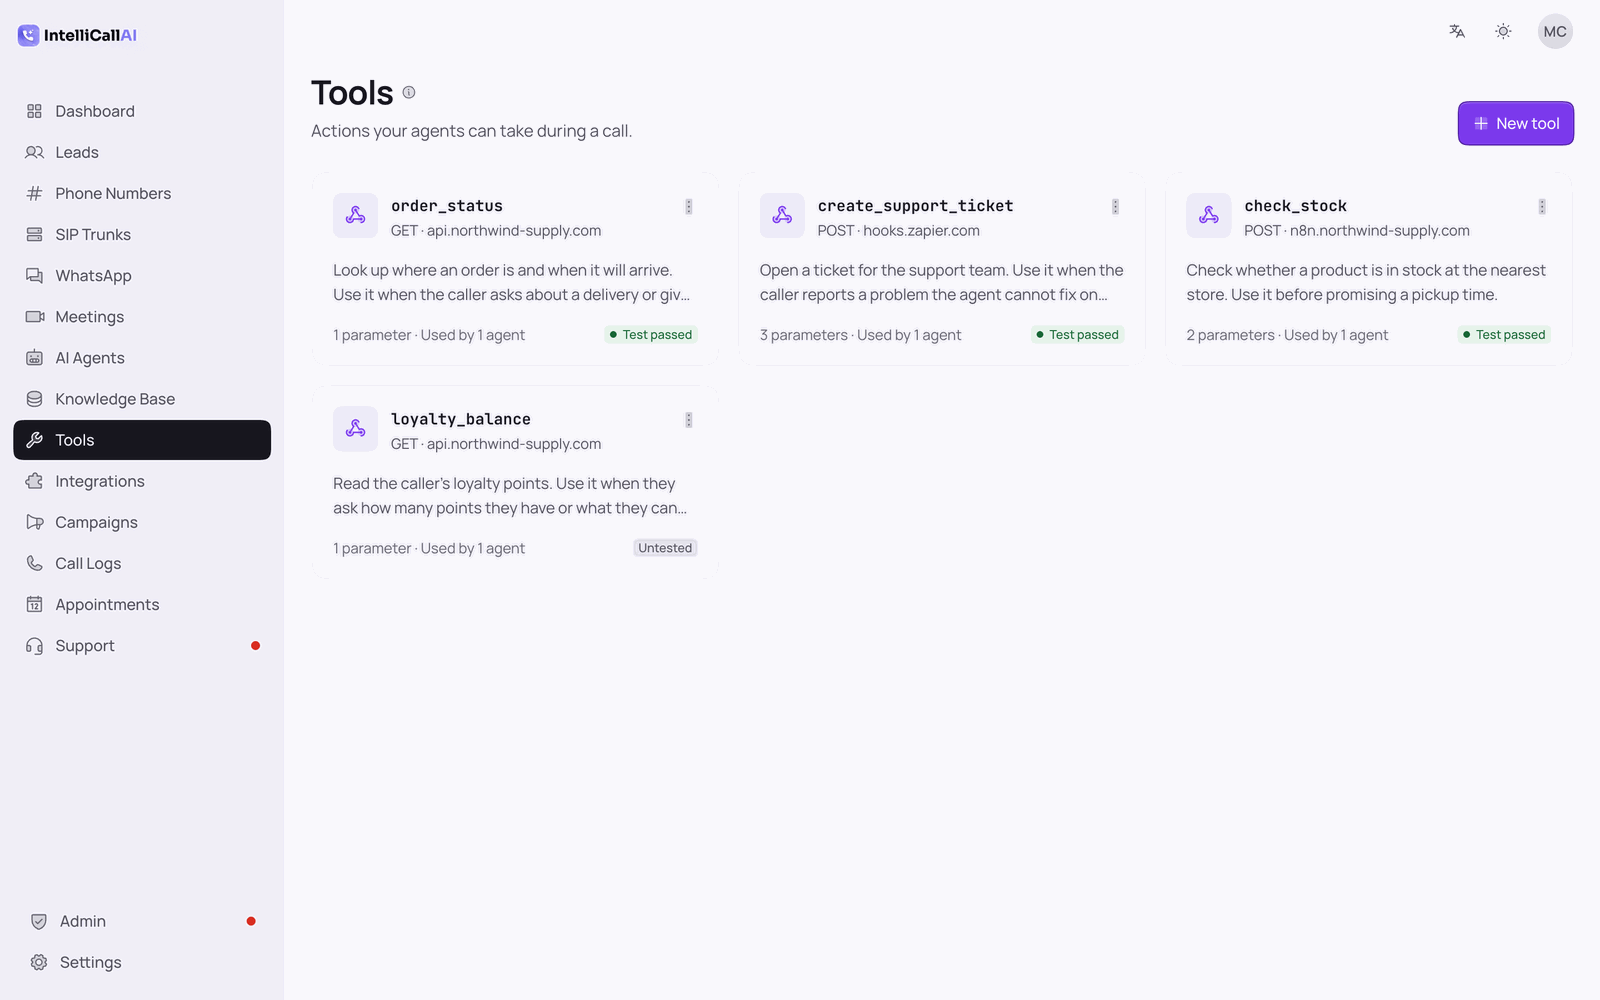
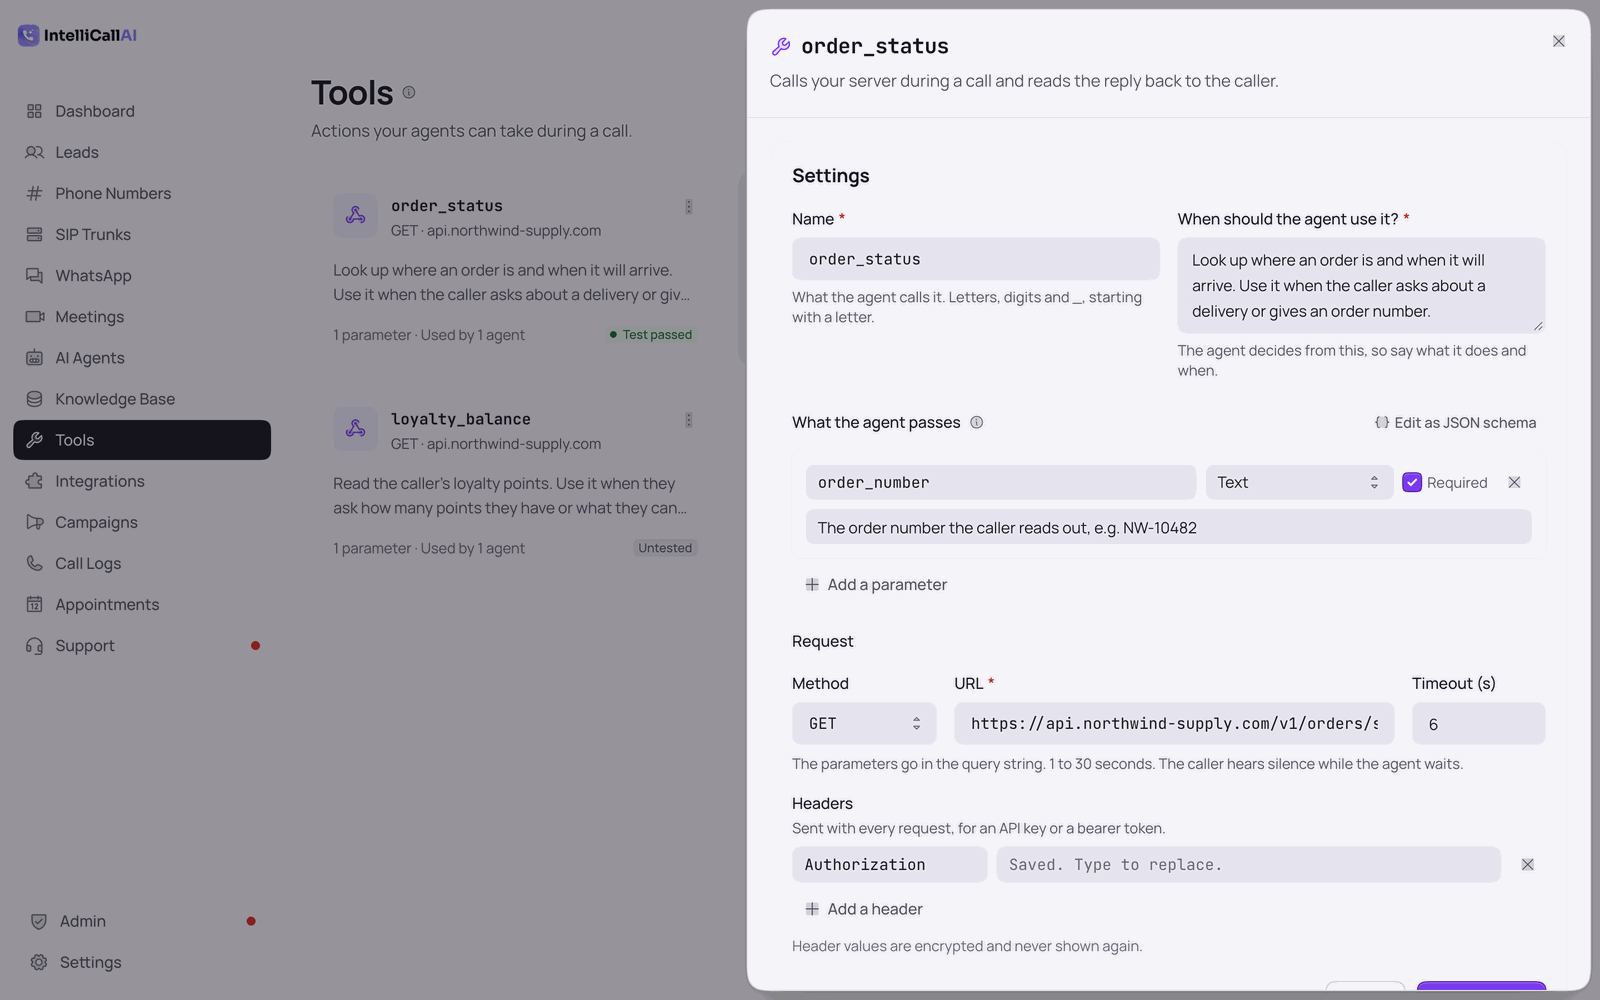
The Tools page with four webhook tools
1. Create a tool
Open Tools in the sidebar and press New tool:
Name: what the agent calls it. Letters, digits and underscores, starting
with a letter (for example order_status).
Description: what it does and when to use it. The agent decides
from this line, so write it like an instruction: "Look up where an order is. Use it
when the caller asks about a delivery."
Parameters: one entry for each thing the agent must send, with a type
(text, number, true/false, or a choice from listed options), a description so the agent
knows what to put there, and whether it is required. Advanced users can edit the JSON
schema directly.
URL and method: your endpoint. With GET and
DELETE the parameters go in the query string; with POST,
PUT and PATCH they are sent as the JSON body. Use
https://; plain http:// is accepted only for a server on your own
network and is flagged in the form.
Headers: sent with every request, for an API key or a bearer token. Values
are encrypted and never shown again.
Timeout: 1 to 30 seconds. The caller hears silence while the agent waits,
so keep endpoints fast.
Editing the order_status tool: name, description, parameters, URL and headers
2. Test it
The Test panel on a saved tool sends exactly what a call would, with your headers,
and shows the reply as the agent would hear it. Fill in sample arguments, press
Run, and fix the endpoint until the answer reads well. The last test result
is shown on the tool's card.
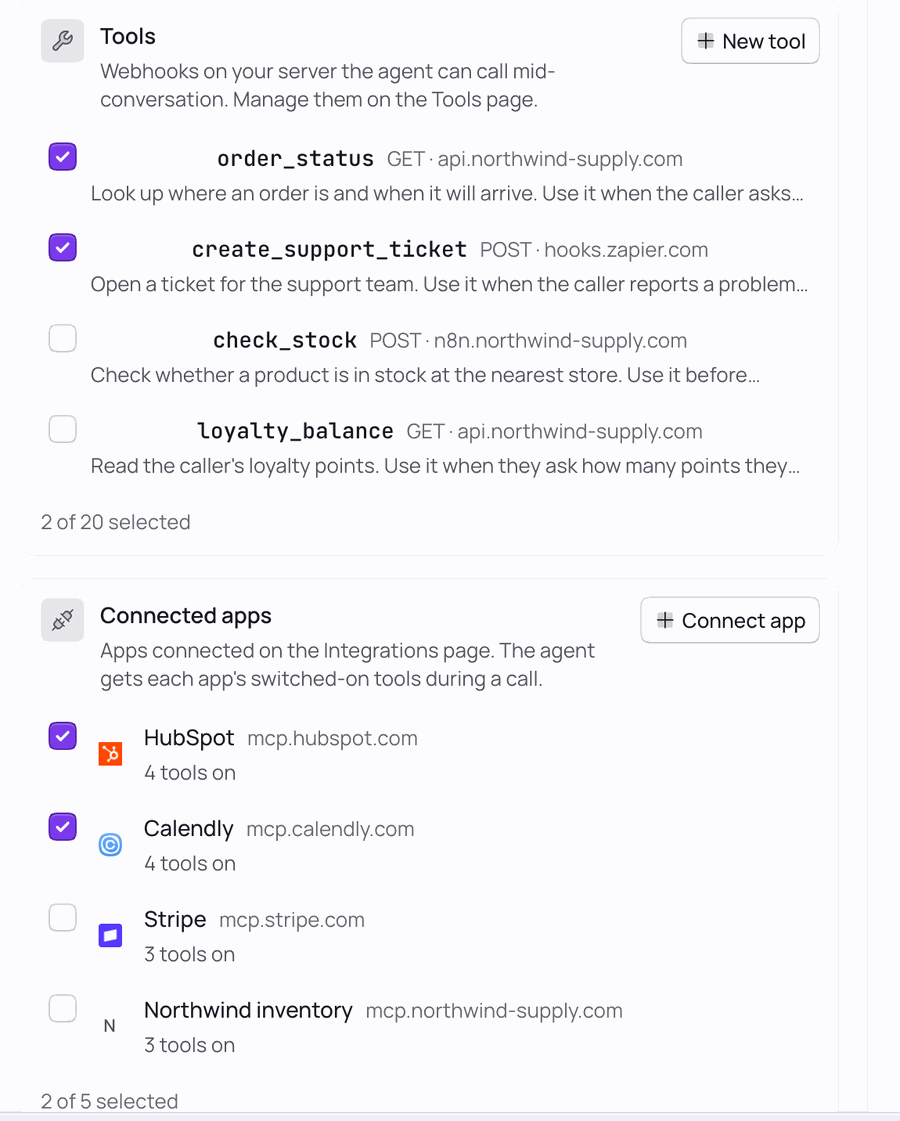
3. Give it to an agent
Open the agent, go to Capabilities and tick the tool. From the agent's next call
it can use it. Mention it in the system prompt too ("use order_status when the caller gives
an order number") so the agent knows when, not just how. Each tool call is listed in the
call's Details in Call Logs, with its arguments, the reply and how long it
took.
Tools and Connected apps ticked in the agent editor
4. What your endpoint receives
Header
Meaning
x-intellicall-tool
The tool's name.
x-intellicall-call-id x-intellicall-agent-id
The call and the agent making the request.
x-intellicall-timestamp
Unix time (seconds) when the request was made.
x-intellicall-signature
HMAC-SHA256, hex, of <timestamp>.<raw body> with your
account's webhook secret (Settings → Webhooks; an
account with no secret gets one automatically). For GET and
DELETE the body is empty, so the signed string is
<timestamp>.. Check it to be sure a request really came from
your IntelliCall.
Reply with JSON or plain text, with a 2xx status. The first 4,000 characters are
read to the agent, so answer in words the agent can repeat ("Order 1234 ships tomorrow"), not
in a large data dump. A non-2xx status or a timeout makes the agent tell the caller it could
not do that right now, and carry on.
Private addresses are refused. A tool URL on
localhost, a LAN address or a cloud metadata address is rejected, so a
caller can never make the agent probe your own network. If your n8n or API really runs on
the same box, set MCP_ALLOW_PRIVATE_URLS=true in backend/.env
and restart. Admin → Plans limits how many tools each plan may create.
Integrations & MCP Apps
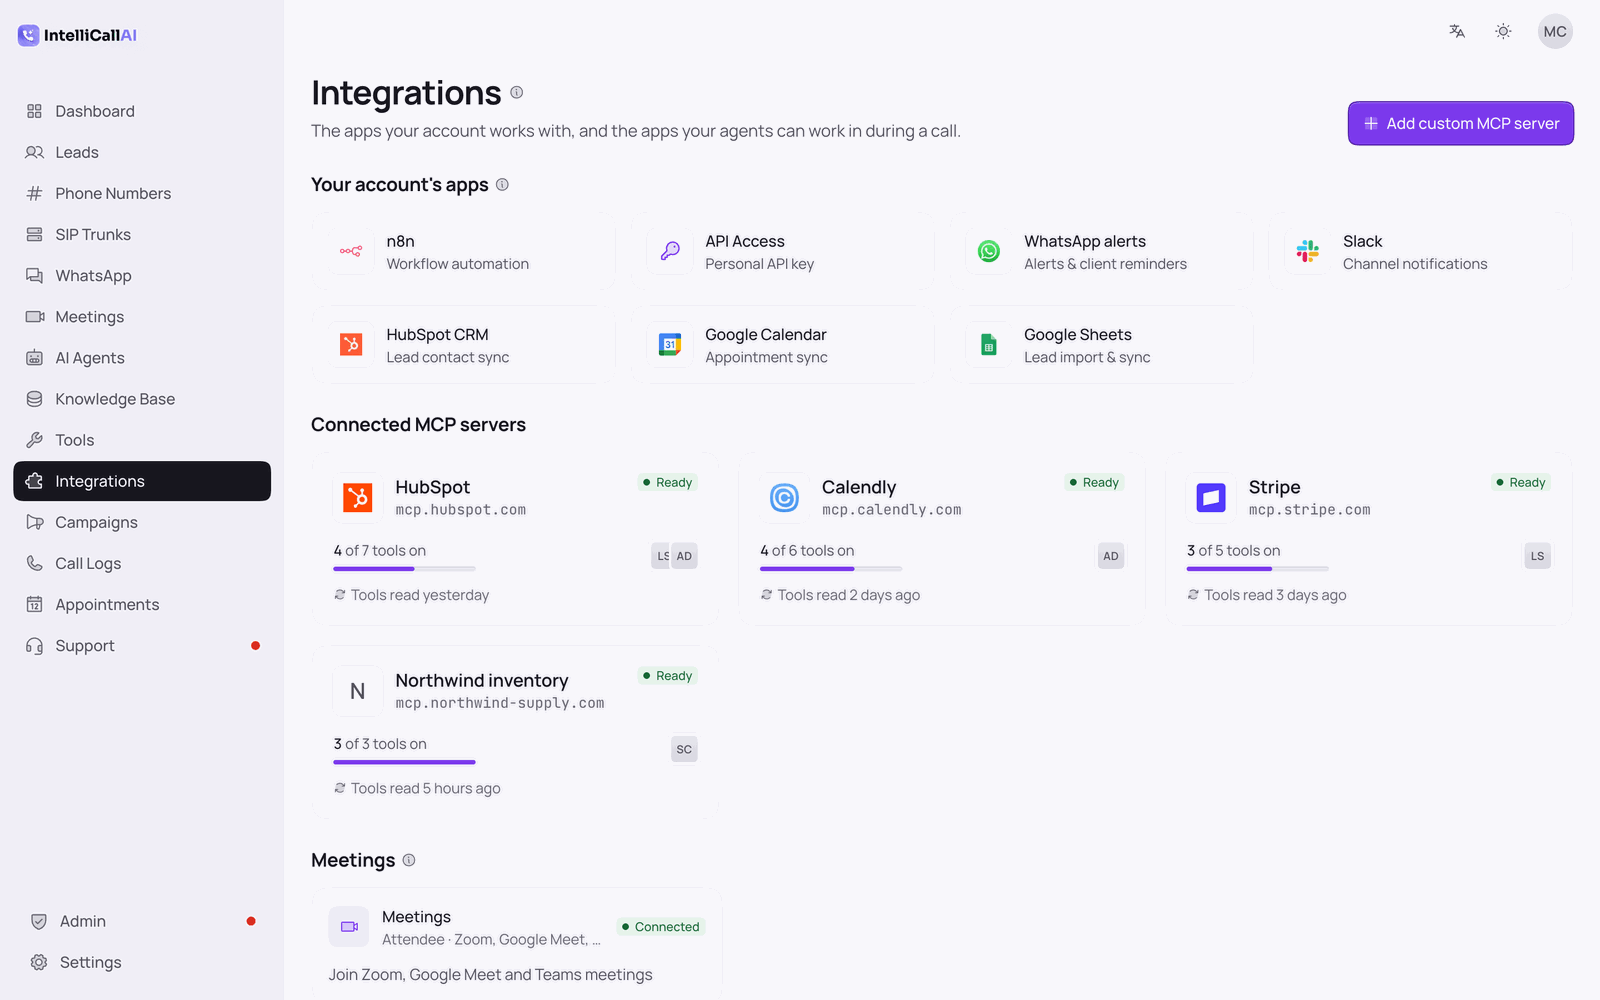
Since v13.0 Integrations has its own place in the sidebar, with two halves:
Your account's apps: Google Calendar, Google Sheets, HubSpot, Slack, n8n,
WhatsApp alerts and your personal API key. These send alerts and sync data on their own and
moved here from Settings; their setup steps are unchanged (see their sections
above).
App directory: apps with an official remote MCP server
(Model Context Protocol). Connect one and its tools become available to your agents, so an
agent can look things up and make changes in that app during a call, using only the
tools you switch on.
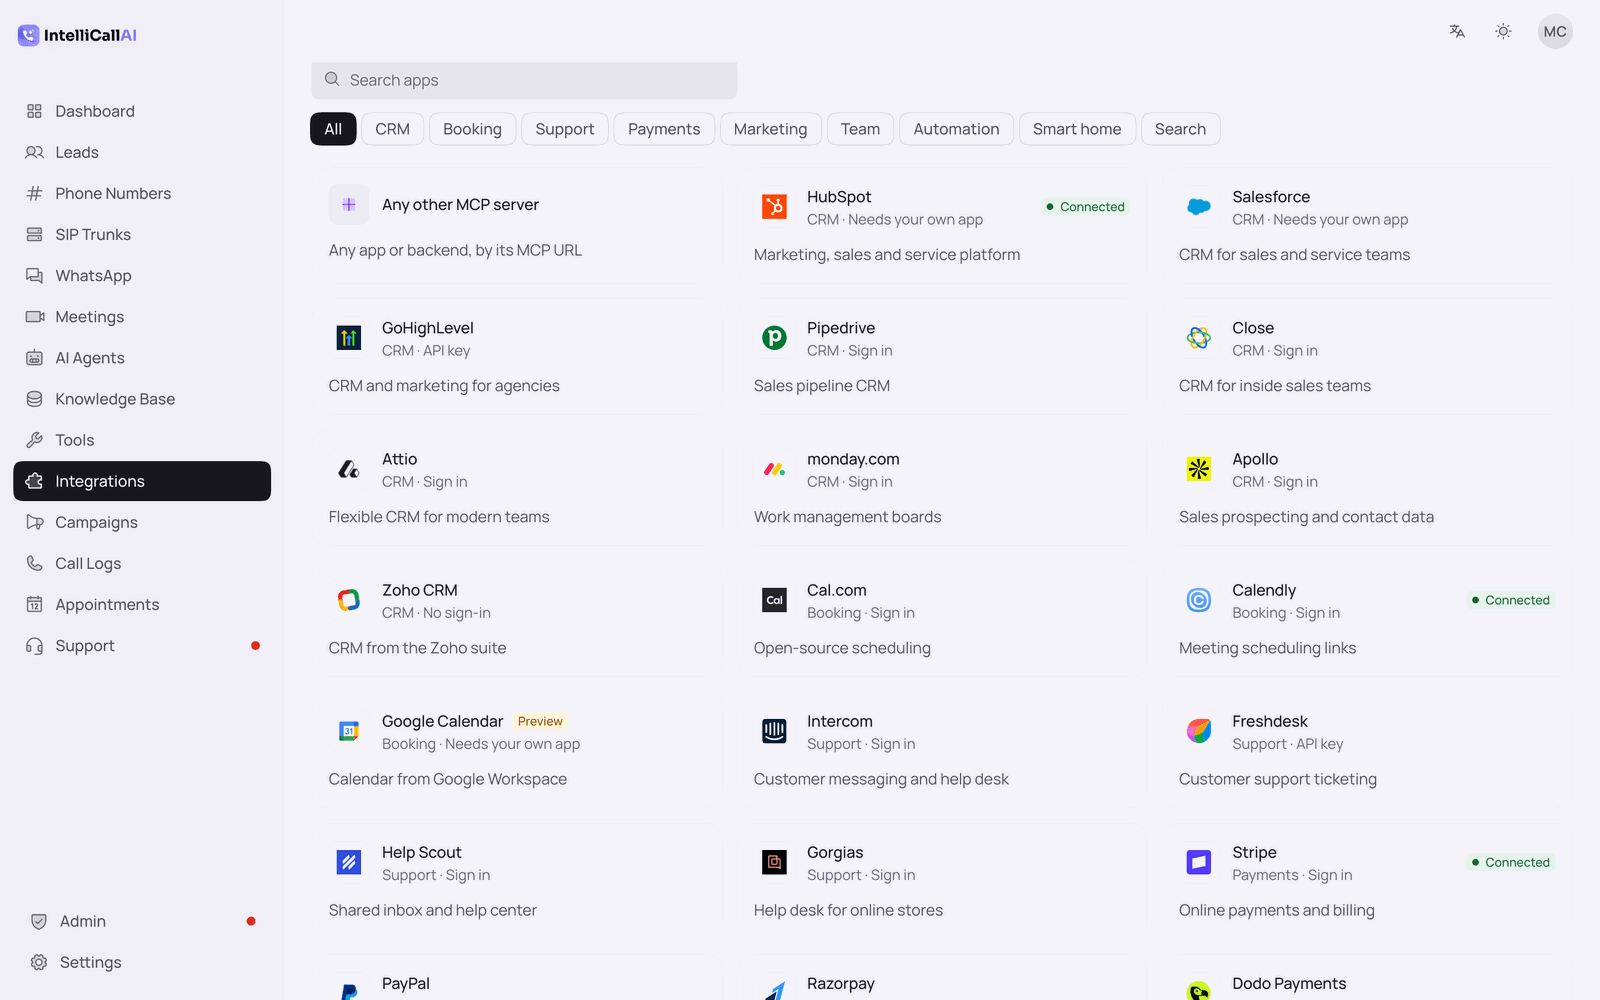
The directory covers CRMs (HubSpot, Salesforce, GoHighLevel, Pipedrive, Close, Attio, monday,
Apollo, Zoho), scheduling (Cal.com, Calendly, Google Calendar), help desks (Intercom, Freshdesk,
Help Scout, Gorgias), payments (Stripe, PayPal, Razorpay, Dodo Payments), and work tools
(Klaviyo, Slack, Notion, Linear, ClickUp, Airtable, Asana, Todoist, Zapier, Make, n8n, Home
Assistant, Exa). Each card says what the app's tools can do and notes any limits of that
vendor's server.
The Integrations page: your account apps, connected MCP servers and Meetings
1. Connect an app from the directory
Pick the app and press Connect. Depending on the app you will see one of:
Sign in (OAuth): you are sent to the app to approve access. Most servers
register IntelliCall automatically, so there is nothing to set up first. A few apps
(HubSpot, Salesforce, Google Calendar) do not allow that; their card lists the steps to
create your own app in the vendor's console, the redirect URL to add to
it, and fields for its client id and secret. It takes a few minutes, once.
API key or token: paste the key the card asks for (for example a
Freshdesk API key, or a GoHighLevel Private Integration Token and sub-account id). Keys
are encrypted and never shown again.
A URL that carries its key (Zoho): create the server in the vendor's MCP
console and paste its URL.
As soon as the connection works, the server's tool list is read. The tools a phone agent needs
most, or the ones the app marks read-only, are switched on for you; choose the rest on the
server's page.
The app directory with categories and connected apps
2. Choose the tools agents may use
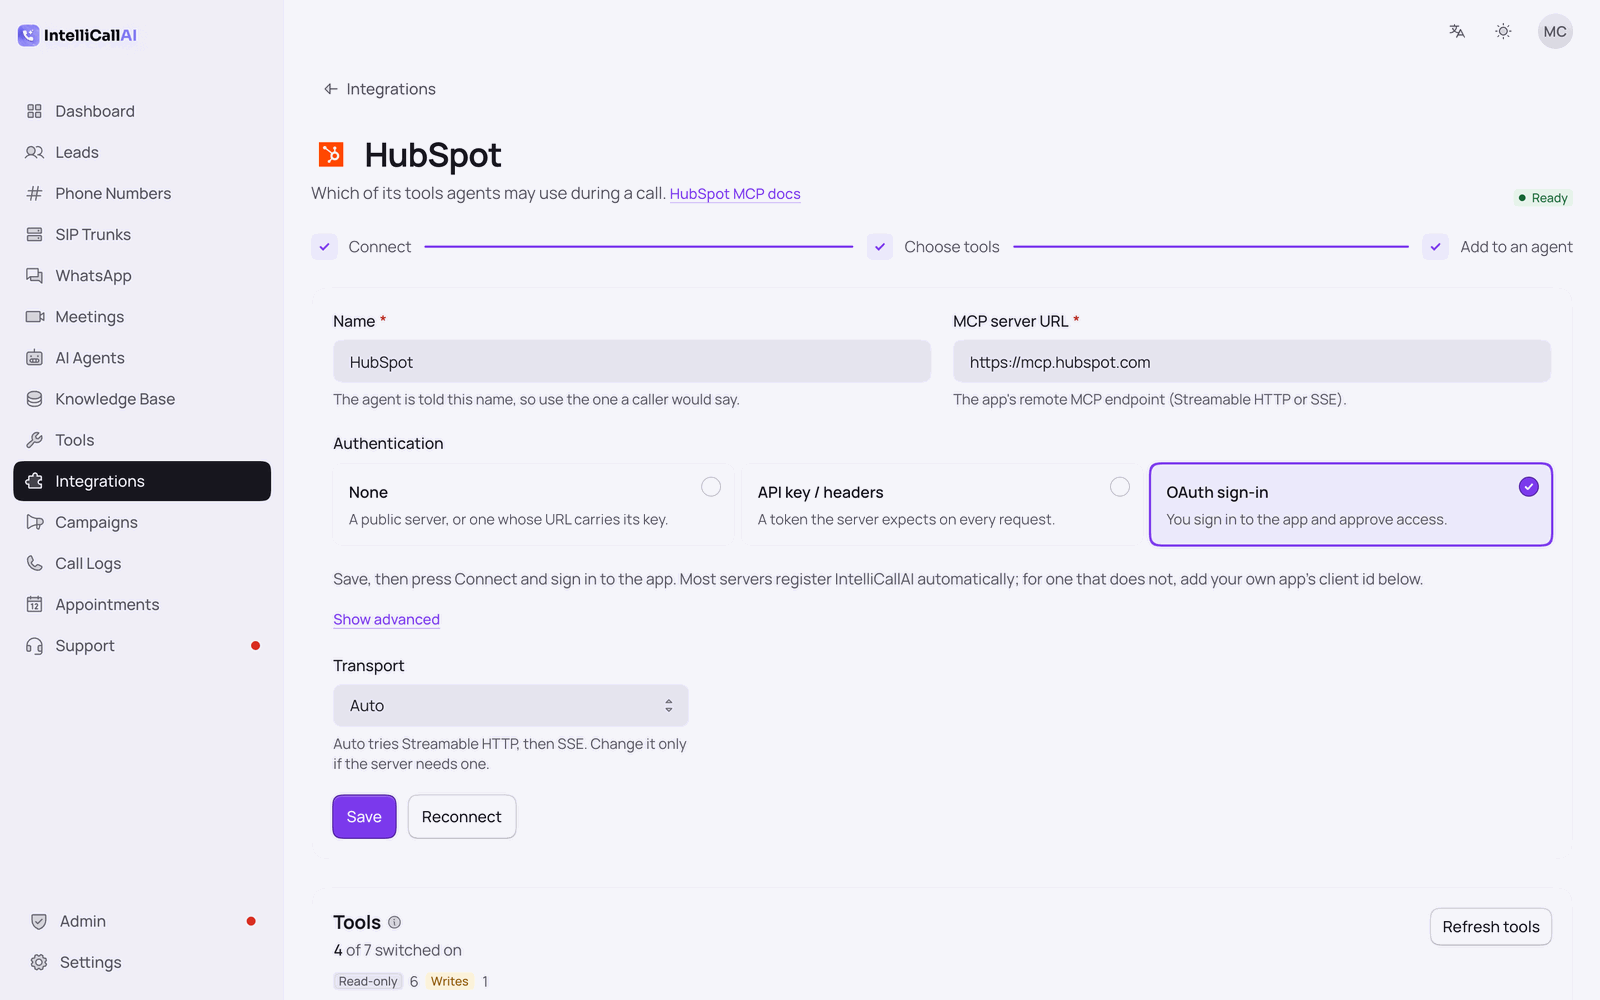
Each connected server has a page listing its tools with a switch. Only switched-on tools are
offered to agents, and before using a tool that changes data the agent asks the caller
to confirm. Agents only use servers whose status is Ready; a server that
shows Needs sign-in or an error is skipped until you reconnect it. Refresh
tools re-reads the list after the vendor changes it.
A connected HubSpot server with its tools
3. Attach the server to an agent
Open the agent, go to Capabilities → Connected apps and pick the server. The
agent is told the server's name, so name it the way a caller would say it
("our CRM", "the help desk"). Tool calls appear in the call's Details like
webhook tools.
4. Any other MCP server
Press Add a custom MCP server and paste the app's remote MCP endpoint
(Streamable HTTP or SSE; Auto tries both). Authentication can be none, headers (a
token on every request) or OAuth (save, press Connect, sign in; add your own
client id only for servers that do not register apps automatically). Your own backend can be
an MCP server too.
Server settings. MCP server URLs on your own network
are refused unless MCP_ALLOW_PRIVATE_URLS=true is set in
backend/.env. MCP_TOOL_TIMEOUT_MS (default 10000) bounds each
tool call so a slow vendor cannot stall the conversation. Admin → Plans limits
the number of connected apps per plan.
Meetings (Zoom, Google Meet, Microsoft Teams)
Since v13.0 an agent can join a video meeting as a named participant. It hears
the room, speaks only when someone says its name (or always, if you prefer), uses its normal
prompt, knowledge, tools and connected apps, and the meeting appears in Call
Logs with its transcript. Meetings count as calls in the user's plan,
and Meetings must be switched on in the plan under Admin → Plans.
Meetings run through Attendee,
an open-source meeting-bot service: Attendee puts a bot in the meeting and streams its audio to
IntelliCall over a WebSocket. Attendee's licence does not let IntelliCall run it for you, so
each user brings their own Attendee account, hosted at
app.attendee.dev (Attendee bills bot hours) or self-hosted.
Server requirements:BASE_URL in
backend/.env must be the backend's public https address. Attendee
connects to wss://your-api-domain/api/meetings/stream for audio and posts bot
status to https://your-api-domain/api/webhooks/attendee/…, so your proxy must
pass WebSocket upgrades and /api/webhooks/ to the backend (see the note under
Easy Install). A self-hosted Attendee on the same LAN needs
MCP_ALLOW_PRIVATE_URLS=true.
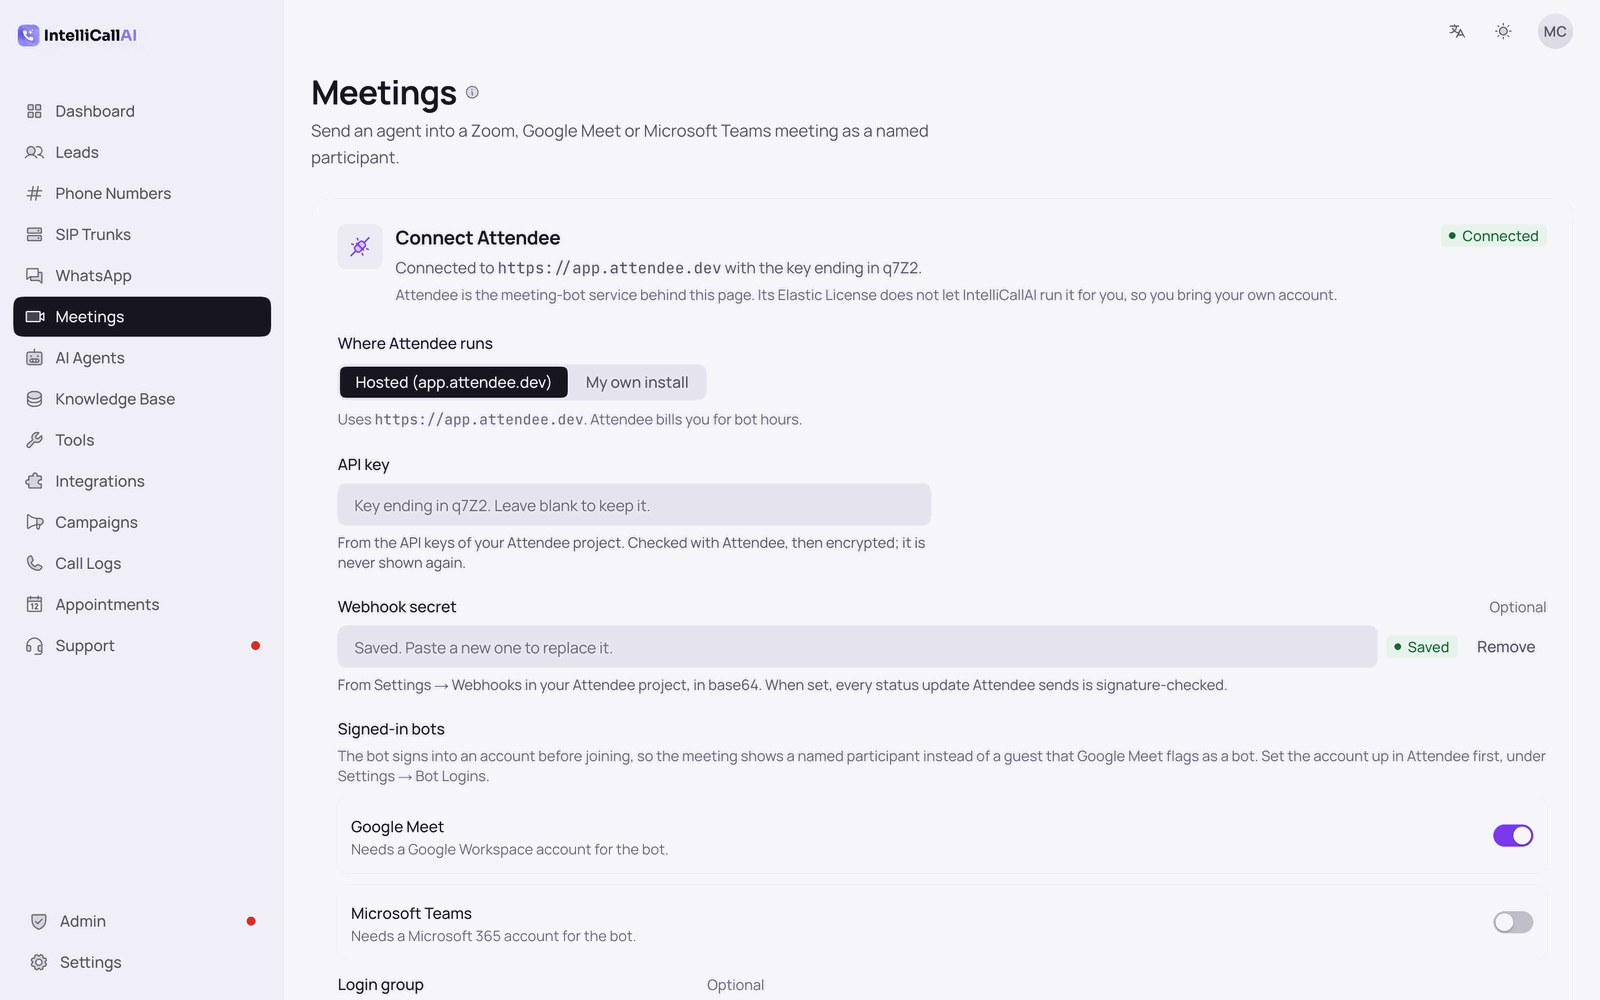
1. Connect Attendee
Sign up at app.attendee.dev (or run
your own install) and create an API key in your Attendee project.
In IntelliCall, open Meetings in the sidebar, choose
Hosted or enter your install's https address, paste the API key and
press Connect. The key is checked with Attendee, then encrypted; it is
never shown again.
Recommended: copy the webhook secret from Settings → Webhooks in
your Attendee project (as Attendee shows it, in base64) into the same form. With it set,
every status update Attendee sends is signature-checked. IntelliCall registers the webhook
itself for each meeting; there is nothing to add in Attendee.
Zoom: your Attendee project also needs a Zoom Meeting SDK app; follow
Attendee's Zoom setup guide.
Signed-in bots (optional, Google Meet and Teams): Google Meet flags a
guest bot and may keep it in the waiting room. Attendee can sign the bot into a Google
Workspace or Microsoft 365 account first, so the meeting shows a named participant. Set the
account up in Attendee under Settings → Bot Logins, then switch it on here and
enter the Bot Logins group name.
The Meetings page with Attendee connected
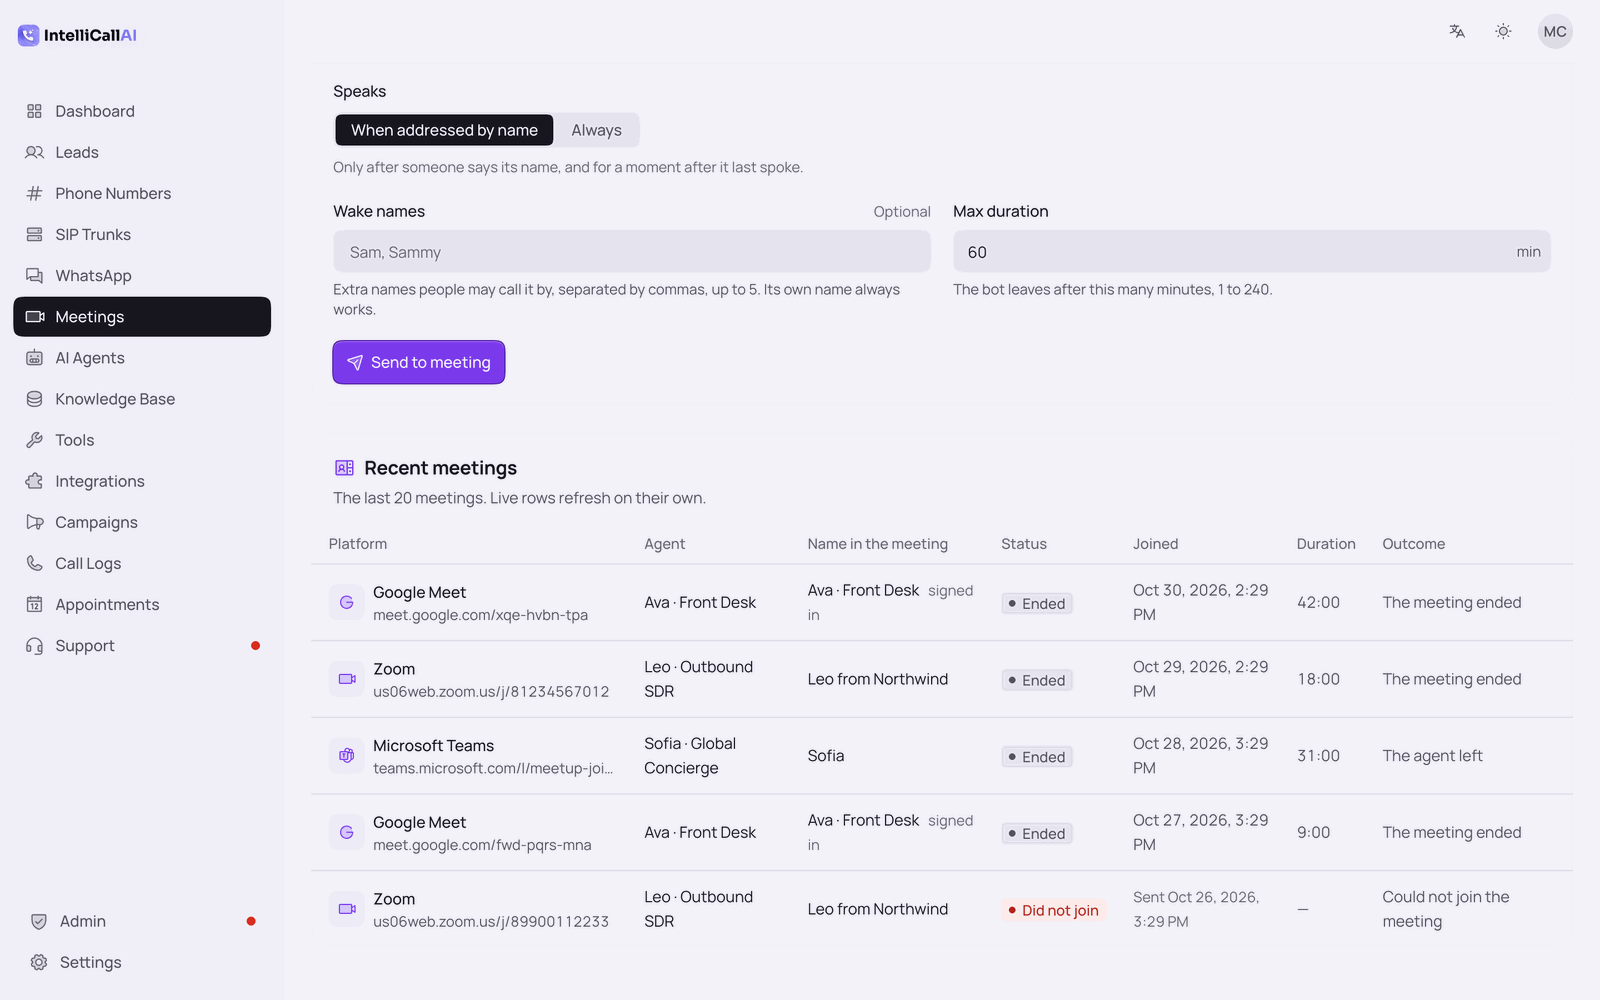
2. Send an agent into a meeting
On the Meetings page, pick the agent and paste the meeting
link (an https Zoom, Google Meet or Teams join link).
Set the name the participant list shows (defaults to the agent's name) and
how it speaks: Only when addressed (after someone says its name, and for
a moment after it last spoke) or Always (answers whatever it hears; best
one-to-one). Add extra wake names people may call it by.
Choose the maximum duration; the bot leaves after that many minutes, or
after MEETING_IDLE_SECONDS (default 600) of silence.
Press Send. The bot joins, waits to be admitted if the host uses a waiting
room, and the row on the page goes live. Leave calls it out early.
Afterwards the meeting is in Call Logs with provider Meeting, its transcript and duration like
any other call.
Sending an agent to a meeting, and the recent meetings list
3. Troubleshooting
"Attendee did not accept that API key": check the key in your Attendee
project and that the address is the one the key belongs to.
"That Attendee address cannot be used": it is a private address; set
MCP_ALLOW_PRIVATE_URLS=true or use the public https address of
your install.
The bot joins but stays silent: Attendee could not open the audio socket.
Check BASE_URL is public https and that the proxy passes the
WebSocket upgrade on /api/meetings/stream.
"<key> is not configured": the agent's voice engine needs an API key
that is missing in Settings. Meetings use the same engine keys as phone calls.
Google Meet keeps the bot in the waiting room or removes it: use a
signed-in bot (step 1.5).
"Meetings are not included in your plan": enable the feature for the plan
under Admin → Plans.
WhatsApp & Meta App
Since v13.0 your agents can answer WhatsApp. Connect a WhatsApp business number
on the WhatsApp page, pick the agent that answers it, and the agent replies to
chats and voice notes with its normal prompt, knowledge and tools, books appointments, and sends
approved templates, reply buttons and lists. Agents on phone calls can also send the
caller a WhatsApp message, template or scheduled reminder. Everything runs on the official
Meta WhatsApp Cloud API: Meta bills template messages to the card in your
WhatsApp Manager, and IntelliCall never sees that bill.
There are two ways to connect a number:
One click with Meta (Embedded Signup): the user presses
Connect with Meta, signs in to the Facebook account that manages their business in
a popup, and picks or adds a number. This needs the platform owner to
register one Meta app once, under Admin → Integrations → Meta (WhatsApp)
(section 1 below).
Manually with the user's own Meta app: the user pastes a token, the Phone
Number ID, the WhatsApp Business Account ID and the app secret from an app they manage.
Nothing is needed from the platform owner (section 2 below).
Before you start:BASE_URL in
backend/.env must be the backend's public https address, and
/api/webhooks/* must reach the backend through your proxy (see the note under
Easy Install). Meta refuses webhook URLs that are not
https. WhatsApp must also be switched on in the user's plan
(Admin → Plans).
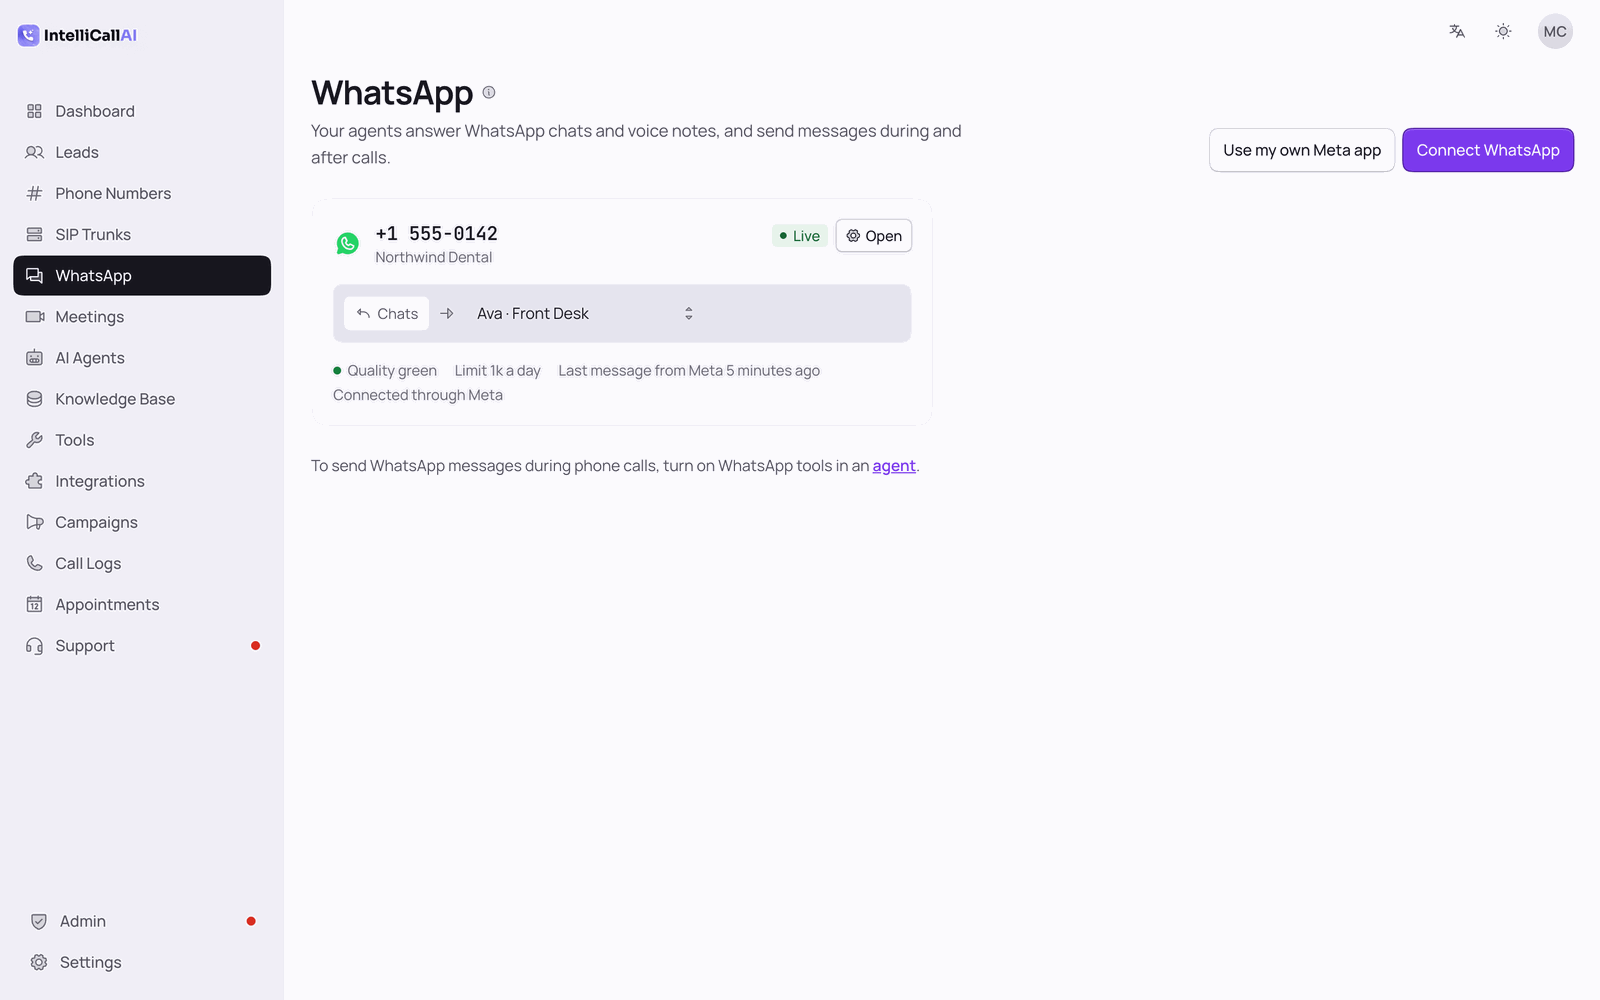
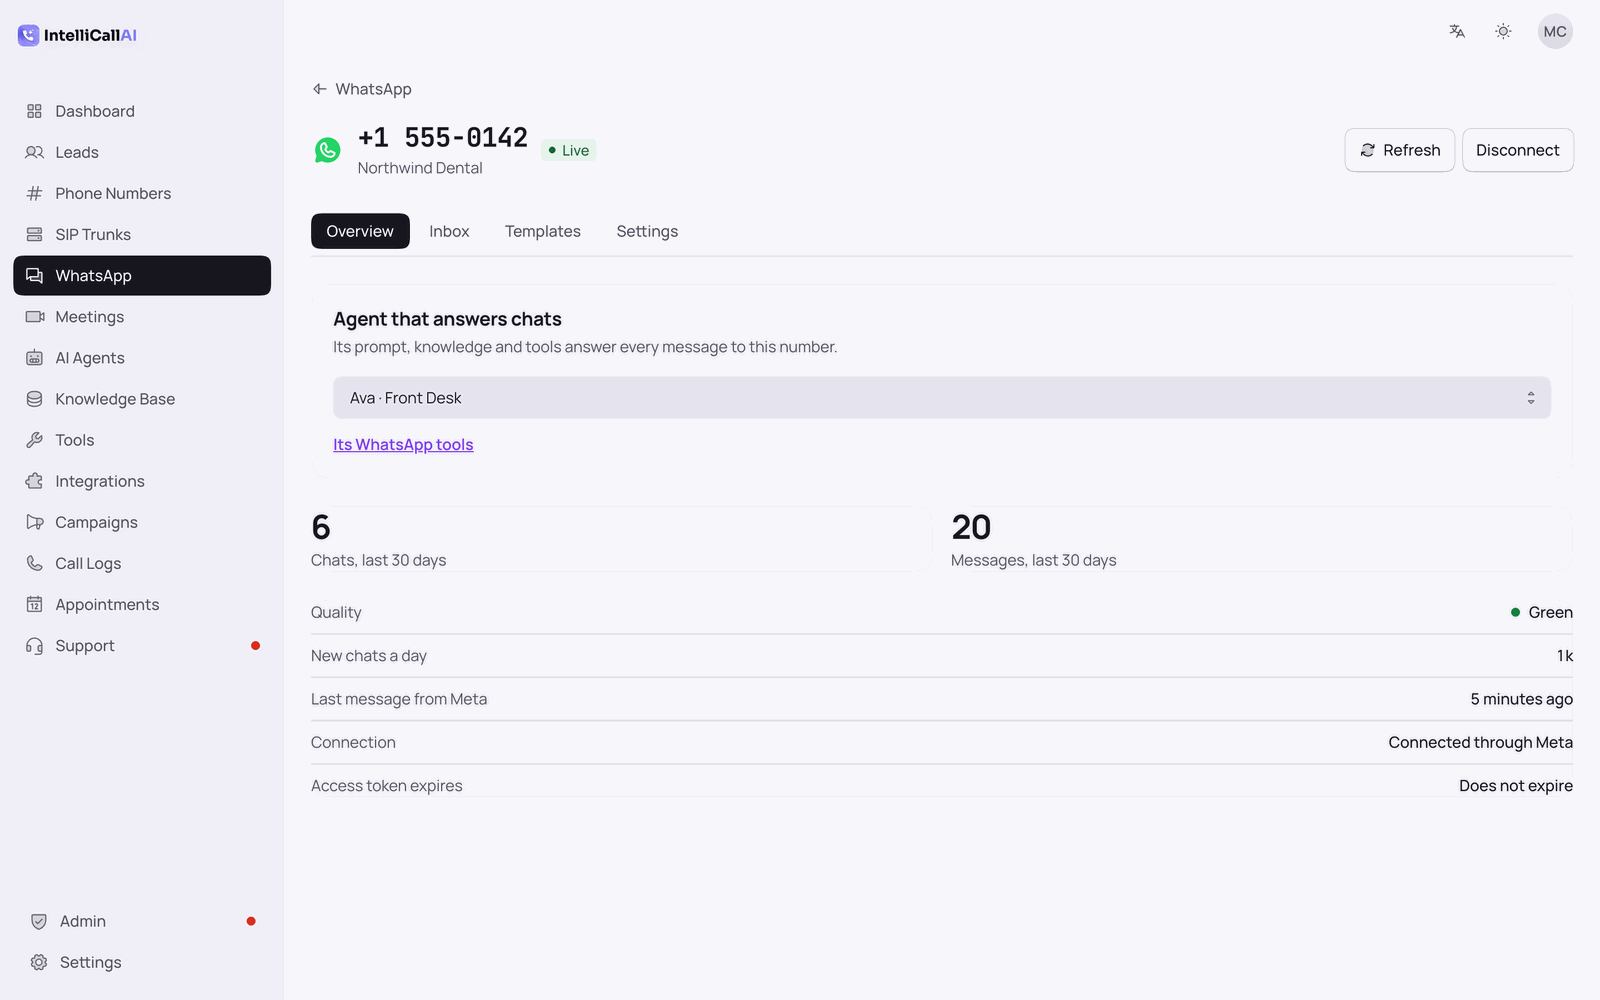
The WhatsApp page with a connected number and its answering agent
1. Platform owner: the Meta app for one-click connect (optional)
Skip this section if every user will connect with their own Meta app. Otherwise, do it once:
Go to developers.facebook.com/apps,
Create App, choose the Business type and add the
WhatsApp product. Meta's current rules require the app's business to be
verified and the app to go through Tech Provider onboarding before other
businesses can connect their numbers through it; follow the prompts on the WhatsApp product
page.
Open WhatsApp → Embedded Signup and create a configuration. Copy its
Config ID.
Open App settings → Basic and copy the App ID and
App Secret.
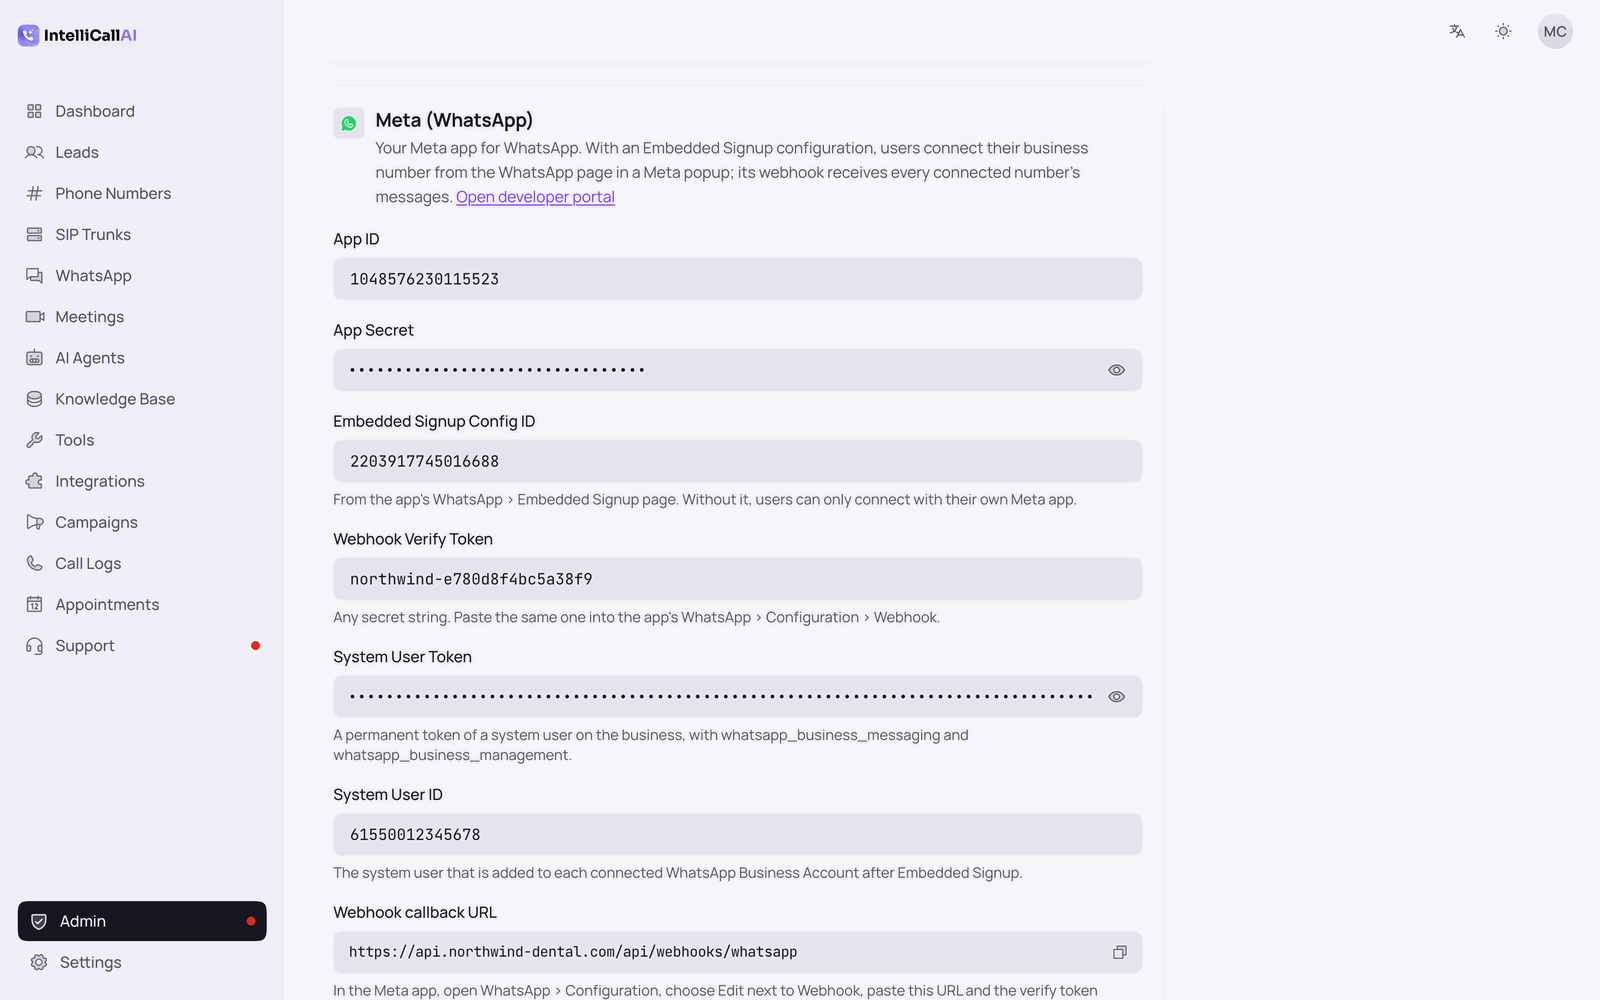
In IntelliCall, open Admin → Integrations → Meta (WhatsApp) and fill in
App ID, App Secret, Embedded Signup Config
ID, and a Webhook Verify Token of your choice (any secret
string). Save. The card now shows the Webhook callback URL, which is
https://your-api-domain/api/webhooks/whatsapp.
Back in the Meta app, open WhatsApp → Configuration, press
Edit next to Webhook, paste the callback URL and the same verify
token, then subscribe to the messages field. Meta calls the
URL once to verify the token; the save fails if the backend is not reachable over
https.
Recommended: in Meta Business Settings → Users → System Users, create a
system user with access to the app, generate a permanent token with
whatsapp_business_messaging and whatsapp_business_management, and
enter it with the system user's ID as System User Token and
System User ID. The business token Meta hands out at sign-up expires after
60 days; with a system user, IntelliCall adds it to each connected WhatsApp Business
Account so the number keeps working.
The same six values can be set in backend/.env as META_APP_ID,
META_APP_SECRET, META_ES_CONFIG_ID,
META_WEBHOOK_VERIFY_TOKEN, META_SYSTEM_USER_TOKEN and
META_SYSTEM_USER_ID. When both are set, the environment wins and the admin card
says so.
Admin, Integrations, Meta (WhatsApp) with the webhook callback URL
2. Connect a number (every user)
Open WhatsApp in the sidebar and press Connect a number.
With Meta (one click), offered when the platform owner completed section 1:
Choose A new number (one not used in WhatsApp yet, or one you can move
off the WhatsApp Business app; the agent answers every chat) or The number on my
WhatsApp Business app (you keep using the app on your phone; the agent answers
too, and steps back for a while whenever you reply yourself).
Meta opens in a popup. Sign in with the Facebook account that manages your business, pick
or create the WhatsApp Business Account and the phone number, and finish. Allow pop-ups
for the site if nothing opens.
The number appears as Connected. There is nothing to configure in Meta: messages
already arrive at the platform's webhook.
Manually, for a number already set up in a Meta app you manage:
In your Meta app, open WhatsApp → API Setup and copy the Phone
Number ID and the WhatsApp Business Account ID. Create a
permanent system user token with
whatsapp_business_messaging and
whatsapp_business_management (the temporary token on the API Setup page
expires after 24 hours). Copy the App Secret from
App settings → Basic; it is only used to check that messages really come
from Meta.
Paste the four values (and an optional name) into the manual form. IntelliCall checks the
token against the Graph API before saving, then shows a callback URL of the
form https://your-api-domain/api/webhooks/whatsapp/a/<id> and a
verify token. The verify token is shown once; connect the number
again to get a new one.
In your Meta app, open WhatsApp → Configuration, press
Edit next to Webhook, paste both values and subscribe to the
messages field.
The number's page shows the webhook state: Nothing has arrived from Meta yet until the
first delivery, then Meta is sending this number's messages here. Send the number a
WhatsApp message from your own phone to see the agent answer.
A connected number: answering agent, chats, quality and connection
3. Pick the agent and tune how it answers
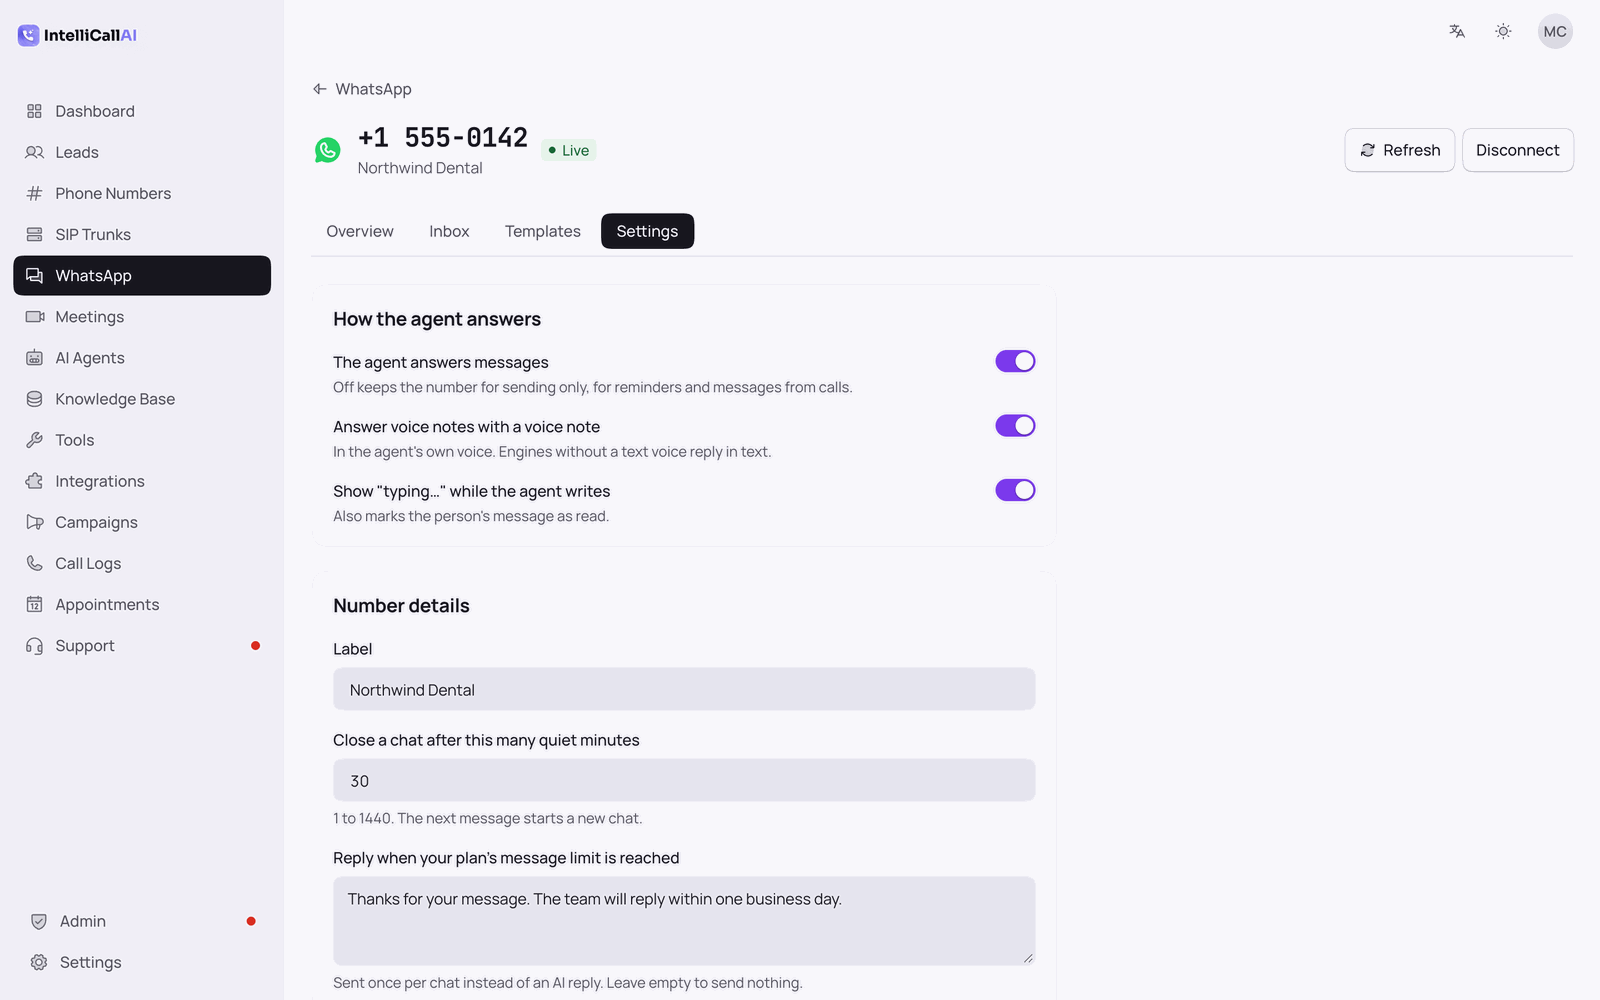
Answering agent: its prompt, knowledge base and tools answer every message
to this number. No agent keeps the chats without answering them.
Answers messages can be switched off to keep the number for sending only
(reminders and messages from calls).
Answer voice notes with a voice note, in the agent's own voice. Needs
ffmpeg on the server (see Requirements); engines
without a text voice, and servers without ffmpeg, reply in text.
Show "typing…" while the agent writes, which also marks the message as
read.
Close a chat after a number of quiet minutes (1 to 1440); the next message
starts a new chat.
Human pause: on a number shared with the WhatsApp Business app, how long
the agent waits after you reply yourself.
Reply when the plan's message limit is reached: one message sent per chat
instead of an AI reply.
How the agent answers: messages, voice notes, typing, quiet minutes
4. Templates
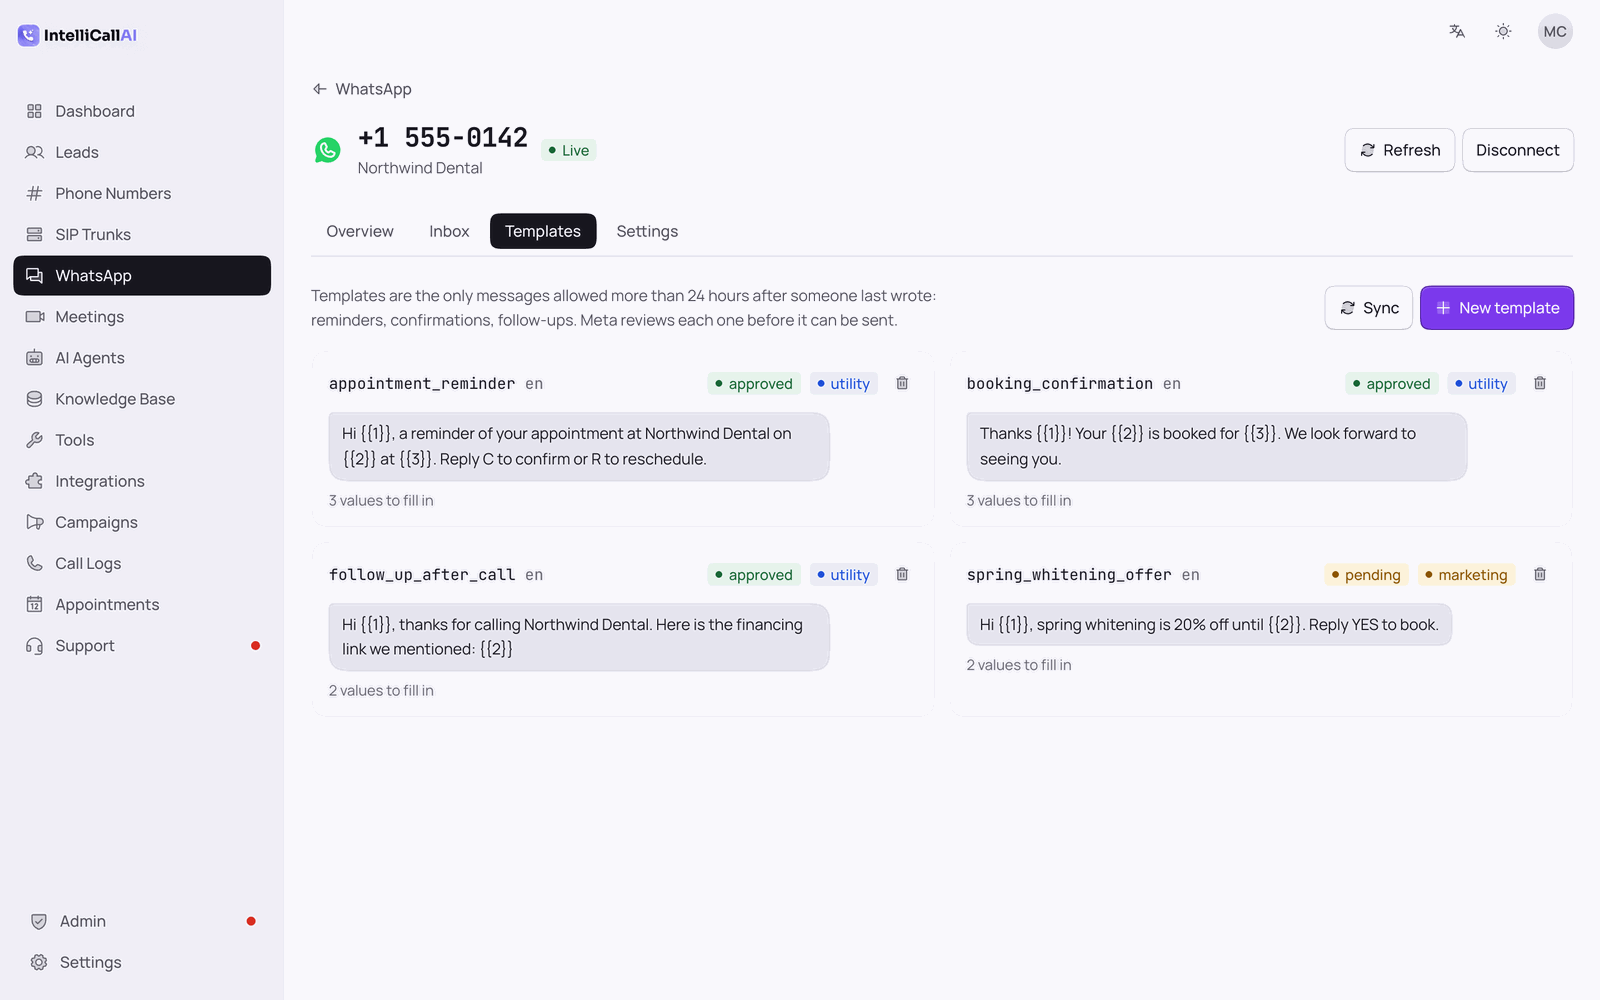
Meta only allows free-form messages within 24 hours of the person's last message. Anything later
(reminders, confirmations, follow-ups) must be an approved template. Write
templates on the number's page with New template: a lowercase name, a category
(Utility for confirmations and reminders, Marketing for offers, which cost
more), a language and a body with numbered placeholders such as {{1}}. The
template is submitted to Meta from IntelliCall and its status updates when you
Sync; Meta usually approves utility templates within minutes. Templates written
in WhatsApp Manager are picked up by the same sync.
Templates synced with Meta, approved and pending
5. What agents can send (the agent editor)
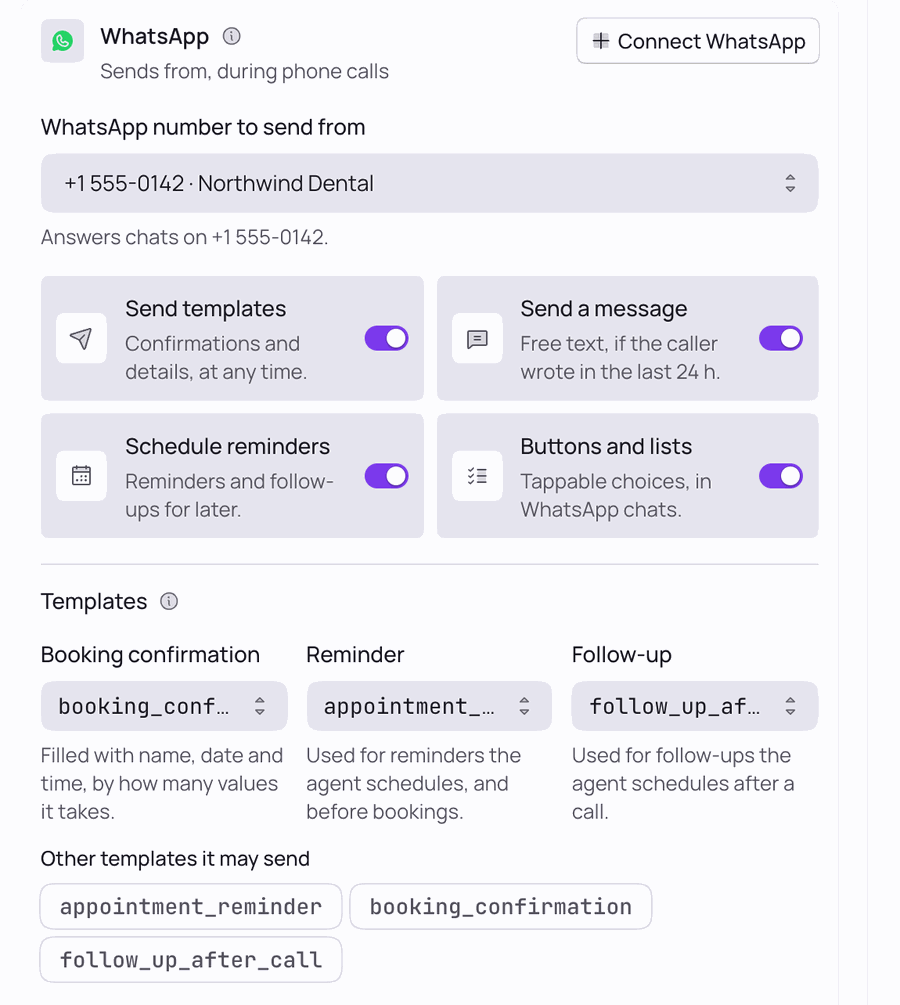
Open an agent, go to Capabilities and turn on the WhatsApp tools you want. The
agent only ever sends to the person it is talking to:
Templates: confirmations and details, at any time.
Messages: free text, if the person wrote in the last 24 hours.
Scheduled messages: reminders and follow-ups for later; they are listed on
the number's page and can be cancelled.
Interactive messages: tappable reply buttons and lists, in WhatsApp
chats.
Below the tools, assign a template to each purpose (booking confirmation,
reminder, follow-up) and choose whether bookings are confirmed over WhatsApp as soon as the
agent books, and how many minutes before a booking the reminder goes out. Max
sends caps what the agent may send on one call or chat turn, and marketing
templates are off by default because Meta limits marketing messages and restricts low-quality
numbers.
WhatsApp tools and templates in the agent editor
6. Inbox and limits
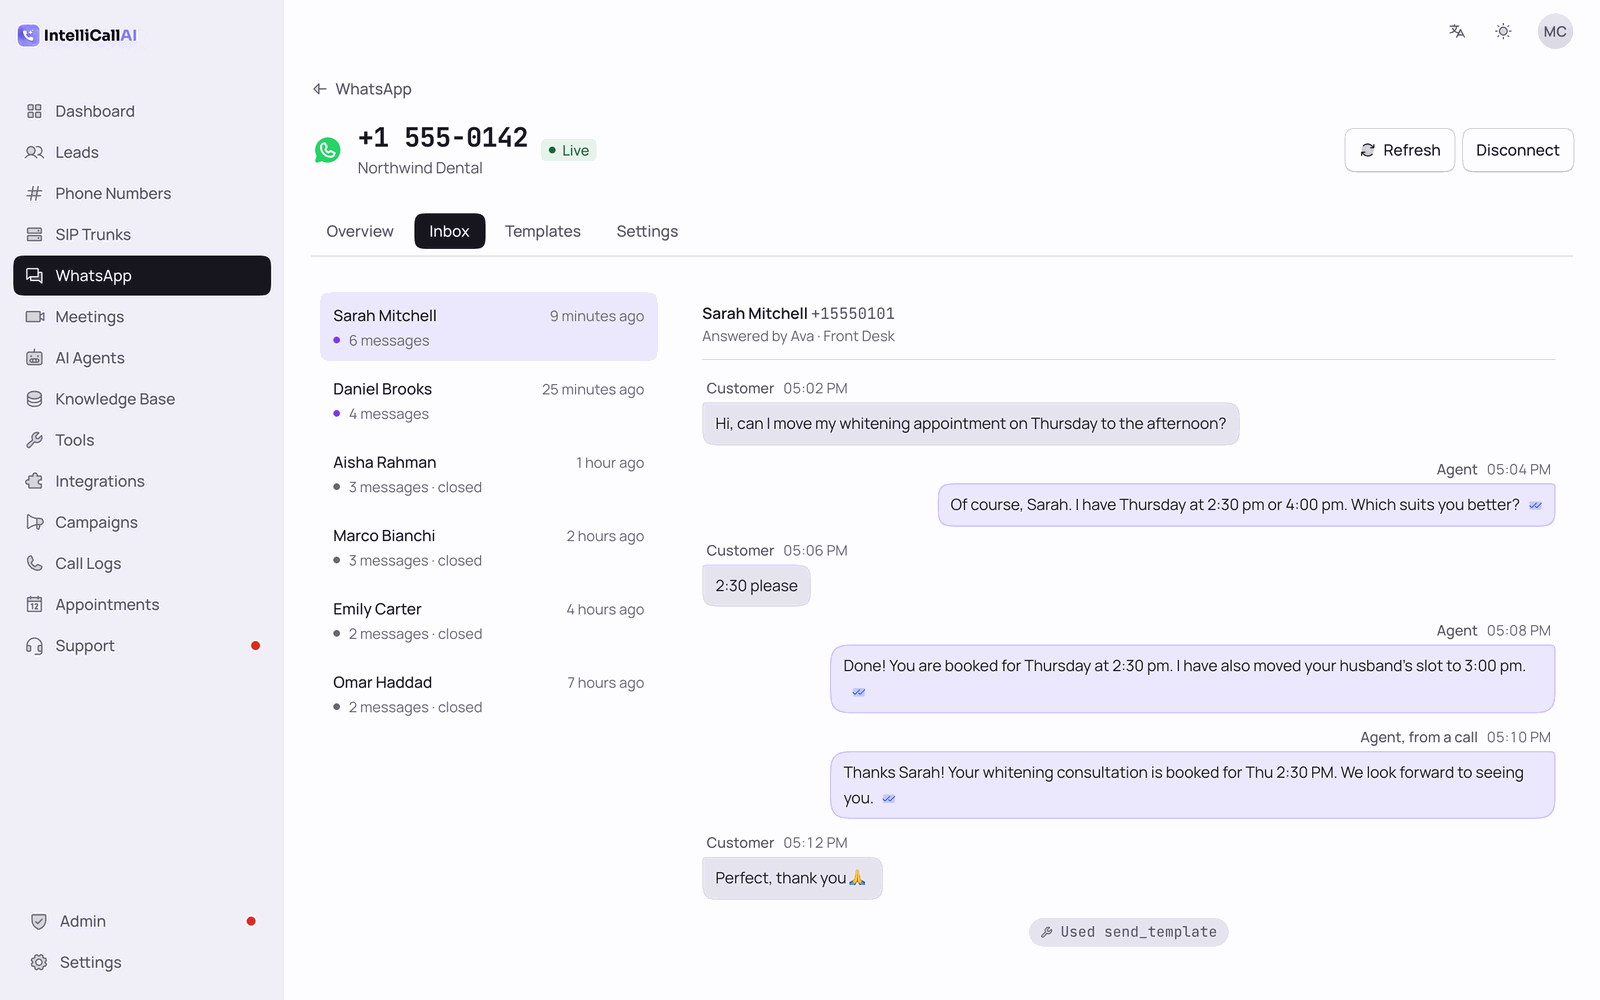
Every chat appears under the number with its messages, media and the agent's replies. Server-wide
rate caps (sends per number per minute, sends per person per hour, agent replies per chat per
day) are set with the WHATSAPP_* variables in Manual
Setup, and Admin → Plans limits the number of WhatsApp numbers and messages per
month on each plan. Disconnecting a number stops the agents and deletes its chats from
IntelliCall; the number stays yours in WhatsApp Manager.
The inbox: a chat the agent answered, with a booking confirmation template
7. Owner alerts and the older reminders card
The WhatsApp card that existed before v13.0 is now Integrations → WhatsApp
alerts. It still sends you real-time alerts (new lead, qualified lead,
completed call, campaign finished, appointment booked or cancelled, caller transferred) and
sends clients appointment reminders with a pre-approved template, exactly as before:
paste an access token and Phone Number ID, enter your own WhatsApp number as the recipient,
open the 24-hour window by messaging the business number from your phone, and set the reminder
template name, language and lead time on the card. A number connected there also appears on
the WhatsApp page marked Reconnect: add its app secret and WhatsApp Business
Account ID to let an agent answer its chats as well.
8. Troubleshooting
Meta's webhook save fails ("The callback URL or verify token couldn't be
validated"): the backend is not reachable at the callback URL over
https, your proxy is not forwarding /api/webhooks/, or the verify
token differs. Open the callback URL in a browser: a 403 means it reached
IntelliCall.
"Nothing has arrived from Meta yet" after messaging the number: the
messages field is not subscribed in WhatsApp → Configuration, or
the webhook points at another server.
"Meta's last delivery failed": the app secret saved for the number does
not match the Meta app, so the signature check fails. Reconnect with the right secret.
The popup never opens or "Meta's sign-up could not load": allow pop-ups
for the site and make sure nothing blocks facebook.com.
"WhatsApp is not included in your plan": switch WhatsApp on for the plan
under Admin → Plans.
Voice notes are answered in text: install ffmpeg or set
FFMPEG_PATH, and check the agent's engine has a text voice.
Template is "pending" or rejected: Meta reviews every template; sync the
number's page for the latest status and read Meta's reason in WhatsApp Manager.
Access token expired: a token from the API Setup page lasts 24 hours and a
business token 60 days. Use a system user token (section 1 or 2).
Google OAuth Setup
Follow these steps to create OAuth 2.0 credentials and retrieve your Client ID and
Client Secret for IntelliCall AI (e.g. for the Web Installer or manual setup).
Open the project picker (top bar, next to “Google Cloud”).
Click New Project.
Give the project a name and select an organization (if applicable).
Click Create.
Make sure the newly created project is selected in the project picker at the top.
Search for OAuth and select OAuth consent screen.
Click Get started and fill in the required details (app name, user support
email, developer contact, etc.). Add email and profile scopes when
prompted.
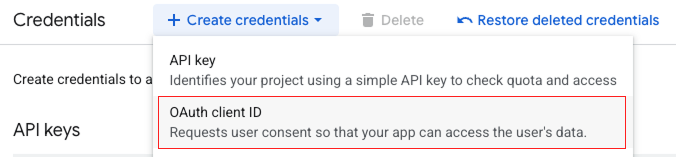
After filling the details, go to Credentials and click Create
Credentials → OAuth client ID (or use the Create OAuth
Client option in your flow).
Select Application type as Web application.
Under Authorized redirect URIs, add:
https://<YOUR BACKEND DOMAIN>/api/auth/google/callback - replace
<YOUR BACKEND DOMAIN> with your actual backend domain (e.g.
https://api.yourdomain.com/api/auth/google/callback).
For local testing you can also add:
http://localhost:5001/api/auth/google/callback.
Then click Create.
From the Credentials (Clients) tab, click on the OAuth client you just created.
Under Additional Information you will see the Client ID and
Client Secret. Copy these into your backend .env (or into the Web
Installer’s Configure Deployment step) as GOOGLE_CLIENT_ID and
GOOGLE_CLIENT_SECRET.
Google Sheets & Lead Sync Setup
To enable the powerful Google Sheets synchronization for lead management, you must enable additional
APIs and configure a second redirect URI in your Google Cloud Project.
Google Drive API (Needed to list your spreadsheets)
Google Sheets API (Needed to read and sync data)
2. Configure Authorized Redirect URI
The lead sync feature uses its own secure callback to handle persistent access to your spreadsheets.
In the Google Cloud Console, go to APIs & Services > Credentials.
Click on the Edit icon for the same OAuth 2.0 Client ID you created for login.
Under Authorized redirect URIs, add this second URL:
[BASE_URL]/api/auth/google-sheets/callback
Save your changes.
Tip: Replace [BASE_URL] with your actual
public URL (e.g., https://yourdomain.com or your current ngrok URL).
If you are testing locally, it would be
http://localhost:5001/api/auth/google-sheets/callback.
3. Connect Your Google Account
In the IntelliCall AI dashboard, open Integrations in the sidebar.
Find the Google Sheets card and click Connect Google
Sheets.
Sign in with the Google account that owns the spreadsheet you want to import from and
approve the requested scopes.
You will be redirected back to the Integrations tab with a green Connected
badge.
Click Manage Sync on the same card to pick a spreadsheet, choose a sheet
tab, and map your columns (Name, Phone, plus optional custom fields). Save when done.
The card then shows the active sheet and last-sync timestamp. The Leads page will
auto-pull new rows the next time you open it.
Google Calendar Sync Setup
The Google Calendar integration automatically mirrors every appointment booked in IntelliCall AI
(whether created manually, by the AI agent during a call, or via the API) to the connected user's
Google Calendar. Updates and cancellations sync in real time.
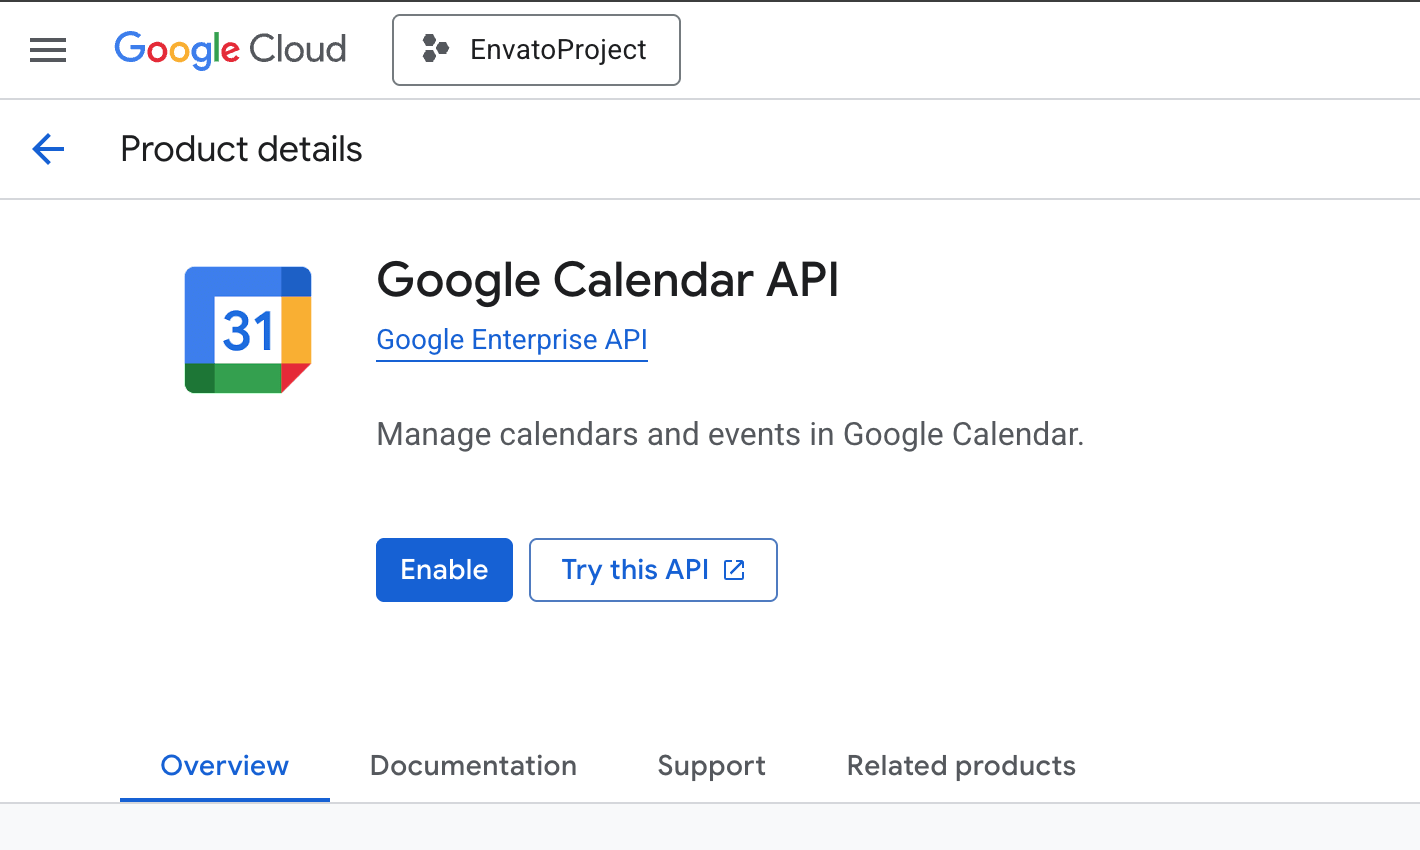
1. Enable the Calendar API
Google Calendar API
Go to the Google API
Library in the same Google Cloud project you used for Google OAuth.
Search for and Enable the following API:
Google Calendar API (Needed to create, update, and delete events on
the user's calendar)
2. Configure Authorized Redirect URI
The Calendar sync feature uses its own dedicated OAuth callback so it can request the
calendar.events scope without affecting the login or Sheets flows.
In the Google Cloud Console, go to APIs & Services > Credentials.
Click the Edit icon on the same OAuth 2.0 Client ID you created for login and
Sheets.
Under Authorized redirect URIs, add this third URL:
[BASE_URL]/api/auth/google-calendar/callback
Save your changes.
Tip: Replace [BASE_URL] with your actual
public backend URL (e.g., https://api.yourdomain.com). For local development it
would be http://localhost:5001/api/auth/google-calendar/callback. No new
environment variables are needed — the integration reuses the existing
GOOGLE_CLIENT_ID and GOOGLE_CLIENT_SECRET.
3. Connect a User Account
In the IntelliCall AI dashboard, open Integrations in the sidebar.
Find the Google Calendar card and click Connect Google
Calendar.
Sign in with the Google account whose calendar should receive appointment events and grant
the requested permission.
You will be redirected back to the Integrations tab. The card will show a green
Connected badge and the email of the linked Google account.
Click Disconnect from the same card at any time to stop syncing.
Disconnecting clears stored tokens but does not remove events already created in
Google Calendar.
4. What Gets Synced
Target calendar: the user's primary calendar.
Event title:Call with {Client Name} ({App Name}) — falls back to
the phone number if no name is on the lead. {App Name} is pulled from
Admin Settings → Branding → App Name, so any white-label rename you've
configured shows up automatically.
Event description: client phone number, appointment notes, and a
"Booked via {App Name}" footer (same dynamic branding).
Start & end: the appointment's dateTime and
duration, expressed in the user's configured timezone.
Attendees: none — events are created on the user's calendar only. The client
does not receive a Google invite.
Editing in IntelliCall AI: using the Edit button on the
Appointments page (date, duration, name, phone, notes) rewrites the same Google event in
place — no duplicates are created.
Cancelling: marking an appointment as canceled (or deleting it)
permanently removes the linked Google Calendar event.
5. Sync Behavior & Failure Handling
Sync is one-way (IntelliCall AI → Google). Changes made directly in Google
Calendar are not pushed back.
Sync runs asynchronously in the background after each appointment create / update / delete. A
failure to reach the Google Calendar API never blocks the appointment operation itself —
errors are logged to the backend console with the prefix [GoogleCalendar].
If a user has not connected their Google account, all sync calls are silent no-ops.
HubSpot CRM Integration
Connect each user's HubSpot account so new leads created in IntelliCall flow into HubSpot as
contacts automatically — matched by phone number, so existing contacts are updated in place
rather than duplicated.
Each user connects their own HubSpot account with a service key they create
inside that account. The key is stored on their own settings row, so tenants stay fully
isolated. There is nothing to configure in Admin → Integrations —
no developer account, no app to register, and no callback URL to keep in sync.
Why service keys: HubSpot stopped allowing new
public apps on 23 June 2026, so the old "register a developer app and
click Connect" route can no longer be set up on a fresh install. Service keys are
HubSpot's supported replacement for data integrations like this one. If you already
connected through the old OAuth app before that date, it keeps working untouched —
see Legacy: OAuth app at the end of this section.
1. Create a Service Key in HubSpot
Sign in to the HubSpot account you want IntelliCall to write contacts into.
Open Settings (the gear icon) → Integrations →
Service keys. You can also reach it from the main sidebar under
Development → Keys → Service keys.
Click Create service key and give it a name you'll recognise later,
for example IntelliCall AI.
Add these exact two scopes:
crm.objects.contacts.read — labeled something like
"View contact properties and other details"
crm.objects.contacts.write — labeled something like
"Change contact properties and other details"
Don't pickcrm.schemas.contacts.read or
crm.objects.contacts.highly_sensitive.v2.read — those are different scopes
and the key will not be able to sync leads.
Save the key and copy it. It looks like
pat-na1-xxxxxxxx-xxxx-xxxx-xxxx-xxxxxxxxxxxx (the region segment differs by
account). Copy the whole string.
Tip: You can only grant scopes you hold yourself, so
create the key from an account with CRM access. If the key is ever exposed, HubSpot lets you
rotate it in place — paste the new value into IntelliCall afterwards and
nothing else needs rebuilding.
2. Paste the Key into IntelliCall
In the IntelliCall AI dashboard, open Integrations in the sidebar.
On the HubSpot CRM card, paste the key into
HubSpot service key and click Connect.
The key is checked immediately. On success the card shows a Connected
badge, the HubSpot account's domain, and the last four characters of the key.
The Sync new leads to HubSpot toggle controls whether new leads are pushed
to HubSpot. When on, every new lead becomes a HubSpot contact (matched on phone number;
existing contacts are updated, never duplicated). Flipping it off pauses syncing without
disconnecting the account — the key remains stored.
Use Replace key after rotating in HubSpot, or Disconnect
to clear the stored key. Data already pushed to HubSpot remains.
If the key is rejected, the error names the cause:
"That does not look like a HubSpot service key" — the value doesn't start with
pat-. You may have copied an app's Client ID by mistake.
"HubSpot rejected this service key" — the key is wrong, truncated, or was deleted
in HubSpot. Copy it again in full.
"…is missing required scope(s)" — the key exists but wasn't granted one of the two
contact scopes. Edit the key in HubSpot, add the named scope, and paste it again.
3. What Gets Synced
Contacts: upserted by phone. The contact's
firstname and lastname come from splitting the IntelliCall lead's
name on the first space; email is taken from a Lead custom field
named email (case-insensitive) if present.
Sync behavior: fire-and-forget. Failures are logged with the prefix
[HubSpot] and never block the underlying lead-create operation. Leads with no
phone number are skipped, so no identity-less contacts are created.
Note: Call logging (engagements on the contact's
timeline) is not part of this integration. HubSpot's call/engagement scopes are gated to
paid Sales Hub tiers and may not appear in developer test accounts, so the integration
focuses on contact sync only.
4. Legacy: OAuth App (existing installs only)
Installs that registered a HubSpot public app before 23 June 2026 can keep using
it — existing connections are untouched by the upgrade and there is nothing to redo. This route
cannot be set up on a new install, because HubSpot no longer issues public apps.
In Admin → Integrations, the HubSpot CRM card holds the
app's Client ID, Client Secret and an optional
Callback URL. The legacy HUBSPOT_CLIENT_ID /
HUBSPOT_CLIENT_SECRET / HUBSPOT_CALLBACK_URL environment
variables still work as a fallback when those fields are empty.
When credentials are present, a secondary Connect HubSpot button appears
beneath the service-key form in Integrations.
The app's Redirect URL must exactly match
[BASE_URL]/api/auth/hubspot/callback — for example
https://api.yourdomain.com/api/auth/hubspot/callback. HubSpot requires HTTPS
for every host except http://localhost.
Its Required scopes must be exactly oauth,
crm.objects.contacts.read and crm.objects.contacts.write.
Access tokens on this path auto-refresh, and refreshed tokens are persisted back to the
Settings document. If you ever disconnect a legacy OAuth connection, reconnecting
is only possible with a service key.
Slack Integration
Send real-time notifications into a Slack channel — every new lead, qualified lead, completed
call, booked appointment, and more. Each user picks one channel per workspace during
the OAuth flow; you can fine-tune which events post via toggles.
The integration uses Slack's Incoming Webhooks — a simple one-URL-per-channel
delivery mechanism. There are no token refreshes, no rate-limit gymnastics, and no extra API
calls beyond posting the message.
Under Scopes → Bot Token Scopes, the
incoming-webhook scope should already be added by enabling Incoming Webhooks
in step 2. If it is missing, click Add an OAuth Scope and add it manually.
No other scopes are needed.
4. Copy Credentials
From the sidebar, open Settings → Basic Information.
Scroll to App Credentials. Copy the Client ID and
Client Secret.
5. Save the Credentials in Admin → Integrations
OAuth credentials are managed inside the dashboard — no .env editing or backend
restart required.
Log in as an administrator and open Admin → Integrations.
On the Slack card, paste:
Client ID — from the Slack app's Basic Information page
Client Secret — from the same Basic Information page (the Show
toggle reveals the value)
Callback URL (optional) — leave blank to auto-detect from the
incoming request, or paste an explicit URL when running behind a proxy. Must
exactly match a Redirect URL configured in the Slack app.
Click Save Slack.
Important: Until both Client ID and Client Secret are
filled in, the user-facing Slack card shows an "integration not configured" notice and the
Add to Slack button is disabled. The platform also falls back to the
legacy SLACK_CLIENT_ID / SLACK_CLIENT_SECRET /
SLACK_CALLBACK_URL environment variables when the admin fields are empty.
6. Connect a User's Workspace
In the IntelliCall AI dashboard, open Integrations in the sidebar.
Find the Slack card and click Add to Slack.
Slack asks which workspace to install into, then which channel to post messages to
(private channels are supported). Pick one and click Allow.
You will be redirected back to the Integrations tab with a green
Connected badge and the chosen channel name shown
(e.g. #leads).
Click Send test on the card to verify wiring — a sample
"New lead created" message lands in the channel within a second.
7. Per-Event Toggles
Below the channel info, each notifiable event has its own toggle:
Lead created — new lead added manually, via bulk import, or campaign
Lead qualified — AI marks a lead as qualified after analysis
Call completed — call finishes with duration, status, and recording link
Inbound call / Outbound call
Campaign completed — all calls in a campaign finish
Appointment booked / Appointment canceled
Toggles save instantly when flipped. To change channels or reinstall, click Disconnect
and run the OAuth flow again.
8. Architecture & Reliability
Delivery: Slack notifications are fan-out from the existing
WebhookService.trigger hub — every event that fires a user webhook also fires
a Slack message (when enabled).
Failure handling: fire-and-forget POST to the channel webhook URL.
Failures log with the prefix [Slack] and never block lead/call/appointment
operations.
No token refresh: Slack's incoming webhook URLs do not expire. The user
only re-authenticates when they want to change channels or revoke access.
Tenant isolation: each user has their own webhook URL stored on their own
Settings row. User A's events never reach User B's Slack.
n8n Integration
n8n is a free, self-hostable workflow automation tool (n8n.io) with nodes for 400+ apps. The integration works in both
directions:
IntelliCall → n8n (triggers): every platform event streams into your
workflow — lead created, lead qualified, call completed, inbound / outbound call, campaign
completed, appointment booked / canceled, each with its own toggle.
n8n → IntelliCall (actions): workflows call the REST API with a
personal API key — create leads, start campaigns, book
appointments, or make the AI dial a number instantly.
Like WhatsApp, this is fully per-user — no platform-level configuration, nothing in
Admin → Integrations.
1. Connect Your Workflow
In n8n, create a workflow that starts with a Webhook node
(method POST) — or import one of the bundled templates below, which already
include it.
Copy the node's Production URL and activate the workflow
(the production URL returns 404 until the workflow is active). While building, you can use
the Test URL with "Listen for test event" instead.
In IntelliCall, open Integrations → n8n, paste the URL,
and click Connect n8n.
Click Send test — a sample event appears in your n8n executions within a
second.
Filter by {{ $json.body.event }} in an IF node to route different events to
different branches. Per-event toggles on the card control what gets delivered at the source.
2. Bundled Workflow Templates
The n8n card offers three ready-made workflows (download → n8n → Workflow menu → Import
from File; each contains a sticky note with its own setup steps):
Instant call on form submit — a form / app POSTs
{ "phone", "name" } to an n8n webhook, and the AI calls the prospect within
seconds via POST /api/calls/dial. Requires an API key and an agent ID.
Call log to Google Sheets — every completed call appends a row (timestamp,
numbers, duration, status) to a spreadsheet.
Qualified lead to CRM + notify — when the AI qualifies a lead, push it to
your CRM and alert the team; swap the placeholder nodes for your CRM / Slack / Gmail nodes.
3. Architecture & Reliability
Delivery: fan-out from the same webhook hub as Slack and WhatsApp — every
event source is covered automatically, with fire-and-forget delivery that never blocks
platform operations. Failures log with the [n8n] prefix.
Unsigned payloads: n8n webhook URLs are unguessable, so deliveries are not
HMAC-signed. If you need signed delivery, use the generic Webhooks tab,
which signs with X-IntelliCall-Signature.
Tenant isolation: each user's webhook URL and event toggles live on their
own settings row.
4. Troubleshooting
Test returns "n8n returned 404" — the workflow isn't active (production
URL), or you didn't click "Listen for test event" (test URL).
Events stop after testing in the n8n editor — test URLs only listen once;
switch to the Production URL and activate the workflow.
Self-hosted n8n behind a firewall — the IntelliCall backend must be able to
reach the n8n URL over HTTP(S).
API Access (Personal API Keys & REST API)
Every user can generate a personal API key to call the IntelliCall REST API from
n8n, Zapier, or custom scripts — create leads, start campaigns, book appointments, pull call
intelligence, or trigger instant AI calls.
1. Generate a Key
Open Integrations → API Access and click
Generate API key.
Copy the key immediately — it is shown once. Only a SHA-256 hash is stored
on the server; if you lose the key, regenerate it.
The card shows the key prefix, creation date, and when it was last used.
Regenerate replaces the key (the old one stops working instantly);
Revoke disables API access entirely.
2. Authenticate Requests
Send the key in an X-API-Key header with any API request:
API keys respect the same rules as dashboard sessions: deactivated accounts are rejected, plan
expiry applies, and rate-limited resources (like monthly calls) count exactly the same.
3. Built-in API Reference
The API Access card includes an expandable API Reference
documenting the automation endpoints with parameters and copy-ready curl examples — including
your own key once generated. Highlights:
POST /api/calls/dial — make the AI call a number right now (no
campaign). Auto-creates the lead if needed (tagged api); counts toward the monthly
call limit.
GET /api/agents — list agents (source of agentId values).
GET / POST /api/leads — list or create leads (creation fires the
leadCreated event to your webhooks / n8n / Slack / WhatsApp).
POST /api/campaigns, POST /api/campaigns/start,
GET /api/campaigns/:id — create, start, and monitor calling campaigns.
GET / POST /api/appointments — list or book appointments (booking syncs to
Google Calendar and schedules WhatsApp client reminders when enabled).
GET /api/call-logs, GET /api/call-logs/:id,
POST /api/call-logs/:id/analyze — call history, transcripts, summaries, and
on-demand AI analysis.
For receiving events, use the Webhooks tab (signed) or the
n8n integration — the API is for making things happen, webhooks are for
being told when they did.
Webhooks
Webhooks allow IntelliCall AI to send real-time event notifications to your own server or third-party
services (e.g., CRMs, Zapier, Make.com) whenever something important happens on the platform.
Configuring Webhooks
Go to Settings > Webhooks tab.
Toggle Enable Webhooks to ON.
Enter your Payload URL - the endpoint on your server that will receive the POST
requests (e.g., https://your-app.com/webhooks).
Copy the auto-generated Signing Secret. Use this to verify that incoming
requests are genuinely from IntelliCall AI (HMAC-SHA256 signature).
Select which Events you want to subscribe to.
Click Save Webhook Configuration.
Available Events
Event
Triggered When
inbound_call
An inbound call is received by an AI agent.
outbound_call
An outbound call is initiated to a lead.
call_completed
A call ends (includes transcript, summary, and qualification score).
lead_created
A new lead is added to the system.
callTransferred
A caller was successfully connected to a human. SIP calls only.
transferFailed
A human could not be reached and the caller stayed with the agent.
lead_qualified
A lead is marked as qualified by the AI.
campaign_completed
A campaign finishes all its calls.
Testing Webhooks
Use the Send Test Event button next to each event type to fire a sample payload to
your endpoint. This is useful for verifying your integration before going live.
Verifying Webhook Signatures
Every webhook request includes an X-IntelliCall-Signature header. Verify it on your
server using HMAC-SHA256:
Tip: You can regenerate the signing secret at any time
from the Webhooks settings tab. Remember to update your server with the new secret after
regenerating.
Email Integration (Brevo)
IntelliCall AI v5 includes native integration with Brevo (formerly Sendinblue) to
send automated email notifications for platform events like new leads or booked appointments.
In the IntelliCall AI Dashboard, go to Settings > Email.
Paste your Brevo API Key into the configuration field.
Select which events should trigger an email (e.g., Appointment Booked, New Lead).
Set the Sender Name and Sender Email (must be a verified
sender in your Brevo account).
Click Save Changes and use the Send Test Email button to
verify your configuration.
Reliable Delivery: Using the official Brevo SDK ensures
high deliverability and provides detailed error logs if an email fails to send due to credit
limits or invalid addresses.
Admin Panel Guide
The Admin Panel is the control center for your SaaS. It is accessible only to users with the
admin role.
To access: Log in as an admin and navigate to /admin or click "Admin"
in the sidebar.
First User as Admin: The very first user to sign up on
your platform is automatically assigned the Admin role. All subsequent users
will be assigned the Member role by default. You can manage user roles from the
User Management section.
1. User Management
View all registered users, their email addresses, and subscription status.
User Management
2. Plan Management (/admin/plans)
Define the tiers for your SaaS (e.g., Free, Pro, Enterprise). You can configure:
Name & Description: Visible on the pricing page.
Price & Interval: Monthly, Yearly, or One-time.
Resource Limits:
Max Agents
Max Campaigns
Lead Capacity
Total Calls/Minutes per month
Plan Management
3. Purchase History (/admin/purchases)
Track all transactions across all payment gateways. View status (Success, Failed), user, plan, and
amount.
Purchase History
4. Gateway Settings (/admin/gateways)
Enable/Disable specific payment providers and manage their API keys directly from the UI.
Gateway Settings
User Roles
IntelliCall AI supports two primary user roles for secure collaboration within your platform.
Initial Admin Assignment: The very first user to create
an account on your platform (via Google OAuth or manual signup) is automatically granted the
Admin role. Subsequent users are assigned the Member role by
default.
Role
Permissions
Admin
Full access to all features, including System Settings, API Key management, and User
management. This role is assigned to the first registered user.
Member
Can manage leads, agents, and campaigns, but cannot access global system settings or
manage other users.
Payment Gateways Setup
IntelliCall AI supports 5 major payment providers. You can enable any combination of them.
Plans are fully configurable from the Admin Panel. You define the tiers, prices, and resource limits
that suit your business. Users subscribe via the Settings > Plan & Billing
page.
How the Billing Flow Works
Sign Up: Users arrive at the landing page and click "Get Started".
Dashboard Access: New users (Member role) have restricted access based on the
default plan limits set in the Admin Panel.
Upgrade Flow:
User navigates to Settings > Plan & Billing.
They see all active plans you created in the Admin Panel.
They click Upgrade, select a Payment Gateway, and complete the
transaction.
Instant Activation: Upon successful payment, their account limits (Agents,
Campaigns, Leads, Calls) are instantly updated.
Configuring Plans
Go to Admin Panel > Plans to create and manage plans. For each plan you can set:
Name & Description: Shown to users on the billing page.
Price & Interval: Monthly, yearly, or one-time.
Resource Limits: Max Agents, Campaigns, Leads, and Calls per month. Set any
limit to -1 to make it Unlimited - the UI will display this
automatically.
Tip: Users can view their current usage (Agents,
Campaigns, Leads) and their plan limits in real-time on the Settings > Plan &
Billing tab, along with their full transaction history.
Support Ticket System
IntelliCall AI includes a built-in support portal. Users can open tickets, track their status, and
exchange messages with admins - all without leaving the dashboard.
For Users: Opening a Ticket
Navigate to Support in the dashboard sidebar.
Click New Ticket.
Enter a Subject and an initial Message describing your issue.
Click Create Ticket. The ticket is immediately visible to admins.
You can view replies and send follow-up messages by clicking on the ticket in the list.
Ticket Statuses
Status
Meaning
Open
Ticket has been submitted and is awaiting a response.
In Progress
An admin is actively working on the issue.
Resolved
The issue has been resolved and the ticket is closed.
For Admins: Managing Tickets
Admins can view all tickets from all users in the Admin Panel. From there you can:
Reply to tickets with messages visible to the user.
Change the ticket status (Open → In Progress → Resolved).
Filter tickets by status to prioritize work.
Dashboard Language
The dashboard ships in five languages: English, Spanish
(Español), French (Français), German (Deutsch) and Arabic
(العربية). This is the language of the
interface — it is a separate setting from the language your AI agents
speak on a call, which is chosen per agent in the agent editor.
Changing the language
Click the globe icon in the header, next to the light/dark toggle, and pick
a language. The interface updates immediately — no page reload, and anything you have
half-typed into a form is kept.
The same setting is available at Settings → Preferences → Interface
Language.
The choice is saved to the user's account, so it follows them to any device they sign in
on. Each user picks their own language independently.
Right-to-left (Arabic)
Choosing Arabic switches the whole interface to right-to-left: the sidebar moves
to the right-hand side, navigation, tables and forms align to the right, menus and drawers open
from the correct side, and directional arrows reverse. An Arabic web font is applied
automatically. Latin-script data — phone numbers, e-mail addresses, API keys — stays
left-to-right so it remains readable inside Arabic text. Nothing needs configuring; it follows
from the language you select.
Adding your own language
No code changes are needed. To add, for example, Portuguese:
Copy the folder frontend/messages/en/ to
frontend/messages/pt/.
Translate the values inside those JSON files. Leave the keys (the names on the left) exactly
as they are.
Add one line to the LOCALES list in
frontend/i18n/config.ts:
{ code: "pt", label: "Português", dir: "ltr" }
Use dir: "rtl" instead for Arabic, Hebrew, Persian or Urdu.
Rebuild the frontend (npm run build). The language appears in the switcher.
You do not have to translate everything at once. Any text you leave untranslated
falls back to English, so a half-finished language still gives you a fully working dashboard
— buyers never see a broken screen or a raw placeholder.
Checking a translation
Three commands in the frontend folder check your work:
Command
What it checks
npm run i18n:keys
How much of your language is translated, plus typos and any placeholder such as
{count} that no longer matches the English original
npm run i18n:literals
Finds any interface text that was never made translatable — useful if you add your
own screens
npm run i18n:unused
Finds translations nothing uses any more
Full notes for translators are in frontend/messages/README.md.
What stays in English
Error messages sent by the server. The API replies in English and the
dashboard shows its wording when it has one. This is deliberate — it keeps the API
contract stable for anyone integrating with it.
The public marketing pages (landing, about, contact, terms, privacy) and
page titles for search engines.
Frontend Customization
The solution includes a polished Next.js landing page. Here is how to make it yours:
Landing Page (`frontend/app/page.tsx`)
This file contains the Hero, Features, Pricing, and Testimonials sections.
Hero Text: Search for Automate Your Outbound Calls to change the
main headline.
Images/Colors: Set your brand color in Admin → Settings → Branding →
Primary Color. The whole app takes its colors from it, in light and dark mode.
Testimonials: Located in the Testimonials section array. Update
the text and author names.
Additional Pages
You can find and edit these files to add your legal text and company info:
About Us:frontend/app/about/page.tsx
Contact:frontend/app/contact/page.tsx
Privacy Policy:frontend/app/privacy/page.tsx
Terms of Service:frontend/app/terms/page.tsx
Troubleshooting
Common Console Errors
Error Log
Resolution
❌ Missing API keys for Custom Voice
You enabled "Use Custom Voice" on an Agent but haven't provided Deepgram or ElevenLabs
keys in Settings > API Keys.
❌ Deepgram Error / ElevenLabs Error
Verify your API keys are correct and have remaining credits. Ensure your firewall isn't
blocking outbound WebSocket connections.
❌ LLM Error / OpenRouter Error
Check your OpenRouter API key and ensures you have a positive balance in your OpenRouter
account.
❌ Twilio Voice Webhook Error
Your BASE_URL is likely unreachable by Twilio. Check your ngrok tunnel and
ensure the URL in .env matches.
❌ Could not find Agent or Lead
The Call SID was received but the associated database records are missing. Ensure you
haven't deleted the agent or lead while a call was in progress.
SIP Trunk Errors
These errors appear in the backend console logs (prefixed with [SIP]) or as toast
notifications in the dashboard when a call fails.
Error / Log Message
Cause & Fix
Asterisk not available. Ensure Asterisk is running and ARI is configured.
The backend cannot reach Asterisk. Check that Asterisk is running
(systemctl status asterisk) and that ASTERISK_ARI_URL,
ASTERISK_ARI_USER, and ASTERISK_ARI_PASSWORD are correctly set
in backend/.env.
Phone number does not have a valid SIP trunk configured
The phone number used for the call has no SIP trunk linked to it. Go to Phone
Numbers, edit the number, and assign a SIP trunk.
Voice engine failed to initialize
The AI voice stream (Deepgram/ElevenLabs) failed to start before the call was placed.
Verify your API keys in Settings > API Keys and ensure the backend
can reach those services.
❌ [SIP] Call rejected by trunk (cause 21: Forbidden) Toast: "SIP
Trunk rejected the call (403 Forbidden)"
Your server's IP address is not whitelisted in your SIP provider's portal, or the
credentials are wrong. Add your server's public IP to the provider's IP Access
Control List or Outbound Profile, or verify the
Username/Password in your trunk settings.
The SIP provider requires credentials but none were supplied, or they are incorrect.
Enter the correct Username and Password in your trunk settings, or add your server IP to
the provider's IP whitelist to bypass authentication.
❌ [SIP] Call rejected by trunk (cause 1: Not Found) Toast: "SIP
endpoint not found"
Asterisk could not find the configured SIP endpoint. The trunk configuration may not
have been loaded. Click Reload Asterisk on the SIP Trunks page, or run
Option 3 in manual_setup.sh (see below).
❌ [SIP] Call rejected by trunk (cause 63: Service Unavailable) Toast:
"SIP provider is unreachable (503)"
The SIP Host/Registrar is unreachable. Verify the hostname is correct (e.g.,
sip.telnyx.com) and that your firewall allows outbound traffic on port 5060
(UDP/TCP).
❌ [SIP] Call rejected by trunk (cause 19: Request Timeout) Toast:
"SIP call timed out. The provider did not respond."
No response received from the SIP provider within the timeout window. Check the SIP Host
and Port in your trunk settings. Ensure UDP port 5060 is open outbound on your server
firewall.
❌ [SIP] Bridge failed: <message>
Asterisk accepted the call but failed to bridge the audio channel. This is usually an
Asterisk resource issue. Restart Asterisk (systemctl restart asterisk) and
try again.
[SIP] Auto-reload failed: <message>
After saving a trunk, the automatic Asterisk config reload failed. Manually click
Reload Asterisk on the SIP Trunks page, or run Option
3 in manual_setup.sh.
[SIP Inbound] No SIP number configured for <number>
An inbound call arrived but no phone number in the system matches the dialed number. Add
the DID number in Phone Numbers with provider set to
SIP and link it to the correct trunk.
[SIP Inbound] No agent mapped to <number>
The phone number exists but has no inbound agent assigned. Edit the phone number in
Phone Numbers and set an Inbound Agent.
Concurrent SIP call limit reached (<N>)
The maximum concurrent call limit has been hit. The default is 50. You can raise it by
setting SIP_MAX_CONCURRENT_CALLS=<number> in
backend/.env and restarting the backend.
UDP SIP OPTIONS timed out after 5000ms (from Test button)
The trunk test sent a UDP ping but got no response. This does not necessarily
mean the trunk is broken - many providers do not respond to OPTIONS pings. Try placing a
real test call instead. If calls also fail, check the SIP host and firewall.
TCP connection failed: <message> (from Test button)
For TCP/TLS trunks, the test could not establish a TCP connection to the provider.
Verify the host, port, and that outbound TCP port 5060 (or 5061 for TLS) is allowed by
your firewall.
One-way audio (caller can hear AI, AI cannot hear caller - or vice versa)
This is almost always a NAT traversal issue. Set
EXTERNAL_IP=<your-server-public-ip> in backend/.env. The
setup script auto-detects this, but it may need to be set manually on VPS environments
with private/public IP separation.
Asterisk / Config File Issues
Symptom
Fix
Dashboard shows Asterisk Offline even though Asterisk is running
The ARI (Asterisk REST Interface) is not reachable. Verify
ASTERISK_ARI_URL=http://localhost:8088, ASTERISK_ARI_USER, and
ASTERISK_ARI_PASSWORD in backend/.env match what is in
/etc/asterisk/ari.conf. Restart the backend after any changes.
pjsip show endpoints shows no trunk-* entries after adding a
trunk
The PJSIP config include is missing or misplaced. Run Option 3: Fix SIP/Asterisk
Configuration in manual_setup.sh (see below). This regenerates
the
config files and ensures the #include is at the top of
pjsip.conf.
Asterisk logs show "configuration contains a duplicate object"
The #include line was added to pjsip.conf more than once. Run
Option 3 in manual_setup.sh - it removes all duplicate
includes
and re-adds exactly one at the top of the file.
Run: cd backend && node services/sip/asterisk-config.js to
regenerate them, then reload Asterisk.
Using manual_setup.sh - Option 3: Fix SIP/Asterisk Configuration
If you are experiencing SIP issues after initial setup, the quickest fix is to run the built-in
repair tool:
sudo bash setup/manual_setup.sh
Select Option 3: Fix SIP/Asterisk Configuration. This will:
Regenerate all Asterisk config files from the current trunks in the database.
Remove any duplicate #include lines from pjsip.conf and re-add exactly
one at the top.
Fix extensions.conf includes.
Clean up stale duplicate config files (*.conf~~*).
Ensure the recording directory exists with correct permissions.
Restart Asterisk and reload all PJSIP modules.
Verify that trunk-* endpoints are loaded and report the result.
Note:manual_setup.sh must be run with
sudo as it modifies files in /etc/asterisk/. It is safe to run
multiple times - it is idempotent.
"WebSocket connection failed"
Ensure BASE_URL in backend .env is correct.
If using ngrok, ensure the tunnel is active and the URL matches.
"Google Auth Error"
Verify Redirect URIs in Google Console match exactly.
Ensure JWT_SECRET is set in backend.
"Database connection error"
Verify MongoDB service is running.
Check if the IP is whitelisted (if using MongoDB Atlas).
Release history
Every earlier release, newest first. Open one to read what changed.
Version 12.1Gives the public site the shared Wixzel header and footer, and puts your own logo at the head of both.
Version 12.1 gives the public site the shared Wixzel header and footer, and
puts your own logo at the head of both.
NEW: The header and footer match the rest of the Wixzel family: a taller
top band with the navigation in the middle, each item carrying its own icon and lighting up
as you read down the page, and a footer that signs off with one shared line
IMPROVEMENT: Your logo from Admin → Settings → Branding leads the
header as well as the footer, with the light and dark versions used where each belongs
IMPROVEMENT: About, Contact, Privacy Policy and Terms wear the same header
as the landing page instead of their own
IMPROVEMENT: The theme switch is the same control in the header, the
footer and the content pages, and remembers your choice as before
IMPROVEMENT: On phones the navigation sheet closes when you pick a
section, and jumping to a section leaves the heading clear of the top band
Version 12.0Gives IntelliCall a new design across the dashboard, sign-in and the public site, and lets your brand…
Version 12.0 gives IntelliCall a new design across the dashboard, sign-in and
the public site, and lets your brand colour theme the whole app.
NEW: A new design in light and dark mode and all five languages: calmer
tinted panels, one typeface (Manrope), a new icon set and quicker, softer motion
IMPROVEMENT: The Primary Color in Admin → Settings →
Branding now colours the whole app, and text colours adjust to stay readable in both
themes. Installs that never changed the default move to the new IntelliCall violet
IMPROVEMENT: Voice engines and quality presets are cards, and long voice
and language lists are searchable. The agent, test call, call details and support panels
open from the side
IMPROVEMENT: Delete, disconnect and other confirmations are proper dialogs
instead of browser pop-ups
IMPROVEMENT: Leads can be filtered by clicking tag chips, each showing how
many leads it has
NOTE: This update replaces the frontend's UI components. Old files in
frontend/components/ui are removed automatically when the frontend builds,
except logo, form-issues and modern-audio-player. If
you have customised frontend files, back them up and re-apply your changes after
updating
Version 11.9.2Catches SIP and phone-number mistakes before they fail a call, fixes inbound fallback forwarding, and says…
Version 11.9.2 catches SIP and phone-number mistakes before they fail a
call, fixes inbound fallback forwarding, and says why a call wasn't analysed.
NEW: SIP trunks have a Send numbers without the + sign
option, for PBXs that reject a destination starting with +. Off by
default; caller ID is unaffected
IMPROVEMENT: Lead numbers are converted to full international form
before dialling, taking the country from the number the call is placed from. A number
that can't be read is refused before dialling, and Call Logs say why. Save leads with
their country code (for example +44 7700 900123) for the best results
IMPROVEMENT: The SIP trunk, phone number, lead, CSV import and
campaign forms point out mistakes before you save, such as a number without its
country code or a trunk host that is this server itself
FIX: A SIP trunk pointing at this server's own SIP address is refused
on save and test, instead of failing every call with "cause 1"
FIX: An inbound call to a number with no agent is forwarded to the
number's Fallback Number over its own SIP trunk, instead of being hung up
FIX:Analyze Now says why analysis failed, for example a
missing or rejected API key, instead of "Failed to analyze transcript"
NEW: Without an OpenRouter key, Gemini Live calls are analysed on your
Gemini key and Sarvam AI calls on your Sarvam key
FIX: The AI Score column in Call Logs no longer shows "Pending"
forever. It shows "Analyzing…" just after a call, then "Not analyzed" with the
reason
SECURITY: Only a call's owner and super admins can analyse it
Version 11.9.1Adds the Brazilian Real as a store currency.
Version 11.9.1 adds the Brazilian Real as a store currency.
NEW:Brazilian Real (R$) is now a currency
option. In Admin → Settings → General, set Currency to
BRL (R$), and your plan prices and transaction amounts show with the
R$ symbol
Version 11.9Fixes how Sarvam AI calls end, corrects the engine shown on campaign pages, and widens the voice choice…
Version 11.9 fixes how Sarvam AI calls end, corrects the engine shown on
campaign pages, and widens the voice choice for non-English agents.
If a Sarvam AI call wouldn't hang up: background noise,
or the caller saying "ok, thanks, bye" over the agent's goodbye, was treated as the caller
speaking again, which cancelled the hang-up. After upgrading, only a real sentence (or
"wait") keeps the call open once the agent has said goodbye.
FIX: Sarvam AI calls no longer stay connected after the goodbye because of
background noise or the caller's own farewell, and the closing line is never answered with a
new reply
FIX: On noisy lines, stray one-word transcripts no longer reset Sarvam's
silent-call timeout, so an abandoned call is ended
FIX: A campaign's details page labelled Sarvam AI, Gemini Live and Deepgram
Voice Agent agents as "ElevenLabs AI / Rachel". It now shows the engine and voice the calls
really use (calls always used the agent's own engine)
NEW:Deepgram Aura voices for the Deepgram Voice Agent engine.
In the agent editor, set Voice provider to Deepgram Aura and pick a voice. The
list comes live from Deepgram, filtered to the agent's language (Italian included), and no
ElevenLabs key is needed
NEW: The ElevenLabs voice picker lists native Voice Library
voices for the agent's language under your own voices. Picking one adds it to your ElevenLabs
account automatically
IMPROVEMENT: Campaign calls are protected against Twilio's "An application
error has occurred" caused by a BASE_URL ending in /, or a missing
BASE_URL when a campaign is started from the dashboard. Make sure
BASE_URL in backend/.env is your backend's public
https:// address
UPDATE: Gemini Live now uses gemini-3.8-live, Google's stable
voice-agent model. The previous preview models shut down on 17 November 2026, so update
before then if you use Gemini agents
UPDATE: The Deepgram Voice Agent engine uses Deepgram's multilingual Flux
recognition for Spanish, French, German, Hindi, Russian, Portuguese, Japanese, Italian and
Dutch, and Flux English for every English accent
FIX: UK, Australian and Indian English agents on the classic engine use
nova-3 instead of nova-2-phonecall, which Deepgram supports only for
US English
UPDATE: ElevenLabs voices load from the current /v2/voices API,
so accounts with more than 500 voices work. Turbo v2.5 is now marked as deprecated by
ElevenLabs. It still works, but Flash v2.5 is the recommended choice
FIX: The Sarvam voice preview sends the language_code field
Sarvam's API now requires
FIX: Signing in with email and password on an account created with Google
sign-in no longer fails with data and hash arguments required. Those accounts can
now add a password in Settings → Set a Password and sign in either way
IMPROVEMENT: The backend logs which MongoDB database it connected to and
warns when MONGODB_URI has no database name (MongoDB then uses
test). Your URI should end in a database name, e.g.
mongodb://127.0.0.1:27017/intellicall-ai
FIX:Call Logs show why a call failed right in its row, and
Details now opens for failed calls (it was disabled for any call without a
transcript)
FIX: When Google refuses or drops a Gemini Live session, the call log
records Google's own reason (for example an API key that has run out of quota), and the call
is hung up instead of leaving the caller in silence
FIX: An outbound SIP call that Asterisk would not dial, or that the carrier
rejected, shows the reason in Call Logs instead of only in the SIP debug log
IMPROVEMENT: Saving a SIP trunk warns you if Asterisk did not load it
IMPROVEMENT: SIP usernames may contain only letters, numbers and
. _ - +. The trunk form names any other character as you type, such as the
@ of an email address. If your provider gave you an email address as the
username, ask them for a plain one
FIX:npm run build no longer fails with
next/font/google queries have exactly one entry on some servers. The fonts now
ship with the app, so the build needs no connection to Google
Version 11.8Is a fix release. It clears a crash that could stop the Create Agent drawer on the AI Agents page from…
Version 11.8 is a fix release. It clears a crash that could stop the
Create Agent drawer on the AI Agents page from opening.
If creating an agent showed an error: opening the
Create Agent drawer could fail with INVALID_MESSAGE: MALFORMED_ARGUMENT. The
example text in the First Message box, Hi {{name}}, this is calling from
{{company}}..., was being read as a broken translation variable. Upgrading to 11.8
is the fix; no agents or settings are affected, and {{name}}-style merge
fields in your own messages keep working exactly as before.
FIX: The Create Agent drawer could crash with
INVALID_MESSAGE: MALFORMED_ARGUMENT; the first-message placeholder now shows
as plain text in all five languages
Version 11.7Is a fix release. It clears a bug that could stop the Settings page saving at all, and moves Google…
Version 11.7 is a fix release. It clears a bug that could stop the
Settings page saving at all, and moves Google Calendar and Google
Sheets credentials into the admin panel, alongside HubSpot and Slack.
If your Settings page refused to save: saving could
fail with "webhooks.events.callTransferred" is not allowed, and because the
page saves as a whole, that blocked every field on it — API keys, timezone,
call settings, not just notifications. Installs that had used the Human Transfer
notification events added in v11.5 were affected. Upgrading to 11.7 is the fix; no data
was lost and nothing needs re-entering.
Setting up Google Calendar and Google Sheets
Google credentials no longer have to be edited into a file on the server. Open
Admin → Integrations → Google, paste the Client ID
and Client Secret from your Google Cloud project, and save — it takes
effect immediately, with no restart. The same panel lists the exact
authorized redirect URIs to paste into Google Cloud Console, so there is
nothing to assemble by hand. One OAuth client covers both Calendar and Sheets.
The GOOGLE_CLIENT_ID and GOOGLE_CLIENT_SECRET settings in
backend/.env still work and need no change — the admin panel simply takes
priority when it is filled in. Those variables still drive
“Sign in with Google” on the login page.
A wrong Client ID used to send you to Google, which answered with a bare
“Access blocked: Authorization Error — Error 401: invalid_client” on
its own page, where nothing could be explained. IntelliCall now checks the credentials first
and tells you what to correct and where.
FIX: The Settings page could refuse to save with
"webhooks.events.callTransferred" is not allowed, blocking every field on the
page
NEW: Google Calendar and Sheets credentials in
Admin → Integrations → Google — no file to edit, no
restart
IMPROVEMENT: The admin panel shows the exact redirect URIs to register in
Google Cloud Console
FIX: A wrong Google Client ID is caught before you are sent to Google,
with a message naming the fix, instead of Google’s invalid_client
page
IMPROVEMENT: Notification events added in future releases can no longer
break the Settings page the way the v11.5 transfer events did
Version 11.6Makes HubSpot far easier to connect. Instead of registering a developer app, each user now pastes a…
Version 11.6 makes HubSpot far easier to connect. Instead of
registering a developer app, each user now pastes a service key from their own
HubSpot account — no developer account, no app, no callback URL to match.
Connecting HubSpot with a service key
In HubSpot, open Settings → Integrations → Service keys, create a key
with the crm.objects.contacts.read and crm.objects.contacts.write
scopes, and paste it into Settings → Integrations in IntelliCall. The key
is verified the moment you paste it, so a bad copy or a missing permission is caught right
there — and if a scope is missing, the error names the exact one to add instead of leads
quietly failing to sync days later. See
HubSpot CRM Integration for the full walkthrough.
Why this changed: HubSpot stopped allowing new public
apps on 23 June 2026, so the old Connect-button route can no longer be set
up on a fresh install. Existing connections are unaffected — if you
already connected through the old OAuth app, nothing changes and there is nothing to redo.
This release also fixes a connection bug that affected more than HubSpot: on installs behind a
reverse proxy that doesn't forward the original scheme, Connect for HubSpot,
Slack, Google Calendar and Google Sheets could fail with an invalid redirect URL,
because the callback was built as http:// even on an HTTPS site. IntelliCall now
assumes HTTPS for any non-local host, so a missing proxy header can no longer break sign-in.
Version 11.5Adds Human Transfer: when a caller asks to speak to a real person, your AI agent can now put them through…
Version 11.5 adds Human Transfer: when a caller asks to
speak to a real person, your AI agent can now put them through instead of leaving them at a
dead end — and if nobody picks up, the caller lands back with the same agent,
mid-conversation, with everything it already knew about them.
Handing a caller to a real person
Open AI Agents, edit an agent, and switch on Human Transfer.
Add the people or departments it may transfer to — each one gets an ID, a display name
and a phone number. Your agent is only ever told the IDs and names, never the numbers, so it
cannot be talked into dialling somewhere you did not authorise.
NEW:Human Transfer on all four voice engines —
Deepgram Voice Agent, Gemini Live, ElevenLabs (Classic) and Sarvam AI.
NEW: As many authorised destinations per agent as you
need, plus a default destination for when the caller simply asks for
“a person” without naming a department.
NEW:Automatic return to the agent when the destination
is busy, declines, or nobody answers within the ring time you set — the caller is
never dropped and never has to start again.
NEW: Per-destination and per-agent ring times, and a cap
on transfer attempts per call so an agent cannot keep re-dialling
someone who is not there.
NEW: A transfer history on every call in Call Logs
— destination, outcome, how long it rang, how long the caller spoke to the human,
and the carrier's reason if it failed.
NEW: Two notification events, Caller Transferred and
Transfer Failed, on Webhooks, Slack, WhatsApp and n8n.
IMPROVED: The recording keeps running through the handover, so the
conversation with your colleague is captured too.
Note: Human Transfer runs over your
SIP trunk. Agents on a Twilio number, and the in-browser agent test, do
not offer it — the option is simply not presented to those agents. Human Transfer is
also off by default, so every existing agent keeps behaving exactly as it
did in v11.0 until you turn it on. See Human Transfer for
the full setup.
Version 11.0Brings two big additions: you can now talk to any agent live in your browser before it ever calls a…
Version 11.0 brings two big additions: you can now
talk to any agent live in your browser before it ever calls a customer,
and there is a new Gemini Live voice engine in which a single Google
model hears, thinks and speaks.
Test an agent in your browser
Open AI Agents and click Test on any agent. Allow your
microphone, and you are talking to it — the agent greets you first, you can
interrupt it mid-sentence, and a live transcript shows what it heard and said.
No phone call is placed: no Twilio call, no SIP trunk, no phone number
and no call minutes. Agents with no number attached at all can be tested.
NEW:Live browser test for every streaming voice
engine — Classic pipeline, Deepgram Voice Agent, Sarvam AI and Gemini Live.
NEW: The test runs the agent's real configuration
— its engine, voice, language, Voice Quality and turn-taking settings, knowledge
base and appointment booking — so what you hear is what a caller gets.
NEW:Live transcript beside the conversation, so you
can read the exchange while you speak.
IMPROVED: The agent always opens the conversation
— the microphone stays closed until it has started speaking, so background noise
cannot cut off its greeting.
IMPROVED: Test sessions are never logged as calls and
never count against a plan, and end automatically after 5 minutes so a
forgotten browser tab cannot run up usage on your AI provider accounts.
NOTE: Agents on the basic Standard (Twilio) voice
cannot be tested this way — that voice is produced by Twilio during a real call.
The Test button explains this and stays disabled until the agent is switched to a
streaming voice engine.
Gemini Live voice engine
A new self-contained engine in which one Google model does speech recognition, reasoning
and speech generation together, so replies come back fast and sound genuinely
conversational. Selectable per agent on SIP numbers, and now also
audible through the browser test above without owning a SIP trunk.
NEW:97 spoken languages, including Malayalam and
others no other engine covers, plus an Auto-detect mode that simply follows
whatever language the caller speaks.
NEW:30 prebuilt voices to choose from per agent,
from bright and upbeat to mature and warm.
NEW:Gemini API Key field in Settings — the
engine is fully self-contained, so this one key is all it needs (no Deepgram,
ElevenLabs or OpenRouter).
NEW: Gemini Live agents support appointment booking,
knowledge bases and ending the call naturally, like every other
engine.
IMPROVED: The engine picker now explains exactly why an engine is
unavailable — a missing key, or for Gemini Live a non-SIP outbound number —
instead of hiding the option.
Version 10.9Adds a Voice Quality & Conversation section to every AI agent, so different agents can sound completely…
Version 10.9 adds a Voice Quality & Conversation section
to every AI agent, so different agents can sound completely different with the same
ElevenLabs voice — a warm, expressive receptionist and a fast, to-the-point
support agent can now share one voice. You will find it in the agent editor, right below
the voice picker, on the Classic pipeline (SIP and Twilio).
NEW:Voice Quality presets — pick
Fast, Balanced, Natural or Expressive per agent.
Presets tune the ElevenLabs voice settings and speech buffering together, so you get a
coherent result without touching any numbers. The Default preset keeps the
exact behaviour of previous versions — existing agents are not changed.
NEW:Custom / Advanced mode — exposes the raw
ElevenLabs per-call controls: stability, similarity boost,
style exaggeration, speaker boost and speed, plus the
ElevenLabs model (Turbo v2.5, Flash v2.5 or Multilingual v2) and a
latency profile that trades first-audio speed against prosody.
NEW:Turn-taking controls per agent —
end-of-turn silence (how much silence ends the caller's turn),
silence tolerance (how long the agent waits after an unfinished-sounding
sentence) and interruption sensitivity (how easily the caller can barge in
over the agent, with built-in false-interruption protection).
IMPROVED:More natural speech in every language
— agents on an explicit preset now send complete clauses to ElevenLabs instead
of flushing on every comma, which noticeably improves prosody and fixes clipped
articles and prepositions, especially in Spanish and other Romance languages.
IMPROVED:Modern ElevenLabs streaming — the
deprecated optimize_streaming_latency parameter has been replaced with
ElevenLabs' current generation controls, selected automatically from the agent's
latency profile.
NEW:Voice Quality panel in Call Log details —
each call now records per-turn diagnostics: response latency (LLM first token, TTS
first text, first audio), interruptions, false voice-activity events, buffer drops and
TTS chunks. Open any call in Call Logs → Details to see exactly
how the conversation performed.
NEW: Agents on the Deepgram Voice Agent engine can
now choose the ElevenLabs model per agent; its turn-taking remains managed server-side
by Deepgram.
Version 10.8.2Adds a Dial Prefix field to SIP trunks. Many wholesale carriers do not route a plain E.164 number — they…
Version 10.8.2 adds a Dial Prefix field to SIP trunks.
Many wholesale carriers do not route a plain E.164 number — they expect a short
technical prefix in front of it (for example 999 followed by
491799988620) and match that prefix literally, without the leading
+. Until now those trunks could register but could not place outbound calls.
Enter the prefix your carrier gave you in SIP Trunks → Dial Prefix and
IntelliCall builds the dial string the way they expect. The field is empty by
default, so existing trunks keep dialling exactly as before — leave it blank
unless your carrier documents a prefix.
Version 10.8.1Is a maintenance release for SIP calling. On SIP calls, an agent reply longer than about ten seconds could…
Version 10.8.1 is a maintenance release for SIP calling. On SIP
calls, an agent reply longer than about ten seconds could have a chunk silently cut
out of the middle, and playback could sound rushed or skip parts of sentences. Buffered
speech is no longer discarded and playback now stays in step with the call for replies
of any length. This applies to every SIP voice engine — ElevenLabs (Classic),
Deepgram Voice Agent and Sarvam. Long replies are buffered up to 60 seconds instead of
10, and the bound can be tuned with SIP_RTP_MAX_QUEUE in
backend/.env if you need more.
Version 10.8Makes the whole dashboard multilingual. Every screen your team uses — the sidebar, agents, campaigns, call…
Version 10.8 makes the whole dashboard multilingual. Every screen your team
uses — the sidebar, agents, campaigns, call logs, settings and the full admin panel
— now ships in English, Spanish, French, German and Arabic, switchable
from the header without a reload. Arabic runs the interface right-to-left
throughout: the sidebar moves to the right, spacing and alignment mirror, and phone numbers and
e-mail addresses stay readable inside Arabic text. Each user's choice is saved to their account,
so it follows them to any device they sign in on. Adding a sixth language takes one folder of
JSON and one line of config — no code changes.
NEW:Five interface languages out of the box —
English, Spanish (Español), French (Français), German (Deutsch) and Arabic
(العربية). Every dashboard and admin screen is
translated, including buttons, form labels, placeholders, empty states and notification
messages.
NEW:Language switcher in the header — next to the
light/dark toggle, so it is where users expect it. The interface changes immediately;
anything half-typed in a form is preserved.
NEW:Full right-to-left support — selecting Arabic
mirrors the entire layout: sidebar on the right, navigation and tables aligned to the
right, menus and drawers opening from the correct side, and directional arrows reversed. An
Arabic web font is applied automatically.
NEW:Language is saved per user — the choice is
stored on the account, not just the browser, so signing in from a different computer or
phone keeps the same language. It can also be set from
Settings → Preferences.
NEW:Add your own language without touching code —
copy frontend/messages/en/ to a new folder, translate the JSON, and add one
line to frontend/i18n/config.ts. Anything you leave untranslated falls back to
English, so a partially translated language still works. See
Dashboard Language.
IMPROVED:Smaller, cleaner frontend — around 2,000
lines of unused code removed, and only the active language is sent to the browser, so
adding languages does not slow the dashboard down.
Version 10.7Sarvam conversational voice
Version 10.7 made the Sarvam AI engine genuinely conversational. Sarvam agents
could take up to 15 seconds to respond to a short reply — saying just
“hello” while the agent was still delivering its opening message left the caller
waiting. They now answer in about a quarter of a second. Interruptions work the
way callers expect: say anything and the agent stops and listens, while a simple
“okay” or “haan” lets it finish its sentence — and background
noise, coughs or a TV in the room never interrupt it at all. Long agent replies also no longer
lose audio mid-sentence.
FIX:Sarvam agents answer immediately — a short
caller reply (“hello”, “yes”, a one-word answer) used to be held
until the agent finished speaking, and in the worst case was released only by a 15-second
safety timer. Short replies are now answered right away.
IMPROVED:Upgraded Sarvam speech recognition — agents
now use Sarvam's realtime transcription model, which returns words while the caller
is still speaking instead of only after they stop. This is what makes fast interruption
possible. If your Sarvam account is not yet enabled for it, the agent automatically falls
back to the previous model and logs a clear notice — no configuration needed either
way.
IMPROVED:Interruptions that behave like a real conversation
— interruption is now decided from what the caller actually said, not from
raw sound level, so line noise, coughs, door slams and background television can no longer
cut the agent off. Acknowledgements such as “okay”, “haan”,
“ശരി” or “हाँ” let the agent finish and are still answered
afterwards — they are never discarded.
FIX:Long replies no longer lose audio — on SIP
calls, an agent reply longer than about 10 seconds could have a chunk silently cut out of
the middle. The audio buffer no longer discards speech, and playback is now paced against
the system clock so it cannot drift out of sync over a long call.
IMPROVED:Faster first word — Sarvam now begins
speaking sooner on every reply, and the voice connection is re-established in the
background after an interruption so the next answer does not wait on it.
NEW:Voice tuning options — optional environment
variables let you tune noise rejection and interruption sensitivity per deployment:
SARVAM_VAD_THRESHOLD, SARVAM_VAD_MIN_SPEECH_MS,
SARVAM_VAD_SILENCE_MS and SARVAM_BARGE_IN_MIN_WORDS. Sensible
defaults are used if you set none of them; see .env.example.
NEW:Sarvam preflight check — run
node scripts/sarvam-preflight.js --key YOUR_KEY on your server to confirm your
Sarvam account is set up correctly for voice calling before you place one.
FIX:.env.example is back in the package
— the backend environment template was missing from the v10.5 and v10.6 downloads. It
is included again and now documents every variable the backend reads.
Version 10.6Integrations & security
Version 10.6 fixed HubSpot connection failures and made the Google integrations fail clearly
instead of confusingly when they are not configured on the server, alongside a dependency
security roll-up.
FIX:HubSpot connect could fail with
“code challenge parameter is missing” — HubSpot's OAuth now
includes PKCE (RFC 7636) on the authorization flow.
IMPROVEMENT:Google Sheets and Google Calendar connect
buttons now show a clear message instead of erroring when those integrations aren't
configured on the server. Previously you were redirected to Google with an empty
client_id and got a bare “Error 401: invalid_client”.
FIX: The setup script could write the wrong value into
GOOGLE_CLIENT_SECRET during interactive reconfiguration.
SECURITY: Dependency updates across the backend and frontend, clearing
every high-severity advisory.
Version 10.5Reliability & hangup detection
Version 10.5 is a reliability release: calls now end the moment they actually
end. Hangups that used to slip through undetected — leaving a call showing
“In Conversation” long after the caller hung up, and sometimes
logging its duration as the full auto-hangup limit instead of how long the call really lasted
— are now caught reliably on SIP. AI agents can also end a call themselves
once the conversation is naturally over, on all three voice engines, and a connected call that
goes quiet for 5 minutes now hangs up on its own instead of sitting open. The
Sarvam AI engine also gets fixed truncation and unified turn-taking, plus
updated underlying models.
NEW:Agents can end the call themselves — once the
caller has said goodbye or confirmed they need nothing else, the agent speaks its closing
line and hangs up on its own, on the Classic, Deepgram Voice
Agent, and Sarvam AI engines alike. No configuration needed; the
agent never uses it to dodge a hard question, and a caller talking over the goodbye cancels
it and keeps the call going.
NEW:Idle-call detection — if a connected call goes
5 minutes with no speech from either side (the caller stepped away without
hanging up, or put the phone down), the agent says a short goodbye and ends the call
automatically. The timeout is configurable via the CALL_IDLE_TIMEOUT_MS
environment variable.
FIX:Reliable SIP hangup detection — SIP calls could
previously stay stuck showing “In Conversation” long after the
caller actually hung up, and once the auto-hangup timer eventually closed them, the logged
duration reflected the full timeout (e.g. 10 minutes) rather than the real
call length. Hangup detection is now reliable across three independent failure paths, and
call duration is measured from the moment the call was actually answered,
not from when dialing started.
FIX:Deepgram Voice Agent reconnect reliability —
calls on this engine could occasionally disconnect and fail to recover mid-call. Both the
connection keepalive timing and the reconnect handshake are fixed.
FIX:Sarvam AI voice truncation — the Sarvam engine's
speech could cut off mid-word on live SIP calls in certain replies. Fixed, along with three
related causes of the agent going silent mid-reply.
IMPROVEMENT:Unified turn-taking — the Classic and
Sarvam AI engines now share the same interruption logic: the agent is interrupted only by
more than a filler word or an explicit stop word (English plus 8 Indian languages), so a
caller saying “yes” or “hmm” no longer cuts the
agent off mid-sentence.
NEW:Sarvam AI models updated — speech-to-text moved
to Saaras v3, text-to-speech to Bulbul v3, and the chat
model to Sarvam's current 105B conversational model. Agents saved on
deprecated models migrate automatically — no re-save needed.
Version 10Sarvam AI & Deepgram Voice Agent engines
Version 10 introduced a new optional Deepgram Voice Agent engine that brought
response times to well under a second, a new Sarvam AI engine that unlocked
native support for Indian languages (Hindi, Tamil, Telugu, Bengali, Kannada,
Malayalam, Marathi, Gujarati, Punjabi, Odia and more), and a major latency tune-up for the
classic pipeline — callers got answers roughly 2× faster. It also
added custom contact fields so every call can be personalized with your own
lead data (appointment dates, service types, and more), and shipped a completely
redesigned marketing landing page.
NEW:Redesigned landing page —
A bold, minimal marketing homepage rebuilt from scratch: full-screen sections that alternate
between your brand primary color and a clean light/dark base, an animated
background grid, floating geometric parallax shapes, giant
outlined watermark typography, and smooth scroll-reveal motion.
Dedicated feature spotlights (each with a live UI mockup) showcase the voice
engines & Sarvam, outbound campaigns, 24/7 inbound over SIP/Twilio, and appointment booking,
alongside integrations, pricing, self-hosting and FAQ sections. Fully dark-mode
aware, it automatically adopts your custom brand color and app name, and the self-hosting section
& floating store buttons stay admin-toggleable from the Admin panel.
NEW:Sarvam AI Voice Engine (Indian languages) —
A new option in the per-agent Voice Engine selector (Agent → Voice section)
that runs speech recognition, reasoning and voice entirely on Sarvam AI
(Saaras speech-to-text → Sarvam's chat model → Bulbul text-to-speech), purpose-built for
Indian languages and accents. Pick a Sarvam language
(Hindi, Bengali, Gujarati, Kannada, Malayalam, Marathi, Odia, Punjabi, Tamil, Telugu or
Indian English) and a Sarvam voice right on the agent. Because it is fully
self-contained, agents on this engine need only a single Sarvam API key —
no Deepgram, ElevenLabs or OpenRouter key required. Works on both Twilio and SIP/Asterisk calls,
supports appointment booking, and existing agents are unaffected until you switch them.
NEW:Deepgram Voice Agent engine (low latency) —
A per-agent Voice Engine selector (Agent → Voice section) lets you
switch from the classic Deepgram → OpenRouter → ElevenLabs pipeline to Deepgram's
Voice Agent API: a single connection handles speech recognition, the LLM, and voice
synthesis with server-side turn-taking, for roughly 0.5–0.8s
voice-to-voice responses. Works on both Twilio and SIP/Asterisk calls. Existing agents are
unaffected until you switch them.
KEEPS YOUR VOICE: The new engine still speaks with the agent's selected
ElevenLabs voice — switching engines doesn't change how your agents
sound.
FEWER KEYS: Agents on the new engine use a Deepgram-managed
LLM, so they only need Deepgram + ElevenLabs keys — no OpenRouter key
required for those agents.
FASTER BOOKINGS: On the new engine, appointment booking uses native
function calling instead of text commands — slot lookups and bookings that
used to take 3–6 seconds now answer in about a second.
IMPROVED:Classic pipeline latency tune-up — faster
end-of-speech detection with smarter turn-taking (the AI keeps waiting while the caller is
mid-sentence and never answers early), ElevenLabs Flash v2.5 for non-English voices,
per-call knowledge-base caching, and quicker first-word playback. Typical responses are
300–900ms faster even without switching engines.
FIX: Speech transcripts were processed twice per result due
to a duplicate Deepgram event handler — fixed across both Twilio and SIP call paths.
NEW:Latency instrumentation — every conversation turn
now logs a ⏱️ [Latency] line (queue wait, LLM first token, first audio) so you
can measure real response times on your own server.
NEW:Custom contact fields (personalized calls) —
Leads are no longer limited to name and company. Add any custom fields to a
lead — e.g. appointment_date, appointment_time,
service_type — from the Add / Edit Lead dialog (a dynamic
add/remove field editor) or automatically by CSV import (every extra column
becomes a field). Reference them anywhere in an agent's Opening Message or
System Prompt as merge tags like {{appointment_date}}, and they
are filled in per call — so the AI knows each lead's details throughout the whole
conversation, not just the greeting. Built-in {{name}} and {{phone}}
tags are always available, tags are case-insensitive, and any tag with no matching field is
silently dropped from what the agent speaks. Works on both the classic and Deepgram Voice Agent
engines, on Twilio and SIP/Asterisk. Ideal for appointment-confirmation and reminder calls.
Version 9.9SIP Debug panel
Version 9.9 added a built-in SIP Debug panel so you can diagnose SIP/Asterisk
problems (like the dreaded “Allocation failed” error) right from the dashboard
— no SSH access to the server required.
NEW:SIP Debug panel — A new Debug
button on the SIP Trunks page opens a side panel with two tabs:
Health Checks and Live Logs.
NEW:Health Checks — One-click server-side diagnostics:
Asterisk ARI connection, PJSIP config file written, config linked into
pjsip.conf, Asterisk CLI access, and per-trunk status (endpoint loaded in
Asterisk, provider reachability via qualify pings, SIP registration state). Every failed check comes with a plain-English
fix hint.
NEW:Live Logs — A real-time stream of SIP events:
outbound/inbound calls, trunk rejections with the SIP cause (403 Forbidden, 407 Proxy Auth,
timeouts…), originate failures with actionable hints, bridge/recording issues, and
Asterisk config reload results. Auto-refreshes while open.
PRIVACY: Logs are per-user — each user only sees events
for their own trunks and calls plus shared system events; superadmins see everything.
NEW:SIP scanner protection — Public SIP servers
get probed by scanners dialing random numbers. IntelliCall now auto-detects source IPs that
repeatedly call unknown numbers and temporarily blocks them (silent hangup, no announcement
that would confirm a live server). Legitimate provider traffic is unaffected, and blocks lift
automatically. Tunable via SIP_SCAN_BAN_THRESHOLD /
SIP_SCAN_WINDOW_MINUTES / SIP_SCAN_BAN_MINUTES.
FIX:Header logo layout glitch — The landing page
header no longer changes height while the logo loads. The logo now renders in a fixed-size
box (any logo aspect ratio fits without distortion), so the top bar keeps a constant height
from first paint.
Version 9.8White-label branding
Version 9.8 sharpens white-label branding so your custom look applies
everywhere — and the stock IntelliCall branding never leaks while assets load.
FIX:Brand color now applies site-wide — The
Primary Color set in Admin → Branding now drives the public landing page,
buttons, accents and highlights (previously the color was saved but the landing page stayed
purple). It is wired through a single CSS variable, so changing the color updates the whole UI.
FIX:No stock-logo flash — The default logo and favicon
are now blank, so the original IntelliCall logo never appears for a moment before your uploaded
logo loads. Until you upload your own assets, the logo area stays empty rather than showing
stock branding.
IMPROVED:Reset restores the stock look — The original
IntelliCall logos and favicon are kept under /images/originals/, and the
Reset Branding button restores them in one click.
Version 9.7Email notifications
Version 9.7 made email notifications fire reliably for every supported event.
FIX:Email notifications for all events — Previously
only Appointment Booked and Appointment Canceled actually
sent email. The remaining events — Lead Created,
Lead Qualified, Inbound Call Received, and
Call Completed — were listed in Settings but never dispatched. All six
events now send email across both the Twilio and SIP/Asterisk call paths.
IMPROVED: Added proper email templates for Inbound Call and
Call Completed, and corrected the Lead Created /
Lead Qualified templates so names, scores, and call details render correctly.
Version 9.6Twilio webhook fix
Version 9.6 corrected the Twilio inbound webhook URL shown on the
Phone Numbers page.
FIX:Twilio “A Call Comes In” webhook URL
— The webhook URL on the Phone Numbers page now renders correctly as
https://your-api-domain/api/twilio/voice. Previously, when the API base URL ended
in /api, a string-replace stripped the wrong segment and mangled the domain
(e.g. https:/.your-domain/…). The URL is now built safely so it is always
copy-paste correct.
Version 9.5Automation & API
Version 9.5 opens the platform up for automation: a native n8n
integration, personal API keys with built-in API docs, an
instant-dial endpoint ("form submitted → the AI calls the prospect in
seconds"), and a redesigned Integrations tab with sidebar navigation.
NEW:n8n integration — Stream every platform event
(lead created, lead qualified, call completed, campaign completed, appointments, and more)
into n8n workflows and automate with 400+ apps. Paste your n8n Webhook node URL, toggle
events, send a test — done. Includes 3 importable workflow templates
downloadable right from the card. See the n8n Integration section.
NEW:Personal API keys — Each user can generate a
long-lived API key (shown once, stored hashed) from the new API Access card
and call the REST API from n8n, Zapier, or scripts via the X-API-Key header.
Regenerate or revoke any time. See API Access.
NEW:Instant AI call endpoint —
POST /api/calls/dial places an outbound AI call to one number right now — no
campaign needed. Auto-creates the lead if it doesn't exist, respects plan call limits, and
fires the usual webhooks. The killer recipe: a website form submits and the prospect's phone
rings within seconds.
NEW:Built-in API reference — The API Access card
documents 12 endpoints (dial, leads, campaigns, appointments, call logs) with parameters and
copy-ready curl examples that include your own key.
IMPROVEMENT:Integrations tab redesign — A sidebar
lists every connector with its logo and live connection status dot; selecting one shows just
that integration's card. OAuth redirects auto-open the right integration.
NEW:SEO & AEO ready landing page — Rich meta
tags (Open Graph, Twitter cards, keywords) generated from your white-label branding, plus
automatic robots.txt and sitemap.xml. For AI answer engines:
a visible FAQ section, SoftwareApplication + FAQPage structured data (JSON-LD), and an
/llms.txt endpoint describing your platform. Set
NEXT_PUBLIC_APP_URL to your public site URL in the frontend environment so
sitemap and social-preview links use your domain.
Version 9WhatsApp
WhatsApp integration (Meta Cloud API) — Real-time event alerts on your
own WhatsApp with per-event toggles. Connect from Settings → Integrations
with your own Meta credentials — verified against the Graph API before saving, no
platform-level app setup. See WhatsApp Integration.
WhatsApp appointment reminders for clients — A background scheduler
messages the client's number before every scheduled appointment using a pre-approved
Meta template. Configurable lead time (15 minutes to 24 hours), timezone-aware,
reschedule-safe, duplicate-proof — with test buttons and human-readable error messages for
common Meta API issues.
Version 8
HubSpot CRM integration — Every new lead created
in IntelliCall (manual, bulk import, or campaign) is automatically upserted as a HubSpot
contact, matched by phone number so existing contacts are updated in place, never duplicated.
Per-user OAuth keeps tenants fully isolated. Configure from
Settings → Integrations.
Google Calendar sync — Every booked appointment
mirrors to the connected Google Calendar account in real time. Edits and cancellations sync
automatically. Event titles use your white-label app name ("Call with Jane Doe
(YourBrand)") so the integration stays on-brand. One-way sync, fire-and-forget, never
blocks appointment operations.
Slack notifications — Get real-time alerts in a
Slack channel for the events that matter: lead created, lead qualified, call completed,
appointment booked, appointment canceled, campaign completed, and more. Each event has its
own toggle. One-click "Add to Slack" OAuth, fan-out from the existing webhook hub so
no extra moving parts.
Google Sheets lead sync — The Sheets connector
is now grouped alongside the other integrations under Settings →
Integrations, with a unified status card showing the active sheet and
last-synced timestamp. The lead-sync auto-pull on the Leads page continues to work exactly as
before.
Admin → Integrations — Manage OAuth Client
IDs, Secrets, and Callback URLs for HubSpot and Slack directly from the dashboard. No more
editing .env or restarting the backend to wire up a new connector. Legacy env
vars still work as a fallback for scripted deployments.
Edit Appointments — Reschedule date / time,
change duration, update client name and phone, or revise notes from the Appointments page.
Edits rewrite the linked Google Calendar event in place — same event ID, no duplicates.
"Integrations" section on the landing page — The
marketing site now showcases the integration ecosystem to trial visitors with logo cards for
each connector.
Need Technical Support?
If you have purchased any of my products from CodeCanyon, you are eligible for free support. Open a
ticket to get help with installation, bugs, or general queries.
If IntelliCall AI has been helpful for your business, we’d really appreciate your feedback. A
positive rating helps other users discover the product and motivates us to keep improving it.
You can rate the project from your CodeCanyon Downloads page - thank you for your support!